 R⋆STARS
Data Entry Guide
R⋆STARS
Data Entry Guide
Chapter #6
Non‑Descriptive Profiles
Purpose
This chapter is intended to provide system users with an understanding of profile maintenance requirements for non-descriptive profiles.
Table
Of Contents
6-1 Profile
Maintenance and Hierarchies
6-2 Relationship
to Other Profiles
01 Labor Distribution Control
Profile
05 Time Sheet Profile / 06
Adjusted Time Sheet Profile
17 Object Clearance Patterns
Profile
20 Appropriation Number
Profile
21 Index/PCA Relationship
Profile
23 Cost Allocation Type
Profile
28A and 28B Transaction Code
Profiles
36 Vendor Amount Limit
Profile
43M On‑Line 1099
Miscellaneous Summary Profile
54 Agency Receivable Document
Exemption Profile
82 Comptroller Relationship
Edit Profile
92 Grant/Project Billing
Request Profile
93 Recurring Transaction Request
Profile
95 Report Distribution
Profile
550 Recurring Transaction
Profile
6-1 Profile
Maintenance and Hierarchies
For information on general profile maintenance and hierarchies, refer to Chapter #5, para. 5-1 through 5-4.
6-2 Relationship
to Other Profiles (Not Used in Oregon)
Many other system profiles are used to validate the
classification element values coded on the Labor Distribution Subsystem (LDS)
profiles. The following chart indicates which system profiles are required for
each LDS profile.
|
LDS PROFILE |
REQUIRED PROFILES |
||||
|
01 |
LC – Labor Distribution Control |
24 |
Index |
25 |
Agency Control |
|
4A |
EM – Employee Master |
01 |
Labor Distribution Control |
24 |
Index |
|
05 |
TS – Time sheet |
4A |
Employee Master |
24 |
Index |
|
07 |
AP – Adjustment Payroll |
4A |
Employee Master |
05 |
Time sheet |
|
08 |
PI – Payroll Interface |
D02 |
Agency |
D10 |
Comptroller Object |
Below are the coding instructions for each of the LDS profiles.
6-3
non-Descriptive Profiles
01
Labor Distribution Control Profile (Not Used in Oregon)
The 01 (LC) Profile contains a variety of data elements that are used to control the processing performed by the Labor Distribution Subsystem. Each agency using Labor Distribution must establish one profile for the year. This profile controls the method of labor charge distribution used agency wide and contains certain default classification elements.
Control Key
◾ AGENCY – Enter the three-character Agency code which must exist in the 25 – Agency Control Profile.
◾ FISCAL YR – Enter the two-digit Fiscal Year, which must match the AGENCY/FY in the 25 profile.
Information
Elements
Whenever the Index or PCA is optional under a specific condition, either the Index or the PCA must be coded.
Unless otherwise noted, the following coding rules apply to all Comptroller Object and Agency Object combinations on this profile:
1. Whenever the Comptroller Object and Agency Object are optional, either the Comptroller Object or the Agency Object must be coded.
2. If the Comptroller Object is coded, the Agency Object may be blank.
3. If the Agency Object is coded and the Comptroller Object is blank, the D11 – Agency Object Profile must contain a Comptroller Object value.
4. If the Comptroller Object and the Agency Object are both coded, the D11 Comptroller Object must match the coded Comptroller Object or the D11 Comptroller Object must be blank.
◾ CTO RATE – Enter the five-digit Comp Time Off (CTO) Rate as #.####. For example, 1.5000 equals CTO accrual rate of 150% of regular pay. The CTO Rate must be equal to or greater than 1.0000 when the DIST METHOD is A or S. If the DIST METHOD is I, this field must be left blank.
◾ CTO INDEX – Enter the five-digit CTO Index for accumulating the CTO reserve. This field is optional if the DIST METHOD is A or S. If coded, Agency/CTO INDEX/FY must exist in the 24 – Index Profile. When he DIST METHOD is equal to I, this field must be blank.
◾ CTO PCA – Enter the five-digit , which must exist in the 26 – PCA Profile. This field is optional if the DIST METHOD is A or S. If the DIST METHOD is equal to I, this field must be blank.
◾ COBJ RG – Enter the four-digit Comptroller Object (COBJ) Regular, which must be defined in the D10 – Comptroller Object Profile. This field is optional when the DIST METHOD is S. If the DIST METHOD is A or I, this field must be blank.
◾ AOBJ RG – Enter the four-digit Agency Object (AOBJ) Regular, which must be defined in the D11 profile. This field is optional when the DIST METHOD is S. If the DIST METHOD is A or I, this field must be left blank.
◾ COBJ OT – Enter the four-digit COBJ Overtime which must be defined in the D10 profile. This field is optional when the DIST METHOD is S. If the DIST METHOD is A or I, this field must be blank.
◾ AOBJ OT – Enter the four-digit AOBJ Overtime which must be defined in the D11 profile. This field is optional when the DIST METHOD is S. If the DIST METHOD is A or I, this field must be left blank.
◾ COBJ SB – Enter the four-digit COBJ Standby, which must be defined in the D10 profile. This field is optional when the DIST METHOD is S. If the DIST METHOD is A or I, this field must be blank.
◾ AOBJ SB – Enter the four-digit AOBJ Standby, which must be defined in the D11 profile. This field is optional when the DIST METHOD is S. If the DIST METHOD is A or I, this field must be left blank.
◾ COBJ PR – Enter the four-digit COBJ Premium, which must be defined in the D10 profile. This field is optional when the DIST METHOD is S. If the DIST METHOD is A or I, this field must be left blank.
◾ AOBJ PR – Enter the four-digit AOBJ Premium, which must be defined in the D11 profile. This field is optional when the DIST METHOD is S. If the DIST METHOD is A or I, this field must be left blank.
◾ COBJ PS – Enter the four-digit COBJ Payroll Statistics, which must be defined in the D10 profile. This field is optional when STATISTICS is B or P. If STATISTICS is N or T, this field must be left blank.
◾ AOBJ PS – Enter the four-digit AOBJ Payroll Statistics, which must be defined in the D11 profile. This field is optional when STATISTICS is B or P. If STATISTICS is N or T, this field must be blank.
◾ DIST METHOD – The Distribution
Method identifies the methods used to distribute gross wages. This is a
required field. Enter the one-character indicator as follows:
|
A |
– |
Actual Method |
I |
– |
Interface Method |
S |
– |
Standard Method |
◾ COBJ TS – Enter the four-digit COBJ Time Sheet, which must be defined in the D10 profile. This field is optional when STATISTICS is B or T. If STATISTICS is N or P, this field must be left blank.
◾ AOBJ TS – Enter the four-digit AOBJ Time Sheet, which must be defined in the D11 profile. This field is optional when STATISTICS is B or T. If STATISTICS is N or P, this field must be blank.
◾ STAFF BENEFITS – Staff
Benefits identifies whether actual or standard methods are used to distribute
employer paid benefit costs. Enter the one-character indicator as follows:
|
A |
– |
Actual |
S |
– |
Standard |
This field is required when the DIST METHOD is A or S. When the DIST METHOD is S, STAFF BENEFITS must be S. If the DIST METHOD is I, this field must be blank.
◾ UNDIST ACCT – Identifies the accounting classification for the labor charges when no EM Profile record is found to match the payroll record. The Undistributed Account Index (UNDIST ACCT INDEX) and/or PCA are posted only if the payroll record does not match either an individual or group EM Profile record.
◾ UNDIST ACCT INDEX – Enter the five-digit Undistributed Account Index, which must be defined in the 24 profile. This field is optional when the DIST METHOD is A or S. If the DIST METHOD is equal to I, this field must be blank.
◾ UNDIST ACCT PCA – Enter the five-digit Undistributed Account PCA which must be defined in the 26 profile. This field is optional if the DIST METHOD is A or S. If the DIST METHOD is equal to I, this field must be blank.
◾ STATISTICS – Identifies
whether the payroll and time sheet hours are to be recorded in R⋆STARS.
Enter the one-character Statistics indicator as follows:
|
P |
– |
Record Payroll Hours |
N |
– |
Do Not Record Hours |
This field is required and must be N or P when the DIST METHOD is I.
Default
Accounts
Identifies the accounting classification for labor charges which may be distributed when a DOE, passed from the payroll system, is not entered on the PI Profile.
◾ DEFAULT ACCT INDEX – Enter the five-digit Default Account Index which must be defined in the 24 profile. This field is optional.
◾ DEFAULT ACCT PCA – Enter the five-digit Default Account PCA which must be defined in the 26 profile. This field is optional.
◾ DEFAULT ACCT COBJ – Enter the four-digit Default Account COBJ which must be defined in the D10 profile. This field is optional. The object editing rules mentioned at the beginning of these coding instructions do not apply to this data element. If left blank, the COBJ value on the Payroll Interface Profile for the DOE will be used.
◾ DEFAULT ACCT AOBJ – Enter the four-digit Default Account AOBJ which must be defined in the D11 profile. This field is optional. The object editing rules mentioned at the beginning of these coding instructions do not apply to this data element. If left blank, the AOBJ value on the Payroll Interface Profile for the DOE will be used.
Standard
Benefits
Identifies the accounting classification used to accumulate the credit for the standard benefits. If the STAFF BENEFITS is S, these fields are optional. If STAFF BENEFIT is A, these fields must be blank.
◾ STD BENEFIT INDEX – Enter the five-digit Standard Benefit Index which must be defined in the 24 profile. This field is optional.
◾ STD BENEFIT PCA – Enter the five-digit Standard Benefit PCA which must be defined in the 26 profile. This field is optional.
◾ STD BENEFIT COBJ – Enter the four-digit Standard Benefit COBJ which must be defined in the D10 profile.
◾ STD BENEFIT PCNT – Enter the Standard Benefit Percentage Rate as #.####, where 0.1000 equals 10%. This is used to charge the classification for standard benefits distribution. This field is required if any of the STANDARD BENEFIT HOUR TYPES (RG, OT, SB and PR) are not N.
◾ STD BENEFIT INDICATORS RG, OT, SB and PR(N) - Indicates
whether benefit costs should be calculated for the following Hours Types:
Regular (RG), Overtime (OT), Standby (SB), and Premium (PR). Enter the
one-character indicator as follows:
|
Y |
– |
Calculate standard benefit for this hour type. |
These indicators are required.
Time
Sheet Hours Coding
◾ OT CODING – Enter the
one-character Overtime Coding indicator as follows:
|
Y |
– |
Overtime hours are coded separately on time sheets. |
This field is required if the DIST METHOD is A or S, and not allowed if the DIST METHOD is I.
◾ SB CODING – Enter the
one-character Standby Coding Indicator as follows:
|
Y |
– |
Standby hours are coded separately on time sheets. |
This field is required if DIST METHOD is A or S. If DIST METHOD is I, this field must be left blank.
◾ PR CODING – Enter the
one-character Premium Coding indicator as follows:
|
Y |
– |
Premium hours are coded separately on time sheets. |
This field is required if DIST METHOD is A or S. If DIST METHOD is I, this field must be left blank.
◾ HOURLY RATE – Enter the
one-character Hourly Rate Indicator as follows:
|
Y |
– |
Use the payroll hourly rate to calculate labor distribution
charges |
This field must be blank if DIST METHOD is I.
Add-On
Information
Contains add-on hour type indicators, rates and charge and credit expenditure accounting classification information. These fields are optional if the DIST METHOD is A or S. If any add-on element is coded, the entire line must be coded. When the DIST METHOD is I, all the add-on fields must be blank.
◾ ADD-ON HOUR TYPE CODING – The add-on
hour types Regular (RG), Overtime (OT), standby (SB), Premium (PR), Paid Time
Off (TO), and Comp Time Off (CO) indicate whether add-on burden costs should be
allocated. Enter the one-character indicator as follows:
|
Y |
– |
Calculate the add-on for this hour type. |
This field is required.
◾ ADD-ON CHG PCNT – Identifies the percentage of labor dollars to be charged as add-on or burden rate. Enter the five-digit Add-On Charge Percent in format #.####, where 0.1000 = 10%. This field is required.
◾ ADD-ON CHG COBJ – Enter the four-digit Add-On Charge COBJ which must be defined in the D10 profile. This field is optional.
◾ ADD-ON CHG AOBJ – Enter the four-digit Add-On Charge AOBJ which must be defined in the D11 profile. This field is optional.
◾ ADD-ON CR INDEX – Enter the five-digit Add-On Credit Index which must be defined in the 24 profile. This field is optional.
◾ ADD-ON CR PCA – Enter the five-digit Add-On Credit PCA which must be defined in the 26 profile. This field is optional.
◾ ADD-ON CR COBJ – Enter the four-digit Add-On Credit COBJ which must be defined in the D10 profile. This field is optional. The object editing rules mentioned at the beginning of these coding instructions do not apply to this data element. If left blank, the Add-On Charge COBJ will be used.
◾ ADD-ON CR AOBJ – Enter the four-digit Add-On Credit AOBJ which must be defined in the D11 profile. This field is optional. The object editing rules mentioned at the beginning of these coding instructions do not apply to this data element. If left blank, the Add-On Charge AOBJ will be used.
◾ STATUS CODE – This element is
required. Enter a one-character Status Code as follows:
|
A |
– |
Active |
I |
– |
Inactive |
This code will default to an Active status if not entered. It may be used to inactivate records no longer in use.
◾ EFF START DATE – Enter the eight-digit Effective Start Date (MMDDYYYY format), which identifies when the record becomes effective. This field can be left blank, which will cause the record to be immediately available.
◾ EFF END DATE – Enter the eight-digit Effective End Date (MMDDYYYY format), which identifies when the record is no longer effective. This field can be left blank.
– No Profile Example Available –
4A
Employee Master Profile (Not Used in Oregon)
The 4A (EM) Profile is a two screen profile that contains distribution classification information at the employee or group level. Individual employees and employee groups can have up to ten predetermined allocations for distributing payroll costs. These predetermined distributions are posted when no time sheet is entered. Also, these distributions are posted if a time sheet is entered and the time sheet hourly rate option is used and the time sheet hours do not equal the payroll hours.
Compensatory time-off, add-ons and standard benefit information may be optionally coded on the EM Profile. If coded, this information overrides the agency-level information coded on the LC Profile.
The record must first be recalled or added from 4A before data on 4B can be updated. The function key F6 provides a toggle between the two screens. 4B can only be accessed from screen 4A through function key F6 .
Control Key
◾ AGENCY – Enter the three-character Agency code, which must be defined and in active status in the LC profile. This is a required field.
◾ INDEX – Enter the five-digit Index code. Agency, Index, and Fiscal Year must be defined in the 24 profile. This is a required field.
◾ EMP CLASS – Enter the three-character Employee Class code. The Employee Class identifies an employee or group of employees that share common accounting classification attributes.
If EMP TYPE coded below is S this field is required. If EMP TYPE is G this field is ptional. If coded, the EMP CLASS must be defined in the D53 – Titles Profile with the Table ID of EMPC.
◾ EMP NO – Enter the ten-digit Employee Number. If EMP TYPE is S, this field is required. If EMP TYPE is G, leave blank.
◾ FY – Enter the two-digit Fiscal Year (FY). This field is required.
Information
Elements
Whenever the Index or PCA is optional under a specific condition, either the Index or the PCA must be coded.
The following coding rules apply to all Comptroller Object and Agency Object combinations on this profile:
1. Whenever the Comptroller Object and Agency Object are optional, either the Comptroller Object or the Agency Object must be coded.
2. If the Comptroller Object is coded, the Agency Object may be blank.
3. If the Agency Object is coded and the Comptroller Object is blank, the D11 Agency Object Profile must contain a Comptroller Object value.
4. If the Comptroller Object and the Agency Object are both coded, the D11 Comptroller Object must match the coded Comptroller Object or the D11 Comptroller Object must be blank.
◾ NAME – Enter the thirty character name of the employee or group. This is a required field.
◾ STD RATES RG – Enter the eight-digit rate-per-hour for Regular time in #####.## format. If the DIST METHOD coded below is A or the DIST METHOD is blank and the Labor Distribution Control Profile for the AGENCY is A, this field must be blank. If the DIST METHOD is S, this field is required.
◾ STD RATES OT – Enter the eight-digit rate-per-hour for Overtime in #####.## format. If the DIST METHOD is A or the DIST METHOD is blank and the Labor Distribution Control Profile for the AGENCY is A, this field must be blank. If the DIST METHOD is S, this field is required.
◾ STD RATES SB – Enter the eight-digit rate-per-hour for Standby time in #####.## format. If the DIST METHOD is A or the DIST METHOD is blank and the Labor Distribution Control Profile for the AGENCY is A, this field must be blank. If the DIST METHOD is S, this field is required.
◾ STD RATES PR – Enter the eight-digit rate-per-hour for Premium time in #####.## format. If the DIST METHOD is A or the DIST METHOD is blank and the Labor Distribution Control Profile for the AGENCY is A, this field must be blank. If the DIST METHOD is S, this field is required.
◾ COBJ RG – Enter the four-digit COBJ for Regular time, which must be defined in the D10 profile. This field is optional when the DIST METHOD is S. If the DIST METHOD is A, this field must be blank.
◾ AOBJ RG – Enter the four-digit AOBJ for Regular time which must be defined in the D11 profile. This field is optional when the DIST METHOD is S. If the DIST METHOD is A, this field must be blank.
◾ COBJ OT – Enter the four-digit COBJ for Overtime, which must be defined in the D10 profile. This field is optional when the DIST METHOD is S. If the DIST METHOD is A, this field must be blank.
◾ AOBJ OT – Enter the four-digit AOBJ for Overtime which must be defined in the D11 profile. This field is optional when the DIST METHOD is S. If the DIST METHOD is A, this field must be blank.
◾ COBJ SB – Enter the four-digit COBJ for Standby time, which must be defined in the D10 profile. This field is optional when the DIST METHOD is S. If the DIST METHOD is A, this field must be blank.
◾ AOBJ SB – Enter the four-digit AOBJ for Standby time which must be defined in the D11 profile. This field is optional when the DIST METHOD is S. If the DIST METHOD is A, this field must be blank.
◾ COBJ PR – Enter the four-digit COBJ for Premium time, which must be defined in the D10 profile. This field is optional when the DIST METHOD is S. If the DIST METHOD is A, this field must be blank.
◾ AOBJ PR – Enter the four-digit AOBJ for Premium time which must be defined in the D11 profile. This field is optional when the DIST METHOD is S. If the DIST METHOD is A, this field must be blank.
◾ COBJ PS – Enter the four-digit COBJ for Payroll Statistics, which must be defined in the D10 profile. This field is optional when STATISTICS is B or P. If STATISTICS is N or T, this field must be blank.
◾ AOBJ PS – Enter the four-digit AOBJ for Payroll Statistics which must be defined in the D11 profile. This field is optional when STATISTICS is B or P. If STATISTICS is N or T, this field must be blank.
◾ COBJ TS – Enter the four-digit COBJ for Time Sheet Statistics, which must be defined in the D10 profile. This field is optional when STATISTICS is B or T. If STATISTICS is N or P, this field must be blank.
◾ AOBJ TS – Enter the four-digit AOBJ for Time Sheet Statistics which must be defined in the D11 profile. This field is optional when STATISTICS is B or T. If STATISTICS is N or P, this field must be blank.
◾ EMP TYPE (Required) – Enter
the one-character Employee Type as follows:
|
G |
– |
Group |
S |
– |
Single |
◾ TIME SHEET REQ – Enter the
one-character Time Sheet Required indicator as follows:
|
Y |
– |
Time sheet is required for the group or employee |
This is a required field.
◾ DIST METHOD – The Distribution
Method identifies whether actual or standard methods are used to distribute
gross wages for the group or employee. Enter the one-character DIST METHOD
indicator as follows:
|
A |
– |
Actuals |
S |
– |
Standards |
If the LC profile DIST METHOD is coded, this field is optional.
◾ STAFF BENEFITS – Staff
Benefits identify whether actual or standard methods are used to distribute
employer benefit costs. Enter the one-character indicator as follows:
|
A |
– |
Actuals |
S |
– |
Standards |
If the DIST METHOD is blank, this field is optional. If coded, STAFF BENEFITS must be A or S if DIST METHOD is A or STAFF BENEFITS must be S if DIST METHOD is S.
◾ HOME BASE ACCOUNT (N) – Enter the Home Base accounts to which labor costs are posted for the hours not recorded on a labor time sheet. HOME BASE ACCOUNT is required for the first line and optional for HOME BASE lines 2-10.
◾ HOME BASE PCNT (N) – Enter the six-digit Home Base Percent to be used in distributing labor costs for the hours not recorded on a labor time sheet in #.#### format where 0.1000 = 10%. The sum of all non-blank percents must be 1.0000.
◾ HOME BASE AY (N) – Enter the two-digit Home Base Appropriation Year.
◾ HOME BASE INDEX (N) – Enter the five-digit HOME BASE INDEX, which must be defined in the 24 Profile for the HOME BASE AY coded. This is an optional field.
◾ HOME BASE PCA (N) – Enter the five-digit Home Base PCA, which must be defined in the 26 profile for the HOME BASE AY coded. This is an optional field.
◾ HOME BASE GRANT/PH (N) – Enter the six-digit Home Base Grant and two-digit Home Base Grant Phase, which must be defined in the 29 – Grant Control Profile. This is an optional field.
◾ HOME BASE PROJECT/PH (N) – Enter the six-digit Home Base Project and two-digit Home Base Project Phase, which must be defined in the 27 – Project Control Profile. This is an optional field.
◾ HOME BASE ACD1 (N) – Enter the three-digit Agency Code 1, which must be defined in the D26 – Agency Code 1 Profile. This is an optional field.
◾ HOME BASE ACD2 (N) – Enter the three-digit Agency Code 2, which must be defined in the D27 – Agency Code 2 Profile. This is an optional field.
◾ HOME BASE ACD3 (N) – Enter the six-digit Agency Code 3, which must be defined in the D36 – Agency Code 3 Profile. This is an optional field.
◾ STATUS CODE – This element is
required. Enter a one-character Status Code as follows:
|
A |
– |
Active |
I |
– |
Inactive |
This code will default to an Active status if not entered. It may be used to inactivate records no longer in use.
◾ EFF START DATE – Enter the eight-digit Effective Start Date (MMDDYYYY format), which identifies when the record becomes effective. This field can be left blank, which will cause the record to be immediately available.
◾ EFF END DATE – Enter the eight-digit Effective End Date (MMDDYYYY format), which identifies when the record is no longer effective. This field can be left blank.
◾ CTO INDEX – Enter the five-digit CTO Index for accumulating the CTO reserve if different from the Labor Distribution Control Profile. This field is optional. If CTO PCA or CTO PCNT is coded, then this field is optional. If coded, the CTO INDEX must be defined in the 24 profile.
◾ CTO PCA – Enter the five-digit CTO PCA if different from the 1 Labor Distribution Control Profile. This field is optional. If CTO INDEX or CTO PCNT is coded, then this field is optional. If coded, the CTO PCA must be defined in the 26 profile.
◾ CTO PCNT – Enter the six-digit CTO PERCENT in X.XXXX format where 0.1000 = 10%. This is an optional field. If CTO INDEX or CTO PCA is coded, then this field is required and must be equal to or greater then 1.0000.
Standard Benefits
Identifies the accounting classification used to accumulate the credit for standard benefits if different from the Labor Distribution Control Profile. If Distribution Method is A or I, these fields must be blank. If Distribution Method is S, these fields are optional.
◾ STANDARD BENEFIT INDEX (N) – Enter the five-digit Standard Benefit Index, which must be defined in the 24 profile. This is an optional field.
◾ STANDARD BENEFIT PCA (N) – Enter the five-digit Standard Benefit PCA, which must be defined in the 26 profile. This is an optional field.
◾ STANDARD BENEFIT COBJ (N) – Enter the four-digit Standard Benefit Comptroller Object, which must be defined in the D10 profile. This is an optional field.
◾ STANDARD BENEFIT AOBJ (N) – Enter the four-digit Standard Benefit AOBJ, which must be defined in the D11 profile. This is an optional field.
◾ STANDARD BENEFIT PCNT (N) – Enter the six-digit Standard Benefit Percent rate as #.####, where 0.1000 = 10%. This is used to charge the classification for standard benefits distribution. If Standard Benefit Indicator RG, OT, SB, and PR are all N, this field must be blank.
◾ STANDARD BENEFIT INDICATORS RG, OT, SB and PR (N)
– Indicates whether benefit costs should be calculated for the
following hour types: Regular (RG), Overtime (OT), Standby (SB), and Premium
(PR). Enter the one-character indicator as follows:
|
Y |
– |
Calculate the standard benefit for this hour type |
These indicators are required.
Add-On Information
Contains add-on applicability indicators, rates, and expenditure and credit accounts for add-on costs if different from the Labor Distribution Control Profile.
◾ ADD-ON INDICATORS RG, OT, SB, PR, TO AND CO (N) – The
add-on hour types Regular (RG), Overtime (OT), Standby (SB), Premium (PR), Paid
Time Off (TO), and Compensatory Time Off (CO) indicate whether add-on burdened
costs should be allocated. Enter the one-character indicator as follows:
|
Y |
– |
Calculate the add-on for this hour type |
These indicators are required.
◾ ADD-ON CHG PCNT (N) – Identifies the percentage of labor dollars to be charged as add-on or burdened rates. Enter the five-digit Add-On Charge Percent in #.#### format, where 0.1000 is 10%. This is a required field.
◾ ADD-ON CHG COBJ (N) – Enter the four-digit Add-On Charge COBJ, which must be defined in the D10 profile. This is an optional field.
◾ ADD-ON CHG AOBJ (N) – Enter the four-digit Add-On Charge AOBJ, which must be defined in the D11 profile. This is an optional field.
◾ ADD-ON CR INDEX (N) – Enter the five-digit Add-On Credit Index, which must be defined in the 24 profile. This is an optional field.
◾ ADD-ON CR PCA (N) – Enter the five-digit Add-On Credit Pca, which must be defined in the 26 profile. This is an optional field.
◾ ADD-ON CR COBJ (N) – Enter the four-digit Add-On Credit COBJ, which must be defined in the D10 profile. This is an optional field.
◾ ADD-ON CR AOBJ (N) – Enter the four-digit Add-On Credit AOBJ, which must be defined in the D11 profile. This is an optional field.
◾ STATUS CODE – This element is
required. Enter a one-character Status Code as follows:
|
A |
– |
Active |
I |
– |
Inactive |
This code will default to an Active status if not entered. It may be used to inactivate records no longer in use.
◾ EFF START DATE – Enter the eight-digit Effective Start Date (MMDDYYYY format), which identifies when the record becomes effective. This field can be left blank, which will cause the record to be immediately available.
◾ EFF END DATE – Enter the eight-digit Effective End Date (MMDDYYYY format), which identifies when the record is no longer effective. This field can be left blank.
– No Profile Example Available –
05
Time Sheet Profile / 06 Adjusted Time Sheet Profile (Not Used in Oregon)
Input coding instructions for the 05 (TS) profile are identical to the 06 (AT) profile and are provided below. The TS profile is used to add, change, and delete employee time sheets prior to the processing of Labor Distribution. The AT profile is used to add, change, and delete an employee’s time sheet data after labor distribution has processed the affected period and changes need to be reprocessed. The original time sheet is not deleted before the adjustment cycle.
Control Key
The control key for the Time Sheet and Adjusted Time Sheet must match an existing Employee Master record with the full key or match a group Employee Master record without regard to employee number or with or without regard to employee class.
◾ AGENCY – Enter the three-character Agency code. This is a required field.
◾ INDEX – Enter the five-digit Index code. This is a required field.
◾ EMP CLASS – Enter three-character Employee Class code. This is a required field.
◾ EMP NO – Enter the ten-digit Employee Number. This is a required field and should begin with a 0 (zero) followed by the employee’s nine-digit Social Security Number.
◾ PERIOD – Enter the six-digit Period (MMDDYY format). This is a required field.
◾ SERVICE DATE – Enter the six-digit Service Date (MMDDYY format) identifying the date the hours were worked. This is an optional field.
◾ PAGE – Enter the two-digit Page number of the time sheet. This is a required field.
◾ TOTAL HOURS – This field is system-calculated. The system adds the total of all Hours + Machine Utilization Hours + Service Units amounts entered on the time sheet or adjusted time sheet. This is an optional field. The user may enter this field for use in entry balancing.
Information
Elements
Whenever the Index or PCA is optional under a specific condition, either the Index or the PCA must be coded.
◾ HOURS – Enter the number of Hours (999.9 format). HOURS must be greater than zero. This field is required for the first time sheet line and optional for time sheet lines 2-12. If HOUR TYPE (HT), entered below, is coded in time sheet lines 2-12, this field is required.
◾ HT – Enter the two-character
Hour Type as follows:
|
RG |
– |
Regular Time |
TO |
– |
Time Off |
This is a required field if the HOURS field is numeric and greater than zero.
◾ HB – Enter the one-character
Home Base (HB) indicator as follows:
|
Y |
– |
Yes, distribute time sheet line to home base accounts |
This is a required field if the HOURS field is numeric and greater than zero. If HOUR TYPE is CD or VT, this field must be N. If HOUR TYPE is CO, this field must be Y.
◾ AY – Enter the two-digit Appropriation Year (AY). If HB is Y, this field must be left blank. If HB is N, this field is required.
◾ INDEX – Enter the five-digit Index identifying the accounting classification to which the time sheet line is to be distributed. If HB is Y, this field must be blank . If HB is N, this field is optional. If coded, the INDEX must be defined in the 24 Profile.
◾ PCA – Enter the five-digit PCA identifying the accounting classification to which the time sheet line is to be distributed. If HB is Y, this field must be blank. If HB is N, this field is optional. If coded, the PCA must be defined in the 26 profile.
◾ GRANT/PH – Enter the six-digit Grant and two-digit Phase to which the time sheet line is to be distributed. If HB is Y, this field must be blank. If HB is N, this field is optional. If coded, the GRANT and PHASE must be defined in the 29 profile.
◾ PROJECT/PH – Enter the six-digit Project and two-digit Phase to which the time sheet line is to be distributed. If HB is Y, this field must be blank. If HB is N, this field is optional. If coded, the Project and Phase must be defined in the 27 profile.
◾ ACD1 – Enter the four-digit Agency Code 1. If HB is Y, this field must be blank. If HB is N, this field is optional. If coded, ACD1 must be defined in the D26 profile.
◾ ACD2 – Enter the four-digit Agency Code 2. If HB is Y, this field must be blank. If HB is N, this field is optional. If coded, ACD2 must be defined in the D27 profile.
◾ ACD3 – Enter the six-digit Agency Code 3. If HB is Y, this field must be blank. If HB is N, this field is optional. If coded, ACD3 must be defined in the D36 profile.
◾ MU – Enter the numeric Machine Utilization (MU – ###.# format). If HB is Y, this field must be blank. If HB is N, this field is optional.
◾ MC – Enter the three-digit Machine Class (MC). If MU is blank, this field must be blank. If MU is coded, this field is required. If coded, the MC must be defined in the D53 profile with Table ID MACH.
◾ SU – Enter the three-digit Service Units (SU). If HB is Y, this field must be blank. If HB is N, this field is optional.
◾ AOBJ – Enter the four-digit Service Units AOBJ, which must be defined in the D11 profile. If SU is coded or HOUR TYPE is VT, this field is required. The Comptroller Object (COBJ) in the D11 AOBJ record must not be blank.
◾ STATUS CODE – This element is
required. Enter a one-character Status Code as follows:
|
A |
– |
Active |
I |
– |
Inactive |
This is a required field. This code will default to an Active status if not entered.
◾ CREATE DATE – This is a display-only field and reflects the system date the time sheet record was created.
– No Profile Examples Available –
07
Adjustment Payroll Profile (Not Used in Oregon)
The 07 (PT) Profile identifies the specific time sheet records used during the regular distribution cycle that must be reversed during an adjustment cycle. Only those employees with a TS, AT and PT profile record are processed during an adjustment cycle.
Control Key
The control key be defined in the TS profile and the AT profile with full key. The Agency, Index, Employee Class, Employee Number, Fiscal Year must be defined in the EM profile with full key or without Employee Number and with or without Employee Class.
◾ AGENCY – Enter the three-character Agency code.
◾ INDEX – Enter the five-digit Index code.
◾ EMP CLASS – Enter the three-character Employee Class code.
◾ EMP NO – Enter the ten-digit Employee Number.
◾ FY – Enter the two-digit Fiscal Year.
◾ PAY PERIOD – Enter the six-digit Pay Period (MMDDYY format). Note that this data element is not in the 4A profile.
Information
Elements
◾ NAME – Enter the eleven-character name of the employee.
◾ PAYROLL LEVEL 2 – Enter the two-character Payroll Level code. This is a required field.
◾ GROSS PAY DOE – Enter the two-character DOE code. This is a required field. The AGENCY, PAYROLL LEVEL 2 AND GROSS PAY DOE must be defined in the 08 – Payroll Interface Profile (PI) with the coded Agency or Agency 000. The Gross Pay DOE must be DOE TYPE E.
◾ GROSS PAY AMOUNT – Enter the Gross Pay Amount as #####.##. This is a required field.
◾ HOURS – Enter the seven-digit Hours associated with each Gross Pay Amount as #####.##.
◾ DOE 1-20 – Enter the two-character DOE that identifies the fringe benefit associated with the Gross Pay Amount. The AGENCY, PAYROLL LEVEL 2 and DOE must be defined in the PI profile with the coded Agency or Agency 000. The benefit DOE must be DOE TYPE F. The DOE is required if its associated Amount is entered.
◾ AMOUNT 1-20 – Enter the Benefit Amount associated with the fringe benefit DOE as #####.##. The Amount is required if its associated DOE is entered.
◾ STATUS CODE – This element is
required. Enter a one-character Status Code as follows:
|
A |
– |
Active |
I |
– |
Inactive |
This code will default to an Active status if not entered. It may be used to inactivate records no longer in use.
◾ EFF START DATE – Enter the eight-digit Effective Start Date (MMDDYYYY format), which identifies when the record becomes effective. This field can be left blank, which will cause the record to be immediately available.
◾ EFF END DATE – Enter the eight-digit Effective End Date (MMDDYYYY format), which identifies when the record is no longer effective. This field can be left blank.
– No Profile Example Available –
08
Payroll Interface Profile (Not Used in Oregon)
The 08 (PI) Profile defines the payroll types or DOE’s (distributions and other earnings) and their characteristics that are passed from the payroll system to LDS. This is a system wide profile that can be customized by individual agencies to meet agency-specific requirements.
Control Key
◾ AGENCY (Required) – Enter the three-character Agency code, which must exist in the D02 – Agency Profile or enter Agency 000.
◾ PAYROLL LEVEL 2 (Required) – Enter the two-digit Payroll Level.
◾ DOE (Required) – Enter the two-character DOE (Distribution and Other Earnings) code.
Information
Elements
◾ TITLE (Required) – Enter the DOE Title up to 40 characters.
◾ DOE TYPE (Required) – Enter
the two-character DOE Type code as follows:
|
E |
– |
Gross Earnings/Salary |
N |
– |
Net Pay Amount |
◾ PAYMENT CATEGORY – Enter the
one-character Payment Category as follows:
|
D |
– |
Distributable – These costs are distributed by
the labor distribution system. |
This is a required field if the DOE Type is E or F. If the DOE Type is N or D, this field must be left blank.
◾ TRANS CODE – Enter the three-digit Transaction Code, which must exist in the 28A – Transaction Code Decision Profile. This field is optional if the DOE Type is D, F or N. If the DOE Type is E, this field must be blank.
◾ PAYMENT TYPE – Enter the
one-digit Payment Type as follows:
|
0 |
– |
Regular Salary and Wages |
3 |
– |
Premium Wages |
This field identifies the type of pay the DOE represents and is required if DOE Type is E and Payment Category is D. If DOE Type is D, F or N, or Payment Category is S, this field must be blank.
◾ FUND – Enter the four-digit Fund. This field is optional if DOE Type is D, F or N, and must exist in the D23 – Fund Profile if the Agency is not equal to 000. If the DOE Type is E, this field must be blank
◾ GL ACCT – Enter the four-digit General Ledger Account. This field is optional if DOE Type is D, F or N and the GL Account Indicator in the 28A profile for the Transaction Code is not equal to N. It also must be defined in the D31 – Comptroller General Ledger Account Profile. GENERAL LEDGER ACCOUNT is not allowed if the DOE Type is E or if the DOE Type is D, F or N and the GL Account Indicator in the 28A profile for the Transaction Code is equal to N.
◾ COMP OBJ – Enter the four-digit Comptroller Object, which must exist in the D10 profile. This field is required if the DOE Type is E or F and not allowed if the DOE Type is D or N.
◾ AGENCY GL – Enter the eight-digit Agency General Ledger. This field is required if the DOE TYPE is D, F or N and the AGL Account Indicator in the 28A profile for the Transaction Code is not equal to N. In addition, the Agency General Ledger must exist in the D32 – Agency General Ledger Profile or must be in AAAFFFFO format where AAA is Agency and FFFF is Fund, which is defined in the D23 profile.
If DOE Type is E, D, F or N and the AGL Indicator in the 28A profile for the Transaction Code is N, this field must be blank.
◾ AGY OBJ – Enter the four-digit Agency Object which must exist in D11 profile. This field is optional when the DOE Type is E or F. If the DOE Type is D or N this field must be left blank.
◾ VARIANCE PCA – Enter the five-digit Variance PCA to accumulate any labor distribution variance amounts. This field is required if DOE Type is E or F, and must be defined in the 26 profile if the Agency is not equal to 000. If the Agency is equal 000, The field must still be five-characters. When the DOE Type is D or N, this field must be left blank.
◾ SUPPLEMENTAL PCA – Enter the five-digit Supplemental PCA to accumulate supplemental labor costs. These are the labor costs that are not distributed during a normal labor distribution run. This field is required if Payment Category is S, and must be defined in the 26 profile if the Agency is not equal to 000. If the Agency is equal to 000, This field must still be five-characters. When the PAYMENT CATEGORY is not equal to S, this field must be blank.
◾ RESERVE PCA – Enter the five-digit Reserve PCA to accumulate reserve labor costs. This field is optional if DOE Type is E, and must be defined in the 26 profile if the Agency is not equal to 000. If Agency is equal to 000, the field must still be five-characters. When the DOE Type is D, F or N, this field must blank.
◾ BENEFIT BASE INDICATOR – Benefit
Base Indicators are used to identify whether Benefits are charged to the Hour
Type on the payroll charges. The Labor Types are Regular (RG), Overtime (OT),
Standby (SB), Premium (PR), Paid Time Off (TO), and Compensatory Time Off (CO).
Enter a one-digit character for each Benefit Base Indicator as follows:
|
Y |
– |
Charge the benefit amounts |
These are required fields when the DOE Type is F and Payment Category is D. If the DOE Type is F and Payment Category is D, at least one Benefit Base Indicator must be Y. If DOE Type is not F or Payment Category is not D, these fields must be left blank.
◾ STATUS CODE – This element is
required. Enter a one-character Status Code as follows:
|
A |
– |
Active |
I |
– |
Inactive |
This code will default to an Active status if not entered. It may be used to inactivate records no longer in use.
◾ EFF START DATE – Enter the eight-digit Effective Start Date (MMDDYYYY format), which identifies when the record becomes effective. This field can be left blank, which will cause the record to be immediately available.
◾ EFF END DATE – Enter the eight-digit Effective End Date (MMDDYYYY format), which identifies when the record is no longer effective. This field can be left blank.
– No Profile Example Available –
10
Menu Control Profile
The 10 profile is used to define the structure of R⋆STARS menus, submenus, and screens. DAS SFMS Operations maintains this profile.
The 10 Profile also establishes valid Link To and Interrupt destinations using pneumonic screen names. For example, the 24 profile has the pneumonic name INDX. This allows the user to access the 24 profile by typing INDX in the LINK TO: field and pressing either Enter or F9 (Interrupt).
When making menu selections, users may enter the screen ID or press the corresponding function key. In the above Index example, the 24 profile can be accessed directly by typing 24 in the LINK TO: field and pressing ↵ Enter . It can also be reached by navigating to the ORGM Menu and pressing F8 (Line Number 7 on this screen).
The Item Number field controls the menu line on which the menu selection information displays. It is important to note the relationship between the line number and the function key. F1 and F9 function keys are reserved (for Help and Interrupt) and are not displayed as menu line choices. If a record has an Item Number of 07, it appears on the seventh line of the menu but corresponds with function key F8 . If a record has an Item Number of 10, it appears on the tenth line of the menu but corresponds with function key F12 . (The F1 –HELP and F9 –INTERRUPT function key information usually appears at the bottom of each screen.)
Control Key
◾ LINK TO ID – Enter up to a
four-character Link To ID. This field identifies the menu pneumonic, the screen
ID, or a pneumonic Link To ID. Examples of Link To IDs are as follows:
|
MAIN |
– |
to link to the Main Menu (menu pneumonic) |
Information
Elements
◾ MENU ID – Enter up to a four-character Menu ID or leave blank. Use this field to identify on which menu this record is to be displayed. For example, to display the Payment Processing menu on the Main Menu, enter MAIN in this field. It is recommended that Menu IDs be pneumonic because menus all use screen number 000.
◾ ITEM NO – Enter a two-digit Item Number (between 01 and 10) or leave blank. The Item Number determines on which line of the menu this record will display. R⋆STARS will right justify the Item Number. For example, if a user enters Item Number 8, the system right justifies the entry to 08. If the Menu ID field is blank, the system assigns an Item Number of zeros 00 and the record is not displayed as a menu choice (e.g. PCA).
◾ PROGRAM NAME – Enter an eight-character Program Name. For example, if the screen ID is D11, enter the screen’s Program Name of DAFMD11. Therefore, when a user is using the system, if the user enters D11 in the Link To field, the system displays the screen program identified on this record – AGENCY OBJECT PROFILE. If the record is establishing the menu structure (i.e., no screen IDs are on the record) the Program Name should be DAFM000.
◾ TITLE – Enter up to a 30-character Title of the menu or screen ID. This title appears as the title of the menu and/or the menu option. If spaces are added before the title, those spaces are reflected on the menu.
◾ STATUS CODE – This element is
required. Enter a one-character Status Code as follows:
|
A |
– |
Active |
I |
– |
Inactive |
This code will default to an Active status if not entered. It may be used to inactivate records no longer in use.
Example:
|
S010 UC: 10 STATE OF OREGON 04/04/14 10:07 AM |
|
LINK TO: MENU CONTROL PROFILE PROD |
|
|
|
LINK TO ID: D11 |
|
|
|
MENU ID: OBJM |
|
|
|
ITEM NO: 05 |
|
|
|
PROGRAM NAME: DAFMD11 |
|
|
|
TITLE: AGENCY OBJECT PROFILE |
|
|
|
STATUS CODE: A |
|
|
|
LAST PROC DATE: 04032014 |
|
Z06 RECORD SUCCESSFULLY RECALLED |
|
|
|
F1-HELP F3-DEL F5-NEXT F9-INT F10-SAVE F11-SAVE/CLEAR ENTER-INQ CLEAR-EXIT |
17
Object Clearance Patterns Profile
The 17 profile defines clearance patterns for Grant drawdown calculations. It allows patterns to be associated with a Grant, Agency Code 1, and/or Object within a Grant. Agency Code 1 is optional and is used to make tasks more specific within a certain Grant. The 17 profile is part of the Grant Billings process that is subject to the Cash Management Improvement Act (CMIA). This profile is Agency maintained.
Control Key
◾ AGENCY – Enter the three-character Agency code. It must exist in the D02 profile.
Information
Elements
◾ GRANT NO – Enter the six-digit Grant Number. It must exist in the 29 profile.
◾ GRANT PHASE – Enter the two-digit Grant Phase. The Grant Number and Phase must exist in the 29 profile.
◾ AGENCY CODE 1 – Enter up to a four-digit Agency Code 1 or leave blank. If entered, it must exist in the D26 profile.
◾ OBJECT RANGE FROM – Enter a four-digit D10 Comptroller Object or D11 Agency Object number or D48 – Grant Object Profile Grant Object that begins the range. Because this is a range, the system will not verify that the Comptroller Object exists in the D10 profile. The same logic holds true for Agency Objects in the D11 and Grant Objects in the D48 profiles.
◾ OBJECT RANGE TO – Enter a four-digit D10 Comptroller Object or D11 Agency Object number or D48 Grant Object number that completes the range. Because this is a range, the system will not verify that the Comptroller Object exists in the D10 profile. The same logic holds true for Agency Objects in the D11 and Grant Objects in the D48 profiles.
◾ CLEARANCE PATTERN – Enter up to a four-character (alpha/numeric) Clearance pattern, which, if entered, must exist in the 18 – Clearance Pattern Profile. If the Object Clearance Patterns are entered for this grant in this profile, the Clearance Pattern field in the 29 profile must be blank.
◾ STATUS CODE – Enter a
one-character Status Code. It will default to Active if not entered. It may be
used to inactivate records no longer in use.
|
A |
– |
Active |
I |
– |
Inactive |
◾ EFF START DATE – Enter the eight-digit Effective Start Date (MMDDYYYY format). It identifies when the record becomes effective. This field can be left blank, it will default to the current date and cause the record to be immediately available.
◾ EFF END DATE – Enter the eight-digit Effective End Date (MMDDYYYY format) or leave blank. EFF END DATE identifies when the record is no longer effective.
Example:
|
S017 UC: 10 STATE OF OREGON 04/04/14 10:06 AM |
|
LINK TO: OBJECT CLEARANCE PATTERNS PROFILE PROD |
|
|
|
AGENCY: 444 |
|
|
|
GRANT/PHASE: 100000 14 |
|
|
|
AGENCY CODE 1: 6001 |
|
|
|
OBJECT RANGE FROM: 0250 |
|
|
|
OBJECT RANGE TO: 0250 |
|
|
|
CLEARANCE PATTERN: ES10 |
|
|
|
STATUS CODE: A |
|
EFF START DATE: 07212013 EFF END DATE: LAST PROC DATE: 04012014 |
|
Z26 RECORD NOT FOUND – NEXT RECORD RECALLED |
|
|
|
F1-HELP F3-DEL F5-NEXT F9-INT F10-SAVE F11-SAVE/CLEAR ENTER-INQ CLEAR-EXIT |
18
Clearance Patterns Profile
The 18 profile defines clearance patterns for Grant drawdown calculations. It defines the days and percentages for the various clearance patterns used by the State. DAS SFMS Operations maintains this profile.
The 18 profile is part of the Grant Billings process that is subject to the Cash Management Improvement Act (CMIA). The CMIA process determines the date that the State Treasurer can draw down funds that are due to the State from the Federal Government. The date determined is the due date. This due date is the date the State Treasurer can draw down funds without incurring interest liabilities. CMIA affects final approved expenditures that are charged to a Grant that has an automatic billing method set up. The payment is derived using either the default days clearance from the D40 – Grant Category Profile or an average clearance day as set up on the 18 profile. An accounts receivable transaction, using the CMIA due date, is generated to indicate an amount due from the Federal Government using the coding block values found in the Recovery Segment of the 29 profile.
Control Key
◾ CLEARANCE PATTERN – Enter up to a four-character (alpha/numeric) Clearance Pattern code.
Information
Elements
◾ TITLE – Enter a Title of up to 50 characters.
◾ DAYS – Enter a two-digit number in the DAYS field in the format 01 to mean 1 day. The corresponding % must be entered if a day is entered and vice versa. If more than 1 set of days/% is entered, the days number must be in ascending order. For example, if you enter one of the days field as 02, then the next days field must be 03 or greater.
◾ % – Enter a three-digit number in the % field in the format 025 to mean 25% and 100 to mean 100%. The % must be greater than zero. The corresponding day must be entered if a % is entered and vice versa. If more than one set of days/% is entered, the %’s must =100%.
◾ STATUS CODE – Enter a
one-character Status Code. It will default to Active if not entered. It may be
used to inactivate records no longer in use.
|
A |
– |
Active |
I |
– |
Inactive |
◾ EFF START DATE – Enter the eight-digit Effective Start Date (MMDDYYYY format). It identifies when the record becomes effective. This field can be left blank, it will default to the current date and cause the record to be immediately available.
◾ EFF END DATE – Enter the eight-digit Effective End Date (MMDDYYYY format) or leave blank. EFF END DATE identifies when the record is no longer effective.
Example:
|
S018 UC: 10 STATE OF OREGON 04/04/14 10:08 AM |
|
LINK TO: CLEARANCE PATTERNS PROFILE PROD |
|
|
|
CLEARANCE PATTERN: ES10 TITLE: EST CLEAR – MEDICAID MMIS PMT SYS 93.778 |
|
|
|
DAYS/%: 02 001 03 037 04 032 05 016 06 007 07 002 08 001 09 001 10 001 14 002 |
|
DAYS/%: |
|
|
|
STATUS CODE: A |
|
EFF START DATE: 03202014 EFF END DATE: LAST PROC DATE: 03212014 |
|
Z06 RECORD SUCCESSFULLY RECALLED |
|
|
|
F1-HELP F3-DEL F5-NEXT F9-INT F10-SAVE F11-SAVE/CLEAR ENTER-INQ CLEAR-EXIT |
20
Appropriation Number Profile
The 20 profile determines the classification and level of control to be exercised over an appropriation. This Appropriation Number can be associated to or looked up by the 24 or 26 profiles. Therefore, the user organization need enter only the Index, PCA, or alternatively the Appropriation Number on the input transaction to identify a transaction to an appropriation. This profile also maintains many of the control indicators that relate to Appropriations, Allotments, Agency Budgets and allotments of Agency Budgets. The 20 profile is maintained and updated by DAS – Budget and Management Division (BAM). Specific agency budget element information is provided by agencies.
Prior to the beginning of each new biennium:
1. BAM distributes two spreadsheets to agencies:
a. The first lists all appropriations currently established on each agency’s 20 Profiles.
b. The second lists all of the agency’s appropriation bills with section references for the coming biennium. The spreadsheet has columns to provide accounting information such as PCA, Index, etc.
2. Agency reviews the listing of Appropriation Numbers indicating which Appropriation Numbers need to be deleted or changed. The agency submits the 20 Profile forms to BAM for any new Appropriation Numbers that need to be created relating to new legislation.
3. Agency, using the listing of Appropriation Numbers, fills in the Appropriation Number and accounting information, PCA/Index next to each appropriation bill section reference and returns this spreadsheet to BAM.
4. BAM updates or establishes new 20 Profiles based on information submitted by the agency.
5. Agencies must update PCA/Index with new Appropriation Numbers before the next step can occur.
6. BAM loads appropriations upon receipt of chapter law and allots 10% of the appropriation with Effective Date of 07/01/YY.
7. Agencies submit first quarter allotment plan to BAM.
Control Key
◾ AGENCY – Enter a three-character Agency Code. It must exist in the D02 profile.
◾ APPN YEAR – Enter a two-digit Appropriation Year to identify the appropriation year of the appropriation being maintained.
◾ APPN NO – Enter a five-digit Appropriation Number.
◾ TITLE – Enter a Title of up to 40 characters.
Information
Elements
◾ TYPE – Enter a one-digit Appropriation Type. Must be in the D53 profile with the Table ID of APTY. The State of Oregon’s default value is 9.
◾ GROUP – Enter a two-digit
Appropriation Group code. Must be in the D15 – Appropriation Group
Profile. Valid codes are as follows:
|
1 |
– |
General Fund |
5 |
– |
Other Funds – Non Budgeted |
|
4 |
– |
Federal Funds – Non Budgeted |
|||
◾ LEG SESS – Enter a two-digit Legislative Session. This number should correspond with the legislative session that the appropriation was approved in.
◾ SESS CALL # – Enter a one-digit Session Call # or leave blank. In Oregon, the default for the regular Legislative Session is 0. Any further Special Sessions should be coded consecutively, starting with 1.
◾ ACT BL # – Enter up to a six-character Act Bill #. In Oregon, this number will capture the Chapter Law Number of the appropriation. Chapter Law Number is assigned by the Secretary of State Office. Zero fill to left of Chapter Law Number.
◾ BL LN # – Enter up to a four-character Bill Line Number or leave blank. In Oregon, Bill Line # will capture the section where the appropriation is found in the Chapter Law. Zero fill to left.
◾ RIDER # – Enter a four-character Rider #. In Oregon, this number will capture the Subsection where the appropriation is found in the Chapter Law. Zero fill to left.
◾ PROG CODE – Enter a four-character Program Code or leave blank. If entered, it must be at the same level as the Appropriation Level Program indicator, which in Oregon must be at least level 2.
◾ COMP SRC/GRP – Enter a four-character Comptroller Source/Group if the appropriation is restricted to a certain object or leave blank. If entered, must exist on the D09 – Comptroller Source/Group Profile.
◾ REL APPN – Enter a five-digit Related Appropriation number or leave blank. This number is used to identify the legal level of control where more than one appropriation is established for internal control purposes. If entered, it must exist in the D53 profile with the Table ID of RELA. This element will default to the current Appropriation Number entered. In Oregon, leave blank to default to current appropriation.
◾ APPD FUND I/E – Enter a
one-character Appropriated Fund I/E. This field is used to restrict
appropriation numbers to certain appropriated funds. In Oregon the code of I
will generally be keyed to allow for the relationship to appropriated funds.
Valid codes are as follows:
|
I |
– |
Include |
E |
– |
Exclude |
◾ APPD FUND – Enter a 4-digit D22 – Appropriated Fund Profile Appropriated Fund. In Oregon, the actual Appropriated Fund number associated with the appropriation will be entered. There will be one Appropriated Fund associated with each Appropriation Number.
◾ REV OBJ I/E – Enter a
one-character D10 Comptroller Revenue Object I/E. This field is used to
restrict certain Comptroller Revenue Objects to an Appropriation Number.
|
I |
– |
Include |
E |
– |
Exclude |
◾ REV OBJ – Enter up to 10 four-digit D10 Comptroller Revenue Objects separated with commas or up to five ranges identified with hyphens and separated with commas or a combination of both (limit 50 characters)
◾ EXP OBJ I/E – Enter a
one-character D10 Expenditure Object I/E. This field is used to restrict
certain Comptroller Expenditure Objects to an Appropriation Number.
|
I |
– |
Include |
E |
– |
Exclude |
◾ EXP OBJ – Enter up to 10 four-digit D10 Comptroller Expenditure Objects separated with commas or up to five ranges identified with hyphens and separated with commas or a combination of both (limit 50 characters).
Some of the following elements have default values that will remain if not changed.
◾ APPN INDS – UB – Enter
a one-character Unexpended Budget indicator. This element determines whether
the agency can roll forward unexpended budget authority for cash and budget
into the new year. In Oregon, appropriations and limitations are approved
for each biennium so this indicator would always be set to 1 – Unexpended
budget authority for cash and budget. Capital budgets will have the date
set to the end of the project and expenditures will be made against the
original appropriation, so the value of 1 would apply for these also.
|
0 |
– |
No unexpended budget authority |
◾ CTL TYPE- CASH – Enter a
one-character Cash Control Type indicator. This element determines the type of
control exercised over Remaining Free Budget and Cash Available on a Cash
basis. In Oregon, this indicator will always be set to 1 – Absolute/Fatal
unless the appropriation is Non Budgeted. This will prevent warrants from
exceeding the budget available budget/appropriation less cash expended).
|
0 |
– |
None |
1 |
– |
Absolute/Fatal |
2 |
– |
Advisory/Warning |
◾ CTL TYPE- ACCR – Enter a
one-character Accrual Control Type indicator. This element determines the type
of control exercised over Remaining Free Budget and Cash Available on an Accrual
basis. In Oregon, this indicator will always be set to 1 – Absolute/Fatal unless the appropriation is Non Budgeted.
This will prevent payables from exceeding the budget available
[budget/appropriation less (cash expended plus accrued expenditures)].
|
0 |
– |
None |
1 |
– |
Absolute/Fatal |
2 |
– |
Advisory/Warning |
◾ CTL TYPE- ENC – Enter a
one-character Encumbered Control Type indicator. This element determines the
type of control exercised over Remaining Free Budget and Cash Available on an Encumbered
basis. In Oregon, this indicator will be set to 2 – Advisory/Warning
for the quarters one through seven unless the appropriation is Non Budgeted.
The 2 will provide a warning when an encumbrance exceeds the budget
available [budget / appropriation less (cash expended plus accrued expenditures
plus encumbrances)]. During the eighth quarter of the biennium, BAM changes
this indicator to 1 – Absolute/Fatal (except for non-budget and
Capital Construction appropriations). The 1 ensures agencies can not over-expend their restricted appropriations. Valid
codes are as follows:
|
0 |
– |
None |
1 |
– |
Absolute/Fatal |
2 |
– |
Advisory/Warning |
◾ BUDG TYPE – Enter a
one-character Budget Type indicator as follows:
|
A |
– |
Appropriated (Appropriations/Limited) |
◾ REV EXC COL – Enter a
one-character Revenue Excess Collection. This element determines if the
appropriation can be increased automatically for excess revenues collected
above the Estimated Collected Budget. In Oregon, this indicator will always
be set to N.
|
Y |
– |
Yes |
◾ DEP INT IND – Enter a
one-character Depository Interest Indicator. This element determines if the
appropriation can accept depository interest. In Oregon, this indicator is
an informational element only and is not used by any process. The
default value to be used is N – No. If accurate
information is known at the time the profile is established, the indicator will
be entered as the appropriate value. Valid codes are as follows:
|
Y |
– |
Yes |
◾ APPN LEVEL – ORGANIZATION – Enter
a one-character Appropriation Organization Level indicator. It determines the
level of the organization structure at which the appropriation will be
controlled. It controls the posting of the Organization Code to the control key
of the Appropriation Financial Table. Oregon Appropriations are made at the
agency level, but do not require the agency to establish an organization
structure. Therefore, the indicator will be set at 0. Valid codes are
as follows:
|
0 |
– |
No Organization |
◾ APPN LEVEL – PROG – Enter
a one-character Appropriation Program Level indicator. It determines the level
of the program structure at which the appropriation will be controlled. Must be
at the same level of the program code entered in the information section above.
This indicator controls the posting of the D04 – Program Code Profile Program
Code to the Appropriation Financial table. In Oregon, the control has been
mandated at program level 2, so the indicator entered will be 2 on all 20
profiles.
|
0 |
– |
No Program Posting |
◾ APPN LEVEL – OBJ – Enter
a one-character Appropriation Object Level indicator. It determines the level
of the object structure at which the appropriation will be controlled. This
indicator controls the posting of the object to the control key of the
Appropriation Financial table. In Oregon, this indicator will be set to a
default value of 0 – No Object Posting. Oregon does not
appropriate at the object level.
|
0 |
– |
No Object Posting |
◾ ALLOT INDS – SEL – Enter
a one-character Allotment Selections indicator. It determines if this
appropriation will be monitored by period and, if so, monthly or quarterly.
This indicator also determines whether appropriation allotment edits are
performed. If the value is N the allotment edit is not performed,
otherwise the edit is performed. In Oregon, BAM will set these indicators
according to each agency’s criteria for budget monitoring. The valid
indicators are as follows:
|
N |
– |
No Allotments |
M |
– |
Monthly Allotments |
Q |
– |
Quarterly Allotments |
◾ ALLOT INDS – CTL TYPE – Enter
a one-character Allotment Control Type indicator. It determines the severity of
the appropriation allotment edits. The valid indicators are as follows:
|
0 |
– |
None |
1 |
– |
Absolute/Fatal |
2 |
– |
Advisory/Warning |
◾ QTR – Enter a one-character Quarter
indicator. This element and following element are used in reports. The purpose
of these elements is to identify a particular quarter in which a maximum
percentage of the appropriation authority may be expended. In some cases, as a
recommendation, a user agency should not spend more than 33% of the
appropriation authority in a particular quarter. The reason for having these
two indicators is to provide reports to help monitor expenditures. The QTR
element determines if a particular quarter will be monitored for expenditures
to be less than the percentage identified on the PERC Indicator below. The
valid QTR indicators are as follows:
|
1 |
– |
1st Quarter |
4 |
– |
4th Quarter |
◾ PERC – Enter a two-digit Percent. This element is used in conjunction with the Qtr element above. The maximum percentage of an appropriation that may be spent in a particular quarter (as identified by the element above). If percent is not used, 00 must be entered.
◾ PROG/OBJ BUD OBJ LEV IND – Enter
a one-character Program/Object Budget Object Level Indicator. Not Used in
Oregon. Code 0 – No Object Posting will be used as default for
all 20 profiles.
|
0 |
– |
No Object Posting |
◾ AGY BDG INDS – CTL TYPE – Enter
a one character Agency Budget Control Type indicator. It determines the
severity of the Agency Budget edits. Valid indicators are as follows:
|
0 |
– |
None |
1 |
– |
Absolute/Fatal |
2 |
– |
Advisory/Warning |
◾ AGY BUD INDS – OBJ LVL – Enter
a one-character Agency Budget Object Level indicator. It determines the level
of the object structure at which the Agency Budget will be controlled. This
element controls the posting of the object to the control key of the Agency
Budget Financial Table. For example, if the value is 3 the inferred
Object value (6000-personal services associated with the Comptroller Object
6011-base salary) is posted to the control key of the Agency Budget Financial
Table. The valid indicators are as follows:
|
0 |
– |
No Object Posting |
◾ AGY BUD INDS – ALLOT SEL – Enter
a one-character Agency Budget Allotment Selection indicator. It determines if
the Agency Budget will be allotted and, if so, monthly or quarterly. This
element also determines whether agency budget allotment edits are performed. If
the value is N the agency budget allotment edit is not performed;
otherwise the edit is performed. The valid indicators are as follows:
|
N |
– |
Not Applicable |
M |
– |
Monthly |
Q |
– |
Quarterly |
◾ AGY BUDG INDS – ALLOT CTL – Enter
a one-character Agency Budget Allotment Control indicator. It determines the
severity of the Agency Budget allotment edits. The valid indicators are as
follows:
|
0 |
– |
None |
1 |
– |
Absolute/Fatal |
2 |
– |
Advisory/Warning |
|
|
Blank |
– |
Allotment Controls do not apply. If the Allotment Selection Indicator is equal to N, then the Allotment Control Indicator must be blank. |
|||||||
◾ STATUS CODE – Enter a
one-character Status Code. It will default to Active if not entered. It may be
used to inactivate records no longer in use.
|
A |
– |
Active |
I |
– |
Inactive |
◾ EFF START DATE – Enter the eight-digit Effective Start Date (MMDDYYYY format). It identifies when the record becomes effective. This field can be left blank; it will default to the current date and cause the record to be immediately available.
◾ EFF END DATE – Enter the eight-digit Effective End Date (MMDDYYYY format) or leave blank. EFF END DATE identifies when the record is no longer effective. In Oregon, the Effective End Date will vary on the type of appropriation. This date is also determined by the State policy for year end closing procedures. Currently, the date will usually be six months past the end of the biennium, to allow for agency year end closing. The date will be different for capital projects where the official End Date will equal the end of the project plus any closing time adjustment – maximum of six years.
Example:
|
S020 UC: 10 STATE OF OREGON 04/04/14 10:10 AM |
|
LINK TO: APPROPRIATION NUMBER PROFILE PROD |
|
|
|
AGY: 101 APPN YEAR: 15 APPN NO: 45454 EDUCATION FUND |
|
|
|
APPROP - TYPE: 9 GROUP: 06 LEG SESS: 76 SESS CALL #: ACT BL #: 00XFER |
|
BL LN #: 0000 RIDER #: 0000 PROG CODE: COMP SRC/GRP: REL APPN: 46101 |
|
|
|
I/E (I=INCLUDE, E=EXCLUDE) |
|
ENTER ONE FUND WITH UP TO 10 COMP OBJS SEPARATED WITH EITHER "-" OR ",". |
|
APPD FUND I 4400 , |
|
REV OBJ I 0000 - 2999 , |
|
EXP OBJ E 3000 - 8999 , |
|
|
|
APPN INDS- UB: 1 CTL TYP- CASH: 1 ACCR: 1 ENC: 2 BUDG TYPE: A REV EXC COL: N |
|
DEP INT IND: N APPN LEVEL- ORGANIZATION: 0 PROG: 2 OBJ: 0 |
|
ALLOT INDS- SEL: Q CTL TYP: 1 QTR: N PERC: 00 PROG/OBJ BUD OBJ LEV IND: 0 |
|
AGY BDG INDS- CTL TYPE: 0 OBJ LVL: 5 ALLOT SEL: N ALLOT CTL: |
|
STATUS CODE: A |
|
EFF START DATE: 07012013 EFF END DATE: 12312015 LAST PROC DATE: 10312013 |
|
Z06 RECORD SUCCESSFULLY RECALLED |
|
|
|
F1-HELP F3-DEL F5-NEXT F9-INT F10-SAVE F11-SAVE/CLEAR ENTER-INQ CLEAR-EXIT |
21
Index/PCA Relationship Profile
The 21 profile is used to ensure that organizational structures and program structures are not combined incorrectly. This profile is Agency maintained.
Agencies who use both Indexes and PCAs, may need to define guidelines to use when choosing Indexes and/or PCAs for a profile set up or an online transaction. The 21 Profile would be used to define what would be allowed.
Control Key
◾ AGENCY – Enter the three-character Agency Code. It must exist in the D02 profile.
◾ APPN YEAR – Enter a two-digit Appropriation Year to identify the appropriation year that the Index/PCA are related to.
◾ INDEX – Enter a five-digit Index Code. It must be entered as either a wild card or a valid code in the 24 profile. Refer to the explanation of wild card below in the definition of PCA.
◾ PCA – Enter a five-character Program Cost Account Number. The PCA must be entered as either a wild card or a valid code in the 26 profile. Wild card means the user can select a range of PCAs by entering an asterisk (*) instead of the exact PCA code. For example, the user may wish for the PCA relationship to be all PCAs in the 50000’s, the user would enter 5****. The asterisks must always come after the number. They can not be separated by a number (e.g. 5**1*).
Information
Elements
◾ TITLE – Enter a Title of up to 40 characters.
◾ STATUS CODE – Enter a
one-character Status Code. It will default to Active if not entered. It may be
used to inactivate records no longer in use.
|
A |
– |
Active |
I |
– |
Inactive |
◾ EFF START DATE – Enter the eight-digit Effective Start Date (MMDDYYYY format). It identifies when the record becomes effective. This field can be left blank; it will default to the current date and cause the record to be immediately available.
◾ EFF END DATE – Enter the eight-digit Effective End Date (MMDDYYYY format) or leave blank. EFF END DATE identifies when the record is no longer effective.
Example:
|
S021 UC: 10 STATE OF OREGON 04/04/14 10:14 AM |
|
LINK TO: INDEX/PCA RELATIONSHIP PROFILE PROD |
|
|
|
AGENCY: 333 (MUST BE IN D02 AGENCY PROFILE) |
|
|
|
AY: 14 |
|
|
|
INDEX: 5**** (MUST BE IN 24 INDEX CODE PROFILE) |
|
|
|
PCA: 5**** (MUST BE IN 26 PROGRAM COST ACCOUNT PROFILE) |
|
|
|
TITLE: EASTERN OREGON TRAINING CENTER |
|
|
|
STATUS CODE: A |
|
EFF START DATE: 04012014 EFF END DATE: LAST PROC DATE: 04142014 |
|
Z07 NEXT RECORD SUCCESSFULLY READ |
|
|
|
F1-HELP F3-DEL F5-NEXT F9-INT F10-SAVE F11-SAVE/CLEAR ENTER-INQ CLEAR-EXIT |
22
Cost Allocation Profile
The 22 profile controls the cost allocation process within the system. All allocation information related to the indirect cost pool is contained in this profile. The key to the 22 profile identifies the indirect cost pool to be allocated. This profile is Agency maintained.
Control Key
◾ AGENCY – Enter a three-character Agency Code. It must exist in the D02 profile.
◾ CA TYPE – Enter a one-character Cost Allocation Type. It must exist in the 23 – Cost Allocation Type Profile.
◾ INDEX CODE – Enter a five-digit Index Code. It must exist in the 24 profile, or enter 00000. If costs are to be allocated based on organization, (i.e. when the 25 profile CA-BY-INDEX is 2), a valid Index code is required. For Cost Allocation on a programmatic basis only, (i.e. when the CA-BY-INDEX is 1, 3 or 4), enter 00000 (zeros).
◾ PCA – Enter a five-digit Program Cost Account number. It identifies the indirect cost pool to be allocated. A PCA number is always required regardless of the allocation method and it must exist in the 26 profile.
◾ APPN YEAR – Enter a two-digit Appropriation Year.
Information
Elements
◾ TITLE – Enter a Title of up to 40 characters.
◾ PCA TYPE – Enter a one-digit
Program Cost Account Type. It identifies the PCA as indirect cost or indirect
variance cost. Identifies the PCA as indirect costs or indirect variance costs.
Valid types are as follows:
|
2 |
– |
Indirect Cost. Identifies Indirect PCAs (cost pools) that are
allocated. |
◾ SEQ – Enter a one-digit Cost Allocation Sequence indicator of 1 – 9. Identifies the step-down sequence when this PCA is to be allocated. For a single-step distribution, code a 1. When a multiple-step-down allocation is required, code the numeric value indicating which step during the allocation process this PCA is to be allocated. A multiple step allocation is required when allocating from one indirect PCA to other indirect PCAs which, in turn, will also be allocated.
◾ VAR – Enter a one-digit
Variance Allocation as follows:
|
1 |
– |
Do not allocate the variance except at year end (Standard Methods, PCA type 2, 3) |
||||||
|
2 |
– |
Allocate whenever the variance allocation is run (Standard Methods, PCA type 2, 3) |
||||||
|
3 |
– |
Do not ever allocate (Actual Methods, and/or PCA type 2). Variance allocation indicators 1 and 2 indicate whether any variance remaining in the Indirect Cost Pool is allocated during a variance allocation run. The variance allocation is run when the 25 profile Run Type equals: |
||||||
|
V |
– |
Periodic Variance |
Y |
– |
Year End Variance |
|||
◾ DIST – TYPE – Enter
a one-digit Distribution Type. (Must be 4 or 5 when the
Charge-ALLOC-BY-OBJ (below) equals Y. Must be 4 or 5 when
PCA Type (above) equals 3. And must be 4 or 5 when VAR
(above) is 3. Valid types are as follows:
|
1 |
– |
Standard Rate – allocates indirect costs based on a standard percentage applied to the distribution base expenditures set up as BASE G/LS on the 23 Profile. (The percentage is coded in the Rate field). |
|
2 |
– |
Standard Cost Per Unit – allocates indirect costs based on a standard rate per unit applied to units or hours recorded in the distribution base set up as BASE G/LS on the 23 Profile. The statistical units or hours are recorded using statistical Agency Object codes. These Agency Objects must be coded in the Dist Base Object Ranges field, and the Object Type must be A. |
|
3 |
– |
Standard Amount – allocates a standard fixed amount that is coded in the Rate field based on eligibility from the BASE G/LS on the 23 profile. |
|
4 |
– |
Fixed Percentage – allocates the indirect costs based on pre-defined percentages coded in the PCA Percent fields in the Fixed Percent Allocation. Up to 15 distributions may be coded and the allocation percentages must total 100%. The BASE G/LS on the 23 profile are not used in this calculation. No variance will remain in the Indirect Cost Pool. |
|
5 |
– |
Calculated Percentage – totals the dollars in the Alloc Range group, for the Dist Base Object codes. R⋆STARS then calculates the percentage that each Index/PCA represents of the total, and this percentage is applied to the actual dollars in the Indirect Cost Pool. The list of BASE G/LS on the 23 Profile are used to determine eligibility for allocation. No variance will remain. |
◾ DIST – RATE – Enter a Distribution Rate in the format 99999.99999 that:
◽ Specifies the standard percentage rate for a Type 1 allocation.
◽ Specifies the standard cost per unit for a Type 2 allocation.
◽ Specifies the fixed amount for a Type 3 allocation.
◽ Must be blank if the Dist Type is 4 or 5.
◾ DIST – DESC (Optional). Must be blank if Dist Type is 4 or 5. Enter the Description up to 20 characters or leave blank.
◾ CHARGE – TC – Enter a three-digit Transaction Code (T-Code) to be used for the system generated charge transaction. It must exist in the 28A profile and 28B – Transaction Code Description Profile.
◾ CHARGE – ALLOC BY OBJ – Enter
a one-character Allocation by Object indicator as follows:
|
Y |
– |
Yes, the original Comp or Agency Object recorded in the indirect PCA will be used in the charge and credit transactions. May be Y if Dist Type is 4 or 5. |
|
N |
– |
No, the original Comp or Agency Object will not remain on the charge and credit transactions. Instead, a different Comp or Agency Object will be coded in the Comp/Agency Object fields. Must be N for Standard Methods. |
◾ CHARGE – COMP/AGY OBJ – Enter a four-digit Comptroller or Agency Object, or leave blank. It identifies the Comp/Agency Object to be used in the charge transactions. Must be blank if Allocation by Object Indicator is Y. It is required if Allocation by Object is N.
◾ CREDIT – TC – Enter a three-digit T-Code to be used for the system generated credit transaction for this cost pool. It must exist in the 28A and B profiles. The credit of this T-Code must be to Indirect cost centers.
◾ CREDIT – INDEX CODE – Enter a five-digit Index code, or enter 00000. It identifies the Index Code used to record cost recovery. Enter 00000 if cost allocation is not by Index code or is by charge Index code only (e.g. the 25 profile CA-BY-IDX is 1 or 3).
◾ CREDIT – PCA – Enter a five-digit Program Cost Account number. It identifies the PCA to be used in the transaction to record the cost recoveries. This is normally the original indirect PCA (in the Control Key). When the PCA Type is 3, or when the Allocation by Object indicator is Y, this PCA must equal the indirect PCA identified in the Control Key.
◾ CREDIT – COMP/AGY OBJ – Enter a four-digit Comptroller or Agency Object or leave blank. It identifies the Comp or Agency Object to be used in the credit transactions. When entered, the Credit Object must be equal to the Charge Object. This field must be blank if Allocation by Object indicator is Y. Comp/Agency Obj is required if Allocation by Object is N.
◾ DIST BASE RANGE – OBJ TYPE – Enter
a one-character Distribution Base Range Object Type or leave blank. If
statistics are used, the type must be A. The type must be blank if Dist Type equals 4. Valid codes are as follows:
|
C |
– |
Comptroller Object |
A |
– |
Agency Object |
◾ DIST BASE RANGE – Distribution Base Range defines the Object accounts to which the Distribution Rate is to be applied and other calculations made to determine the amount of the allocation. Includes four sets of Object code ranges. At least one set must be coded if the Dist Type is 1,2, 3 or 5. Leave blank if Dist Type is 4 because this type does not use Distribution Base.
◾ OBJECT LOW (1-4) – Enter a four-digit Comptroller or Agency Object or leave blank. It identifies the low end of the DIST BASE RANGE.
◾ OBJECT HIGH (1-4) – Enter a four-digit Comptroller or Agency Object or leave blank. Identifies the high end of the Dist Base Range. It must be entered if the corresponding Object Low is entered. Object High must be greater than or equal to Object Low.
◾ ALLOC RANGE – The Allocation Range group identifies the Direct Cost Pools that will receive allocations. It includes up to five ranges of Index and PCA codes to receive allocations. At least one set must be coded if the Dist Type is 1, 2, 3, or 5. Leave the fields blank if the Dist Type is 4 because this type does not use Allocation Range.
◾ INDEX LOW (1-5) – Enter a five-digit Index Low or 00000. It identifies the low end of the Index Range for allocation to organizational units. Enter 00000 if the 25 profile CA-BY-INDEX is 1.
◾ INDEX HIGH (1-5) – Enter a five-digit Index High or 00000. It identifies the high end of the Index Range for allocation to organizational units. It must not be less than the corresponding Index Low. Enter 00000 if the 25 profile CA-BY-INDEX is 1.
◾ PCA LOW (1-5) – Enter a five-digit PCA Low. It identifies the low end of the PCA Range.
◾ PCA HIGH (1-5) – Enter a five-digit PCA High. It identifies the high end of the PCA Range. Must not be less than the corresponding PCA Low.
◾ FIXED PCNT ALLOC – Fixed Percent Allocation specifies up to fifteen Index/PCA combinations that are to receive allocations under Dist Type 4. At least two sets must be coded when the Dist Type is 4. Leave the fields blank if the Dist Type is 1, 2, 3, or 5.
◾ INDEX (1-15) – Enter a five-digit Index Code. It is required if allocating by Index (i.e. when the 25 profile CA By Index indicator equals 2,3, or 4). It must be 00000 when the 25 profile CA BY INDEX indicator is 1.
◾ PCA (1-15) – Enter a five-digit Program Cost Account. It is required when the Dist Type is 4.
◾ % (1-15) – Enter a PCA Percentage in the format .99999. It indicates the fixed percentage of actual costs to be allocated to the corresponding Index/PCA combination. The sum of all the coded percentages must equal 1.00000.
◾ EFF START DATE – Enter a eight-digit Effective Start Date (MMDDYYYY format). It identifies when the record becomes effective. This field can be left blank; it will default to the current date and cause the record to be immediately available.
◾ EFF END DATE – Enter an eight-digit Effective End Date (MMDDYYYY format) or leave blank. EFF END DATE identifies when the record is no longer effective.
◾ STATUS CODE – Enter a
one-character Status Code. It will default to Active if not entered. It may be
used to inactivate records no longer in use.
|
A |
– |
Active |
I |
– |
Inactive |
Example:
|
S022 UC: 10 STATE OF OREGON 04/04/14 10:31 AM |
|
LINK TO: COST ALLOCATION PROFILE PROD |
|
AGENCY: 454 CA TYPE: S INDEX CODE: 99601 PCA: 00100 APPN YEAR: 15 |
|
TITLE: COST ALLOCATION POOL PCA TYPE: 2 SEQ: 1 VAR: 3 |
|
DIST- TYPE: 5 RATE: DESC: |
|
CHARGE- TC: 301 ALLOC BY OBJ: Y COMP/AGY OBJ: |
|
CREDIT- TC: 302 INDEX CODE: 99600 PCA: 00100 COMP/AGY OBJ: |
|
DIST BASE OBJ LOW 1: 9950 HIGH 1: 9950 LOW 2: HIGH 2: |
|
RANGE- TYPE: A LOW 3: HIGH 3: LOW 4: HIGH 4: |
|
AND 1: 99600 1: 99600 1: 14000 1: 14999 |
|
ALLOC INDEX 2: INDEX 2: PCA 2: PCA 2: |
|
RANGE- LOW: 3: HIGH: 3: LOW: 3: HIGH: 3: |
|
4: 4: 4: 4: |
|
5: 5: 5: 5: |
|
INDEX PCA % INDEX PCA % INDEX PCA % |
|
1: 2: 3: |
|
FIXED 4: 5: 6: |
|
PCNT 7: 8: 9: |
|
ALLOC 10: 11: 12: |
|
13: 14: 15: |
|
EFF ST DT: 07012013 EFF END DT: LAST PRC DT: 02132014 STAT CODE: A |
|
Z06 RECORD SUCCESSFULLY RECALLED |
|
|
|
F1-HELP F3-DEL F5-NEXT F9-INT F10-SAVE F11-SAVE/CLEAR ENTER-INQ CLEAR-EXIT |
Example:
|
S022 UC: 10 STATE OF OREGON 04/04/14 10:33 AM |
|
LINK TO: COST ALLOCATION PROFILE PROD |
|
AGENCY: 454 CA TYPE: X INDEX CODE: 00000 PCA: 00100 APPN YEAR: 15 |
|
TITLE: A-CAF: CLUSTER ALLOC-PS PCA TYPE: 2 SEQ: 1 VAR: 3 |
|
DIST- TYPE: 4 RATE: DESC: |
|
CHARGE- TC: 301 ALLOC BY OBJ: Y COMP/AGY OBJ: |
|
CREDIT- TC: 302 INDEX CODE: 00000 PCA: 00100 COMP/AGY OBJ: |
|
DIST BASE OBJ LOW 1: HIGH 1: LOW 2: HIGH 2: |
|
RANGE- TYPE: LOW 3: HIGH 3: LOW 4: HIGH 4: |
|
AND 1: 1: 1: 1: |
|
ALLOC INDEX 2: INDEX 2: PCA 2: PCA 2: |
|
RANGE- LOW: 3: HIGH: 3: LOW: 3: HIGH: 3: |
|
4: 4: 4: 4: |
|
5: 5: 5: 5: |
|
INDEX PCA % INDEX PCA % INDEX PCA % |
|
1: 00000 14001 .19720 2: 00000 14002 .00080 3: 00000 14003 .01330 |
|
FIXED 4: 00000 14004 .02780 5: 00000 14005 .05080 6: 00000 14006 .04050 |
|
PCNT 7: 00000 14007 .00600 8: 00000 14008 .05720 9: 00000 14009 |
|
ALLOC 10: 00000 14010 .03000 11: 00000 14011 12: 00000 14012 .01930 |
|
13: 00000 14013 .00330 14: 00000 14014 .37310 15: 00000 09100 .18070 |
|
EFF ST DT: 07012013 EFF END DT: LAST PRC DT: 02132014 STAT CODE: A |
|
Z06 RECORD SUCCESSFULLY RECALLED |
|
F1-HELP F3-DEL F5-NEXT F9-INT F10-SAVE F11-SAVE/CLEAR ENTER-INQ CLEAR-EXIT |
23
Cost Allocation Type Profile
The 23 profile provides the ability to allocate gross costs, expenditure reductions, adjustments, and year-end encumbrances to Federal grants or entitlement categories and State-only funding pools within agencies and programs. The 23 profile controls the allocation amount and bases for D31 Comptroller General Ledger Accounts that are user defined on this profile. The Cumulative Balance Indicator in conjunction with the Run Type Indicator on the 25 profile defines whether the allocated amount is the General Ledger balance or activity. DAS SFMS Operations maintains this profile.
Control Key
◾ CA TYPE – Enter a one-character Cost Allocation Type. Examples of cost allocation types include expenditures, encumbrances, revenues and budgets.
Information
Elements
◾ TITLE – Enter a Title of up to 40 characters.
◾ CUM BAL IND – Enter a
one-character Cumulative Balance Indicator. The Cumulative Balance Indicator is
a required field. Valid values are Y and N. The cumulative
balance indicator in conjunction with the Run Type Indicator on the 25
Profile defines whether the allocated amount is the General ledger balance or
period activity.
|
CUM BAL IND |
RUN TYPE (from 25 Profile) |
GL BALANCE / ACTIVITY |
|
Y |
S (Standard) / C (Standard YTD) |
Prior Month Activity |
|
N |
S (Standard) / C (Standard YTD) / V
(Variance) |
Prior Month Balance |
◾ ALLOCATE G/LS – Enter a four-digit Allocate General Ledger (GL) Account. These GL accounts will receive the allocation. At least one Allocate GL Account must be entered and it must be defined in the D31 profile. Up to twelve Allocate GL accounts are allowed for one CA Type. In Oregon, a GL Account may be specified as an Allocate GL for multiple CA Type records.
◾ BASE G/LS – Enter a four-digit Base General Ledger Account. At least one Base GL must be entered and it must be defined in the D31 profile. Distribution Types 1, 2, 3 and 5 use these GLs to identify the base used for the allocation. Distribution Type 4 does not use a base GL for the allocation.
◾ STATUS CODE – Enter a
one-character Status Code. It will default to Active if not entered. It may be
used to inactivate records no longer in use.
|
A |
– |
Active |
I |
– |
Inactive |
◾ EFF START DATE – Enter the eight-digit Effective Start Date (MMDDYYYY format). It identifies when the record becomes effective. This field can be left blank; it will default to the current date and cause the record to be immediately available.
◾ EFF END DATE – Enter the eight-digit Effective End Date (MMDDYYYY format) or leave blank. EFF END DATE identifies when the record is no longer effective.
Example:
|
S023 UC:
10
STATE OF
OREGON
04/04/14 10:36 AM |
|
LINK TO: COST ALLOCATION TYPE PROFILE PROD |
|
|
|
CA TYPE: X |
|
TITLE: EXPENDITURES ( CASH & ACCRUALS ) |
|
CUM BAL IND: Y |
|
ALLOCATE G/LS: 3500 BASE G/LS: 3500 |
|
3501 3501 |
|
|
|
STATUS CODE: A |
|
EFF START DATE: 04012014 EFF END DATE: LAST PROC DATE: 04142014 |
|
Z07 NEXT RECORD SUCCESSFULLY READ |
|
|
|
F1-HELP F3-DEL F5-NEXT F9-INT F10-SAVE F11-SAVE/CLEAR ENTER-INQ CLEAR-EXIT |
24
Index Code Profile
The 24 profile provides the means for recording accounting data at various levels of organizational detail within the agency structure for internal reporting. This profile provides a method of data input coding reduction that eases coding and reduces coding errors. This profile is Agency maintained.
The R⋆STARS classification structure provides up to 9 levels of internal organizational classifications. Index Codes are assigned only at the lowest level organizations. Data elements such as Appropriation Number, PCA, Fund, Project, Grant, Recurring Transaction Index, and Agency Codes may be coded as look up elements.
The following general steps should be followed to prepare data for the Index Code Profile creation:
1. Prepare an organization chart that illustrates the hierarchical relationship between the various levels within each agency.
2. Assign a unique Organization Code to each entity in the organization structure, and create an entry in the D03 – Organization Code Profile for each Organization Code defined.
3. Assign unique Index Codes to each of the lowest level organizational units in the chart. The numbering convention used for Index Codes should be reviewed in conjunction with the cost allocation scheme developed. If costs are allocated based on ranges of Indexes, the numbers applied must facilitate the use of this Index range feature.
4. Identify the Appropriation Number associated with each Index Code classification, if applicable.
5. Identify the primary Fund associated with each Index Code classification, if applicable.
6. Determine if a Program Cost Account (PCA), Grant, Project or Agency Codes 1, 2 and 3 will be related to an Index.
7. Be sure related profile entries have been entered for the Fund and other optional codes as required.
8. Code the Index Code Profile maintenance forms (if used) and enter into the Index Code Profile.
Control Key
◾ AGENCY – Enter the three-character Agency Code. It must exist in the D02 profile.
◾ APPN YEAR – Enter a two-digit Appropriation Year to identify the appropriation year the Index is related to.
◾ INDEX – Enter a five-digit Index Code that uniquely identifies the lowest level of organization detail.
Information
Elements
◾ TITLE – Enter a Title of up to 40 characters.
◾ ORG CODE – Enter the four-digit Organization Code. It must exist in the D03 profile. This org code should be set at the lowest (most detail) level of the organization structure.
◾ APPROP NUMB – Enter a five-digit Appropriation Number or leave blank. If entered, it must exist in the 20 profile. The Appropriation Number represents the program or activity within the current appropriation bill that is the spending authority for the organization unit
◾ FUND – Enter a four-digit Fund code or leave blank. If entered, it must exist in the D23 profile If a fund is coded in an accounting transaction, the fund specified in the Index Code Profile can be overridden if the D02 profile Data Related Error Position 14 is set to warning (W) or ignore (I). If the Position is blank, fatal Error Code EAK – CAN’T OVERRIDE FD will appear on the transaction.
◾ AGCY BUD ORG LVL IND – Enter a
one-digit Agency Budget Organization Level Indicator. It indicates the level
that the agency budget will be controlled internally – as seen
on the 61 – Agency
Budget Financial Inquiry Screen.
It controls the posting of the Organization Code to the Agency Budget
Financial Table (61 Screen). If this value is coded, the D03
Organization Code must be at the same level or a lower level in the
organization structure.
|
0 |
– |
No Organization Level |
5 |
– |
Organization Level 5 |
◾ GRANT NO – Enter a six-character Grant Number or leave blank. If entered, it must exist in the 29 profile. It is used to relate an Index Code to a Grant and Grant Phase. A Grant Number can also be related to a PCA or Project Number, or be coded on input. In cases where more than one grant is looked up in one accounting transaction, coding overrides the 24 profile. The 24 profile overrides the 26 profile, and the 26 profile look up will override the D42 – Project Number Profile lookup. If the D02 profile Data Related Error Position 17 is set to warning (W) or ignore (I), Grant Number and Grant Phase can be overridden on the transaction. If the Position is blank, fatal Error Code EAM – CANT OVRRD GRT#/PH will appear on the transaction.
◾ GRANT PHASE – Enter a two-digit Grant Phase or leave blank. If Grant Number is blank, then Grant Phase must be blank. If entered, it must exist in the 29 profile.
◾ PROJECT NO – Enter a six-character Project Number or leave blank. If entered, it must exist in the 27 profile. It is used to relate an Index Code to a Project and Project Phase. A Project Number can also be related to a PCA or Grant Number, or coded on input. In cases where more than one project is looked up in one accounting transaction, input coding overrides the Index Code Profile. The Index Profile overrides the 26 profile and the 26 profile overrides the D47 – Grant Number Profile lookup. If the D02 profile Data Related Error Position 18 is set to (W) or ignore (I), Project Number and Project Phase can be overridden on the transaction. If the Position is blank, fatal Error Code EAN – CANT OVRRD PRJ#/PH will appear on the transaction.
◾ PROJECT PHASE – Enter a two-digit Project Phase or leave blank. If Project Number is blank, then Project Phase must be blank. If entered, it must exist on the 27 profile.
◾ CONVERTED CC – Enter a five-character Converted Cost Center code or leave blank. This field references a cost center number when a direct relationship exists and is used for conversion or interfaces.
◾ PCA – Enter a five-character Program Cost Account Number or leave blank. If entered, it must exist in the 26 profile. It is used to look up the program information stored for a particular PCA. This option can be used if an agency’s organization unit related to a program level relates directly to programs. If a PCA is coded on an accounting transaction that differs from the PCA looked up by an Index Code in the transaction, the PCA input will override the PCA looked up by the Index Code. If entered, the appropriation number on the PCA must match the appropriation number in the Index Code Profile. If the D02 profile Data Related Error Position 20 is set to (W) or ignore (I), PCA number can be overridden on the transaction. If the Position is blank, fatal Error Code EAP – CANT OVRRD PCA will appear on the transaction.
◾ MPCODE – Enter a ten-character agency defined Multipurpose Code or leave blank.
◾ AGENCY CODE 1 – Enter a four-character Agency Code 1 or leave blank. If entered, it must exist in the D26 profile.
◾ AGENCY CODE 2 – Enter a four-character Agency Code 2 or leave blank. If entered, it must exist in the D27 profile.
◾ AGENCY CODE 3 – Enter a six-character Agency Code 3 or leave blank. If entered, it must exist in the D36 profile.
◾ STATUS CODE – Enter a
one-character Status Code. It will default to Active if not entered. It may be
used to inactivate records no longer in use.
|
A |
– |
Active |
I |
– |
Inactive |
◾ EFF START DATE – Enter the eight-digit Effective Start Date (MMDDYYYY format). It identifies when the record becomes effective. This field can be left blank; it will default to the current date and cause the record to be immediately available.
◾ EFF END DATE – Enter the eight-digit Effective End Date (MMDDYYYY format) or leave blank. EFF END DATE identifies when the record is no longer effective.
Example:
|
S024 UC: 10 STATE OF OREGON 04/04/14 11:00 AM |
|
LINK TO: INDEX CODE PROFILE PROD |
|
|
|
AGENCY: 110 APPN YEAR: 15 INDEX: 70100 |
|
|
|
TITLE: HS ADMINSTRATION |
|
|
|
ORG CODE: 7010 |
|
|
|
APPROP NUMB: FUND: AGCY BUD ORG LVL IND: 4 |
|
GRANT NO/PH: PROJECT NO/PH: CONVERTED CC: |
|
PCA: MPCODE: AGENCY CODE - 1: 2: 3: 00701 |
|
|
|
STATUS CODE: A |
|
EFF START DATE: 07012013 EFF END DATE: LAST PROC DATE: 04042014 |
|
Z06 RECORD SUCCESSFULLY RECALLED |
|
|
|
F1-HELP F3-DEL F5-NEXT F9-INT F10-SAVE F11-SAVE/CLEAR ENTER-INQ CLEAR-EXIT |
25
Agency Control Profile
The 25 profile is used to provide control at the agency level. Each agency may perform selected actions independent of other agencies. The 25 profile overrides the 97 – System Management Profile for Agency controlled actions. This profile is Agency maintained.
A 25 profile record is input each fiscal year for each agency and provides:
◾ Identification of valid agency/fiscal year combinations to be used to control certain system functions
◾ Cost allocation processing rules for that agency
◾ Identification of Billing Deficit Coding Blocks to accumulate expenditure overruns for billable projects
◾ Identification of default Coding Blocks to be used when the codes are not entered during transaction entry
◾ Reporting indicators used to generate periodic reports
◾ Level of document matching indicators for pre-encumbrance and encumbrance transactions
◾ Level and type of posting of objects in financial transactions
◾ Identification of financial closing dates for posting and reporting purposes
◾ Agency Budget posting information
Control Key
◾ AGENCY – Enter the three-character Agency Code. It must exist in the D02 profile.
◾ FISCAL YEAR – Enter a two-digit Fiscal Year to identify the year of the record being maintained.
Information
Elements
◾ COST ALLOCATION – Cost Allocation indicators identify when the cost allocation process is run. Refer to the related 22 and 23 profiles for a detailed explanation. Agencies that do not use Cost Allocation must leave this section blank. Cost Allocation indicators are used to monitor the status of cost allocation. These include
◾ RUN IND – Enter a one-character Run Indicator. It designates that an Agency is ready to run cost allocation. At the conclusion of the cost allocation process, this indicator will automatically reset to N. If RUN IND is Y, the LAST STEP RUN indicator is looked at to identify the next step ready for processing. If RUN IND is C, all steps (up to 9) of the allocation process will be generated.
Valid indicators are as follows:
|
Y |
– |
Run next step in cost allocation cycle |
◾ RUN TYPE – Enter a
one-character Run Type indicator. It identifies the method of cost allocation.
The Run Types include the following:
|
S |
– |
Standard Cost – The allocation is based
on the prior period’s expenditures. |
◾ NO STEPS – Enter a two-digit Number of Step Down allocations. It represents the total Number of Step Down allocations (up to 9) that will be required to complete the entire cost allocation process.
◾ LAST STEP – Enter a two-digit Last Step Run indicator. It identifies the last cost allocation step processed by R⋆STARS. This indicator is automatically increased by R⋆STARS when a Cost Allocation step is completed. If a cost allocation step is to be re-run, the last step must be reset to the step that is to be re-run. After the entire cost allocation process is completed and before the first step of the next process can be run, the Last Step Run Indicator must be set to 00.
◾ CA BY IDX – Enter a one digit
Cost Allocation (CA) By Index Code. It indicates if the cost allocation process
will include Index Codes. CA By Index of 3 posts the necessary (credit)
transactions to the original Index codes charged. If the CA By Index value is 1,
the Charge Index (the Index in the Control Key) and the Credit Index (in the 22
profile) must be 00000. If the value is 2 both the Charge and Credit
Index must be a valid Index in the 24 profile. If the value is 3
or 4, the Charge Index must be 00000. The Credit Index for value 3
is also 00000 and for value 4 it must be a valid Index in the 24
profile. Valid codes are as follows:
|
1 |
– |
No Index |
3 |
– |
With Charge Index |
◾ CA BY PROJ – Enter a one-digit
CA By Project indicator. It indicates if the cost allocation process should be
performed with or without regard to Project. This indicator determines whether
project/phase should be included in the distribution base and subsequently used
on the system generated charge transactions. Valid indicators are as follows:
|
1 |
– |
No Project |
2 |
– |
With Project |
◾ CA BY GRANT – Enter a
one-digit CA By Grant indicator. It indicates whether cost allocation is to be
performed with or without regard to Grant. This indicator determines whether
the grant/phase should be included in the distribution base and subsequently
used on the system generated charge transactions. Valid indicators are as
follows:
|
1 |
– |
Grant |
2 |
– |
With Grant |
◾ CA POST – Enter a one-digit CA
Posting indicator. It indicates if the transactions generated by Cost
Allocation will post to the R⋆STARS financial tables or
whether Memo only transactions will be generated. Valid indicators are
as follows:
|
Y |
– |
Post the transactions to the Financial Tables |
◾ CA RANGE – Enter a two-digit CA RANGE FROM and the two-digit CA RANGE TO if Run Type is R, otherwise leave blank. These indicate the fiscal months to be included in the Cost Allocation Run. Valid values are 01 through 13. If entered, CA RANGE FROM must not be greater than CA RANGE TO.
◾ CA TYPES – Enter up to ten one-character Cost Allocation Types that must exist in the 23 profile. If RUN IND = Y or C, at least one CA Type is required.
◾ BILLING DEF – The Billing Deficit Coding Block provides a single classification to accumulate billable project expenditures that would be billed if they did not exceed the billable budget amount. If an agency is not using Grant and/or Project Billing these elements should be blank.
Billing deficit classifications are generally used when an agency has multiple Indexes or PCAs charged to a Project with a billing method that limits billings to the billable budget (Billing Methods 3, 4, and 6 in the 27 profile). It is also used when rates are used to calculate billable amounts.
The default classifications maintained are Index, PCA, Comptroller Object, and Agency Object. The deficit balance is reduced when the budget is adjusted. Billing Deficit Coding blocks may only be changed when a new 25 profile record is established each year.
◾ IDX – Enter a five-digit Index Code or leave blank. If entered, must exist in the 24 profile.
◾ PCA – Enter a five-digit PCA code or leave blank. If entered, must exist in the 26 profile.
◾ EXP COMP OBJ – Enter a four-digit Expenditure Comptroller Object or leave blank. If entered, the comptroller object must exist in the D10 profile and have an Object Type = E. Required if Agency Object is entered.
◾ EXP AGY OBJ – Enter a four-digit Expenditure Agency Object or leave blank. If entered, the Agency Object must exist in the D11 profile.
◾ DEFAULT – Default Coding Blocks are used to identify specific elements to be posted to when the elements are not entered on the transaction input screen, are not looked up by other elements (such as Index or PCA), and are required by the 28A and 28B profiles.
Note: Either the Index or PCA entered in this segment must infer a fund to complete the account coding block. The default classifications maintained are Index, PCA, Comptroller Object and Agency Object.
◾ IDX – Enter a five-digit Index code or leave blank. If entered, it must exist on the 24 profile.
◾ PCA – Enter a five-digit default PCA code or leave blank. If entered, it must exist on the 26 profile.
◾ REV COMP OBJ – Enter a four-digit Revenue Comptroller Object or leave blank. If entered, it must exist on the D10 profile and have Object Type = R. It is required if Agency Object is entered.
◾ REV AGY OBJ – Enter a four-digit Revenue Agency Object or leave blank. If entered, it must exist on the D11 profile.
◾ REPORTING IND – These Reporting Indicators allow each agency to control the generation of their periodic reports. They are used to trigger the execution of reports identified as having a Frequency of Weekly, Monthly, Quarterly, or Annually in the 91 – Report Request Profile and a Frequency Control indicator equal A. Enter the Reporting Indicator value of Y – Run Reports, or N – Do not Run Reports for each of the Reporting Indicators: Week, Month, Quarter, Year. For the specific instructions for Frequency Control value S, see the 91 and 97 profiles.
◾ WEEK – Enter a Y or N. Y will automatically generate all report requests that have been established with a frequency of Weekly and a Frequency Control of A on the 91 profile.
◾ MONTH – Enter Y or N. Y will automatically generate all report requests which have been established with a frequency of Monthly and a Frequency Control of A, on the 91 profile.
◾ QUARTER – Enter a Y or N. Y will automatically generate all report requests which have been established with a frequency of Quartrly and a Frequency Control of A on the 91 profile.
◾ YEAR – Enter a Y or N. Y will automatically generate all report requests which have been established with a frequency of Annually and a Frequency Control of A on the 91 profile.
◾ DOCUMENT MATCH LEVEL INDICATORS – These indicators determine the match requirements between an original document setting up an expenditure and the document reducing that original document.
◾ PRE ENC – Enter the one-digit
Pre-Encumbrance Document Match Level code. It determines the coding elements on
a payment or encumbrance transaction liquidating a pre-encumbrance that must
match the coding elements on the original pre-encumbrance. The valid codes are
as follows:
|
0 |
– |
None – no match required. |
|
1 |
– |
Appropriation – the Appropriation Number only must match on both payment or encumbrance document and pre-encumbrance document. |
|
2 |
– |
All – match payment or encumbrance document coding to all input coding elements on the pre-encumbrance |
◾ ENC – Enter a one-digit
Encumbrance Document Match Level code. It determines the coding elements on a
payment transaction liquidating an encumbrance that must match the coding
elements posted on the original encumbrance. The valid codes are as follows:
|
0 |
– |
None – no match required. |
|
1 |
– |
Appropriation – the Appropriation Number only must match on both payment and encumbrance document |
|
2 |
– |
All – match payment document coding to all input coding elements on the encumbrance |
◾ non-ENC – Enter a one-digit
Non Encumbrance Document Match Level code as follows:
|
1 |
– |
All except vendor – match payment or liquidation document coding to all input coding elements on the transaction creating the document, except for vendor number and mail code. |
|
2 |
– |
All – match payment or liquidation document coding to all input coding elements on the transaction creating the document. |
◾ REDUCE AGENCY BUDGET INDICATORS – These indicators determine whether pre-encumbrances and/or encumbrances are included in the fund control edits for Agency Budgets.
◾ PRE ENC – Enter a
one-character Pre-Encumbrance Indicator as follows:
|
Y |
– |
Yes, reduce the Agency Budget |
◾ ENC – Enter a one-character
Encumbrance Indicator as follows:
|
Y |
– |
Yes, reduce the Agency Budget |
◾ COMP OBJ REQD ON D11 – Enter a
one-character Comptroller Object Required Indicator as follows:
|
Y |
– |
Yes, D10 Comptroller Object is required on D11
profile |
◾ FIXED ASSET IND – Not Used
in Oregon. Code N will be used as default for all 25
profiles. Enter a one-character Fixed Asset Ind as
follows:
|
Y |
– |
Yes, the agency is capturing fixed assets |
◾ THRESHOLD-CAP – Not Used in Oregon. Field will be blank for all 25 profiles. Enter a Threshold-Capitalization amount that does not exceed 999.99 and is greater than zero or leave blank. Required if Fixed Asset Ind = Y.
◾ THRESHOLD-INV – Not Used in Oregon. Field will be blank for all 25 profiles. Enter a Threshold-Inventory amount that does not exceed 999.99 and is greater than zero or leave blank. Required if Fixed Asset Ind = Y.
◾ CAPTURE – Not Used in Oregon.
Field will be blank for all 25 profiles. Enter the one character
Property Capture Code as follows:
|
F |
– |
Fixed Asset Subsystem |
This determines the point at which the property ID is required. The Capture Code is required if the Fixed Asset Ind = Y, but otherwise may be left blank.
◾ AGENCY OBJECT IND – Enter a
one-character D11 Agency Object Indicator. It determines if an agency
uses this optional code and, if so, for what classification of objects. If the
Agency Object Indicator R, an Agency Object will be required on all
revenue transactions. If the Indicator is E, all expenditure
transactions will require an Agency Object. If the Indicator is N, an
Agency Object is not allowed on any transaction. Valid indicators are as follows:
|
R |
– |
Revenue |
S |
– |
Statistical |
◾ LAST MONTH CLOSED – Enter a two-digit Last Month Closed value. This indicator and the next (LAST YEAR CLOSED) are used to indicate which period is closed. They prevent the posting of transactions based on effective date to a closed month/year. Valid fiscal month values are 00 through 13. Use 00 if no month has been closed for the fiscal year listed in the LAST YEAR CLOSED field.
◾ AGY BUD BY ORG IND – Enter a
one-character Agency Budget by Organization Indicator. It indicates if Agency
Budgets will be controlled by Organization. If this indicator is set to Y,
Index will be required on all transactions posting to the Agency Budget Financial
Table. Valid indicators are as follows:
|
Y |
– |
Yes, Agency Budget is controlled by Organization |
◾ AE LAST MONTH/YEAR PURGED – Enter a two-digit Month and Year that indicates the last date accounting transactions were deleted from the Inactive Accounting Event Table. Leave blank if transactions have not been purged.
◾ AGY BUD BY PGM IND – Enter a
one-character Agency Budget by Program Indicator. It indicates if Agency
Budgets will be controlled by Program. If this indicator is set to Y,
PCA or Appropriation Number referencing a program will be required on all
transactions posting to the Agency Budget Financial Table. Valid indicators are
as follows:
|
Y |
– |
Yes, Agency Budget is controlled by Program |
◾ REPORTING MONTH/YEAR – Enter a two-digit Month and the two-digit Year. They indicate the current month and year of reporting.
◾ LABOR RUN IND – Not Used in
Oregon. Code N will be used as default for all 25 profiles.
Enter a one-character Labor Run Indicator as follows:
|
Y |
– |
Yes, run the Labor Distribution Subsystem |
◾ INTEREST CALC RUN / MONTH – Enter
the one-character Interest Calculation Run indicator and a two-digit Month
Calculated Interest. The interest calculation run and month calculation
interest indicate whether interest will be calculated on a delinquent invoice
and if so, the month in which interest calculations begins. Valid indicators
for INTEREST CALC RUN are as follows:
|
Y |
– |
Yes, calculate interest on the delinquent documents |
The INTEREST CAL MONTH use the month values 01-12. This value will direct the system to the month in which interest calculations begin on the delinquent document. A valid month value must be entered if INTEREST CALC RUN is Y. Leave the Month field blank if INTEREST CALC RUN is N.
◾ COLLECTION TRANSFER RUN – Not
Used in Oregon. Code N will be used as default for all 25
profiles. Enter the one-character Collection Transfer Run as follows:
|
Y |
– |
Yes, the delinquent invoice will be transferred from accounts
receivable to the collections account |
◾ GRANT/PROJ BILLING RUN – Enter
a one-character Grant/Project Billing Run indicator. See Billing elements on 29
profile. This element will be ignored for billing methods 7 & 8
(daily billing for CMIA). It indicates that the agency is ready to run grant
and project billings. Valid indicators are as follows:
|
Y |
– |
Yes, run the Grant/Proj Billing
Subsystem |
◾ SGL ORG LVL IND – Enter a
one-digit Summary General Ledger Organization Level Indicator. It determines
the organizational level general ledger account data will be summarized. Valid
indicators are as follows:
|
1 |
– |
Post organization level 1 |
◾ STATUS CODE – Enter a
one-character Status Code. It will default to Active if not entered. It may be
used to inactivate records no longer in use.
|
A |
– |
Active |
I |
– |
Inactive |
◾ EFF START DATE – Enter the eight-digit Effective Start Date (MMDDYYYY format). It identifies when the record becomes effective. This field can be left blank; it will default to the current date and cause the record to be immediately available.
◾ EFF END DATE – Enter the eight-digit Effective End Date (MMDDYYYY format) or leave blank. EFF END DATE identifies when the record is no longer effective.
Example:
|
S025 UC: 10 STATE OF OREGON 04/04/14 11:09 AM |
|
LINK TO: AGENCY CONTROL PROFILE PROD |
|
|
|
AGENCY: 101 FISCAL YEAR: 14 |
|
COST RUN IND: RUN TYPE: NO STEPS: LAST STEP: |
|
ALLOCATION- CA BY IDX: CA BY PROJ: CA BY GRANT: CA POST: |
|
CA RANGE FROM: TO: CA TYPES: |
|
BILLING DEF- IDX: PCA: EXP COMP/AGY OBJ: |
|
DEFAULT- IDX: PCA: REV COMP/AGY OBJ: |
|
REPORTING INDS- WEEK: N MONTH: N QUARTER: N YEAR: N |
|
DOCUMENT MATCH LEVEL INDICATORS - PRE ENC: 1 ENC: 1 non-ENC: 1 |
|
REDUCE AGENCY BUDGET INDICATORS - PRE-ENC: N ENC: Y (Y OR N) |
|
COMP OBJ REQD ON D11: Y |
|
FIXED ASSET - IND: N THRESHOLDS - CAP: INV: CAPTURE: |
|
AGENCY OBJECT IND: B (R=REV, E=EXP, B=BOTH, N=NONE) |
|
LAST MONTH CLOSED: 00 AGY BUD BY ORG IND: N (Y OR N) |
|
AE LAST MONTH/YEAR PURGED: AGY BUD BY PGM IND: Y (Y OR N) |
|
REPORTING MONTH/YR: 10 14 LABOR RUN IND: N (Y,N OR A) |
|
INTEREST CALC RUN/MONTH: N COLLECTION TRANSFER RUN: N (Y OR N) |
|
GRANT/PROJ BILLING RUN: N SGL ORG LVL IND: 1 STATUS CODE: A |
|
EFF START DATE: 07012013 EFF END DATE: LAST PROC DATE: 04042014 |
|
Z06 RECORD SUCCESSFULLY RECALLED |
|
|
|
F1-HELP F3-DEL F5-NEXT F9-INT F10-SAVE F11-SAVE/CLEAR ENTER-INQ CLEAR-EXIT |
26
Program Cost Account
The 26 profile is used to identify the lowest level of program structure used by an agency. Through this Profile each agency can define its own accounting structure. Each program within the structure is assigned a unique Program Code. The Program Codes are defined in the D04 profile. Program Cost Accounts (PCAs) are coded only for the lowest level within the program structure. This profile is Agency maintained.
For each PCA, this profile defines the PCA type (i.e., direct or indirect) and the associated program hierarchy. The program hierarchy can be an unlimited number of levels for tracking expenditures and revenues, however, budgetary control is limited to a maximum of nine levels.
The 26 profile may be used to store optional codes such as Fund, Grant, Project, Agency Code 1, 2, and 3. This information can then be inferred when the PCA is used on an accounting transaction. The inferred information is then used to post to the R⋆STARS financial profiles.
If an Agency is planning to use cost allocation, the scheme for the PCA numbering convention must be considered. R⋆STARS Cost Allocation provides for the definition of up to five ranges of direct cost centers (PCAs). The size of the range is not restricted, but a Cost Allocation plan can impact the numbering convention required when defining direct cost centers (PCAs). It is recommended that an Agency define its cost allocation requirements prior to establishing PCA codes.
The following steps should be followed in establishing PCAs:
1. Determine the lowest level that program information must be recorded (this must be at least to the levels of appropriation). Prepare a program structure chart.
2. Assign a unique Program Code to each entity in the program structure, and create an entry in the D04 Profile for each Program Code defined.
3. Assign a PCA only at the lowest level of program.
4. Develop the indirect cost centers to be used in the cost allocation process, if used, and define them to a program structure and level.
5. Determine if the Appropriation Number, Fund, Grant/Phase, Project/Phase and/or other optional elements will be related to PCAs.
6. Ensure that related profile entries have been entered as required.
7. Determine at what program level the Agency Budget Program Level is to be posted and at what program level the Reporting level is to be reported. This must be equal to or lower than the appropriation level.
8. Code the Program Cost Account forms (if used) and enter them into the 26 Profile.
Control Key
◾ AGENCY – Enter the three-character Agency Code. It must exist in the D02 profile.
◾ APPN YEAR – Enter a two-digit Appropriation Year.
◾ PCA – Enter a five-digit PCA Number.
Information
Elements
◾ PCA TYPE – Enter a
one-character PCA Type that identifies the PCA as direct or indirect. Amounts
associated with indirect PCAs may be allocated to indirect and direct PCAs.
Amounts associated with direct PCAs may not be allocated. Refer to Chapter 15 of this guide for
additional information.
|
D |
– |
Direct (use this value for all PCAs if agency does not use Cost
Allocation) |
◾ TITLE – Enter a Title of up to 40 characters.
◾ PROGRAM CODE – Enter a four-digit D04 Program Code that identifies the lowest level of the program accounting structure to which the PCA relates. The Program Code must exist in the D04 profile.
◾ PCA GROUP – Enter a five-character PCA Group or leave blank. If entered, it must exist in the D19 – PCA Group Profile.
◾ AGCY BUD PGM LEVEL IND – Enter
a one-digit Agency Budget Program Level Indicator. It controls the posting of
the Program Code to the Agency Budget Financial Table therefore determining the
level of detail posted to the Agency Budget Financial Table as seen on the 61
screen. To ensure that transactions are not controlled at a program level
higher than the Appropriation Program level, this indicator must be set at a
level equal to or lower than the Appropriation Program level defined on the 20
profile. Valid indicators are as follows:
|
0 |
– |
No Program |
5 |
– |
Program Level 5 |
◾ FUNCTION CODE – Not Used in Oregon. Enter the four-digit Function Code or leave blank.
◾ AGY BUD FUNC LEVEL IND – Not
Used in Oregon. This indicator determines the level of function
structure which is posted to the Agency Budget Financial Table as seen on the 61
screen. Enter a one-digit Agency Budget Function Level as follows:
|
0 |
– |
No Function |
5 |
– |
Function Level 5 |
◾ NACUBO FUND – Not Used in Oregon. Enter the four-digit NACUBO Fund if Agency Type in D02 profile is H. NACUBO Fund must exist in D18 – NACUBO Fund Profile. If the Agency Type in D02 Profile is 0, leave blank.
◾ NACUBO SUBFUND – Not Used in Oregon. Enter the four-Digit NACUBO Subfund or leave blank. If entered, must exist in D38 NACUBO Subfund Profile, must also be the same in D18 NACUBO Fund Profile and Agency Type in the D02 profile must be H.
◾ APPN NUMB – Enter a five-digit Appropriation Number or leave blank. If entered, it must exist in the 20 profile.
◾ FUND – Enter a four-digit Fund or leave blank. If entered, it must exist in the D23 profile.
◾ INDEX – Enter a five-digit Index Code or leave blank. If entered, it must exist on the 24 profile.
◾ GRANT NO – Enter a six-digit Grant Number or leave blank. This identifies the Grant to which the PCA relates, if applicable. If entered, the Grant Number and Phase must exist in the 29 profile.
◾ GRANT PHASE – Enter a two-digit Grant Phase code, enter 00 or leave blank. This field must be entered if Grant Number is entered, and must be blank if Grant Number is blank. If entered, the Grant Number and Phase must exist in the 29 profile.
◾ PROJECT NO – Enter a six digit Project Number or leave blank. This identifies the Project to which the PCA relates, if applicable. This data element may be used to relate a PCA to a specific Work Authorization. If entered, the Project Number and Phase must exist in the 27 profile.
◾ PROJECT PHASE – Enter a two-digit Project Phase code, enter 00 or leave blank. It must be entered if Project Number is entered, and must be blank if Project Number is blank. If entered, the Project Number and Phase must exist in the 27 profile.
◾ RTI – Enter up to a six-character Recurring Transaction Index or leave blank. If entered, it must exist in the 550 – Recurring Transaction Profile.
◾ MPCODE – Enter up to a ten-character Multipurpose Code or leave blank.
◾ AGENCY CODE 1 – Enter a four-digit Agency Code 1 or leave blank. If entered, is must exist in the D26 profile.
◾ AGENCY CODE 2 – Enter a four-digit Agency Code 2 or leave blank. If entered, it must exist in D27 profile.
◾ AGENCY CODE 3 – Enter a five-digit Agency Code 3 or leave blank. If entered, it must exist in the D36 profile.
◾ GRANT REQ IND – Enter a
one-character Grant Required Indicator. It determines whether the user must
enter a grant/phase when using the PCA on a financial transaction. The default
is N. Valid indicators are as follows:
|
Y |
– |
Yes |
◾ PROJECT REQ IND – Enter a
one-character Project Required Indicator. It determines whether the user must
enter a project/phase when using the PCA on a financial transaction. Default is
N. Valid indicators are as follows:
|
Y |
– |
Yes |
◾ STATUS CODE – Enter a
one-character Status Code. It will default to Active if not entered. It may be
used to inactivate records no longer in use.
|
A |
– |
Active |
I |
– |
Inactive |
◾ EFF START DATE – Enter the eight-digit Effective Start Date (MMDDYYYY format). It identifies when the record becomes effective. This field can be left blank; it will default to the current date and cause the record to be immediately available.
◾ EFF END DATE – Enter the eight-digit Effective End Date (MMDDYYYY format) or leave blank. EFF END DATE identifies when the record is no longer effective.
Example:
|
S026 UC: 10 STATE OF OREGON 04/04/14 11:15 AM |
|
LINK TO: PROGRAM COST ACCOUNT PROFILE PROD |
|
|
|
AGENCY: 444 APPN YEAR: 15 PCA: 28282 |
|
|
|
PCA TYPE: D TITLE: INTERVENTION PRG CENTRAL ADMIN |
|
|
|
PROGRAM CODE: 1100 PCA GROUP: AGY BUD PRG LEVEL IND: 2 |
|
FUNCTION CODE: AGY BUD FUNC LEVEL IND: |
|
NACUBO FUND: NACUBO SUBFUND: |
|
APPN NUMB: 60222 FUND: 3122 INDEX: |
|
|
|
GRANT NO/PH: 141141 00 PROJECT NO/PH: RTI: |
|
MPCODE: AGENCY CODE - 1: 2: 3: 00440 |
|
|
|
GRANT REQ IND: Y PROJECT REQ IND: N |
|
STATUS CODE: A |
|
EFF START DATE: 07012013 EFF END DATE: LAST PROC DATE: 02132014 |
|
Z06 RECORD SUCCESSFULLY RECALLED |
|
|
|
F1-HELP F3-DEL F5-NEXT F9-INT F10-SAVE F11-SAVE/CLEAR ENTER-INQ CLEAR-EXIT |
27
Project control Profile
The 27 profile provides agencies with the flexibility to identify, account, and bill for projects and interagency agreements in R⋆STARS. This profile is Agency maintained.
The 27 profile maintains a variety of information for each Project and Phase. The Project Identification Section includes elements, which, when included in the profile, will reduce coding on project related transactions. Other indicators define the level used to post financial information to the Project Financial Table, the severity of budget control, and if billed, how and when the project will be billed. The billing area (buyer information) defines how the internal charge transaction to the buyer will be generated and what will be included on the transaction. The recovery area (seller information) defines how the recovery transaction to the seller will be generated for reimbursable projects. Included are all of the classification elements used to record revenue, expenditure reimbursement, and accounts receivable transactions.
For more information about projects in general, see Chapter 13 of this guide.
Control Key
◾ AGENCY – Enter the three-character Agency Number. It must exist in the D02 profile.
◾ PROJECT NO – Enter a six-character Project Number assigned to the Project. It must exist in D42 profile.
◾ PROJECT PHASE – Enter a two-digit Project Phase. If the project is not divided into Phases, enter zeros (00).
◾ AGENCY CODE 2 – Enter up to a four-digit Agency Code 2 or leave blank. If entered, it must exist in the D27 profile.
Information
Elements
◾ NOTE – Located in Upper Right Corner. This is Y or N value to indicate Yes, there is a note or No, there is not a note for a particular profile record. The default will be N and once a note has been generated, R⋆STARS sets the indicator to Y. The User can access the notepad by keying Note in the Link To field and pressing F9 (Interrupt) to start an active interrupt.
◾ TITLE – Enter a Title of up to 40 characters.
◾ PROJ TYPE – Generated by R⋆STARS. Project Type is identified on the D42 profile.
◾ CONTRACTOR/SFX – Enter a 10-digit Contractor and Contractor Suffix. If entered, it must exist in the 34 – Agency Vendor Profile or the 51 – Vendor Mail Code Profile. This field is for information only. It is not edited against the vendor number entered on the transaction.
◾ FINAL POST DATE – Enter an eight-digit Final Post Date (MMDDYYYY format) or leave blank.
◾ VALID PCAS – Enter up to 10 five-digit Valid PCAs or leave blank. If entered, each PCA must exist in the 26 profile. If left blank, all PCAs will be considered valid to be used in combination with this Project/Phase. This field is for information only. It is not edited against the PCA entered on the transaction.
◾ GRANT NO – Enter a six-character Grant Number or leave blank. The Grant Number and Phase (below) are used to associate a Grant/Phase with the Project/Phase. All budgetary, expenditure, and revenue transactions recorded against this Project/Phase will also post to the Grant Table for the referenced Grant/Phase. If entered, it must exist in the Agency’s 29 profile.
◾ GRANT PH – Enter a two-digit Grant Phase. It is required if Grant is entered, and must be blank if Grant No is blank. If entered, it must exist in the Agency’s 29 profile.
◾ AGENCY CODE 1 – Enter a four-digit Agency Code 1 or leave blank. If entered, it must exist in the D26 profile.
◾ SERV DATE CTL IND – Not
Used in Oregon. Code N will be used as default for all 27
profiles. Enter a one-character Serv Date Ctl Ind as follows:
|
Y |
– |
Yes, service dates of transactions must occur prior to the Final
Post Date defined in this profile |
◾ GEOGRAPHIC CODE – Enter a two-character Geographic Code or leave blank. If entered, it must exist in the D53 profile with a table ID of CAGC.
◾ SGL POST LVL IND – Enter a
one-digit Summary General Ledger Indicator. It provides the ability to maintain
a Project/Phase General Ledger and inquire on balance sheet accounts within
Project/Phase. Valid indicators are as follows:
|
0 |
– |
Do not post Project |
1 |
– |
Post Project only |
2 |
– |
Post Project and Phase |
◾ EXP POST LVL IND – Enter a one-character Expenditure Post Level Indicator. It controls the posting of the (expenditure) Object and Fund to the control key of the Project Financial Table. For example, if the value is 0, no Object or Fund information is posted to the control key of the Project Financial Table. These two elements (Object and Fund) would be blank. If a value is 1 the D10 Comptroller Object on the transaction is posted to the Project Financial Table and the Fund is blank. Note that project billable and expendable budgets (except Method 3) must be posted at the level of this indicator. When project budgets are not used, this indicator should be set at the level desired for on-line inquiry. All transactions are recorded at detail levels in the Accounting Event and General Ledger Tables.
Valid indicators are as follows:
|
0 |
– |
No Object |
A |
– |
D23
Fund and no Object |
◾ REV POST LEVEL IND – Enter a
one-digit Revenue Object Posting Level Indicator. It controls the posting of
the (revenue) Object to the control key of the Project Financial Table. Valid
indicators are as follows:
|
0 |
– |
No Object |
A |
– |
D23 Fund and no Object |
◾ PROJECT CTL TYPE – Enter a
one-digit Project Control Type indicator. When this indicator is set to 1,
expendable budgets must be entered to enable expenditure transactions to post
against the project. When set to 2, expendable budgets should be posted
to avoid the constant generation of warning messages. Budgets are entered in R⋆STARS
through the standard financial transaction data entry process. Valid indicators
are as follows:
|
0 |
– |
None. Expenditures or encumbrances greater than the Project Expendable Budget will not cause an error message. |
|
1 |
– |
Absolute/Fatal. Expenditures or encumbrances greater than the Project Expendable Budget will not be posted. A Fatal message will be issued. |
|
2 |
– |
Advisory/Warning. Expenditures or encumbrances that exceed the Project Expendable Budget will be posted. A warning message will be issued. |
◾ BILLING TYPE – Enter a
one-digit Billing Type as follows:
|
1 |
– |
Other Project – may be reimbursed externally. One Accounts Receivable transaction is reported at the Phase level if billed. Billing transactions are not automatically posted. Any billing cycle other than zero may be selected. |
|
2 |
– |
Capital Project – treated the same as Billing Type 1. |
|
4 |
– |
Interagency – may be reimbursed internally. If billed, one charge transaction and multiple recovery transactions are generated. Billing Cycles 0 or 1 may be used. |
|
5 |
– |
External Project – may be reimbursed externally. If billed, one charge and multiple recovery transactions are reported but not automatically posted. Any Billing Cycle may be selected. |
◾ BILLING METHOD – Enter a
one-digit Billing Method indicator. This indicator determines the Billing
Method to be applied to a particular project. This indicator may be changed
at any time. For example, a project originally set up as non-billable may be
changed to Billable at a later date by changing the Billing Method and Billing
Cycle to non-zero values. At that time, cumulative-to-date expenditures will be
billed. Values indicators are as follows:
|
0 |
– |
Project Not Billed is used for non-billable projects. These projects will not be selected for billing. |
|
1 |
– |
Standard Cost Per Unit billings are calculated by multiplying the Standard Billing Rate by the Total Units posted Project-to-Date and subtracting previously billed amounts. |
|
2 |
– |
Standard Percentage billings are calculated by multiplying the Standard Billing Rate (percentage) by the total Project-to-Date Expenditures and subtracting previously billed amounts. |
|
3 |
– |
Standard Cost Per Unit To Budget billings are calculated by multiplying the Standard Billing Rate times the project-to-date units. This method then bills the lower of the calculated bill less previously billed amounts or the billable budget less previously billed amounts. |
|
4 |
– |
Standard Percentage To Budget billings are calculated by multiplying the Standard Billing Rate (percentage) times project-to-date expenditures. This method then bills the lower of the calculated bill less previously billed amounts or the billable budget less previously billed amounts. |
|
5 |
– |
Actual billings are generated for the actual expenditures Project-to-Date less previously billed amounts. |
|
6 |
– |
Actual To Budget bills the lower of the billable budget less previously billed amounts or actual expenditures less previously billed amounts. |
◾ BILLING CYCLE – Enter a
one-digit Billing Cycle indicator. It tells the system when to bill a
particular project. Valid indicators are as follows:
|
0 |
– |
Project Not Billed – identifies projects that are not automatically billed. These projects may only be billed manually. |
|
1 |
– |
Automatic During Month Close – identifies the projects to be billed during the month closing process. All billable Interagency Agreements must be coded 1. |
|
2 |
– |
Automatic By Date – identifies projects to be billed automatically on a specific cycle or date. If a Cycle of 2 is used, the user must also specify the Cycle to be billed on the 92 Profile. |
◾ BILLING MMDD – Enter up to four dates (MMDD or DD) or leave blank. At least one field is required when the Bill Cycle equals 2. These fields allow up to four specific billing dates for a project by entering a month and a day (MMDD) for billing on certain dates, or just a day (DD) for monthly or weekly billing. Valid MM values are 01 through 12. Valid DD values are 01 through 31.
Examples are as follows:
|
|
MMDD1 |
MMDD2 |
MMDD3 |
MMDD4 |
|
Specific Date |
0928 |
|
|
|
◾ OBJ RANGE – Low and High – Enter a four-digit Object Range Low and High or leave both blank. The Range must be entered at the same level of the Expenditure Object Posting Level indicator. For example, if this indicator is set to 3, Agency Object Groups must be entered in the Range. For Billing Methods 1 and 3, this range identifies the statistical units (such as miles) to which to apply a Standard Rate. The Object Range Low and High are required. For Billing Methods 2 and 4, this range identifies the Objects that are to be billed using Standard Percentage Methods. For Billing Methods 5 and 6, this range is optional and is used to limit the Objects that will be billed.
◾ RATE – Enter an 11-digit Rate in 99999.99999 format. For example, 1.50000 is 150%. This field is required if the Billing Method equals 1, 2, 3 or 4. Otherwise, leave this field blank. This indicator specifies the Rate used to compute standard cost per unit that is used in Billing Methods 1 or 3 or the Standard Percentage that is used in Billing Methods 2 or 4.
◾ CUST NO/MC – Enter a 10-digit Customer Number and the three-digit Customer Mail Code or leave blank. They are used for billing externally reimbursed projects. If entered, they must exist in the 34 or 51 profiles.
◾ BILLING classification elements specify the classification used in the charge transaction to record billing activity. Additionally, they specify the data elements, which are printed on the Project Billed Detail Report – completed for Interagency Projects (Billing Type 4) only.
◽ AGENCY – Enter a three-character Agency Number. It identifies the requester Agency. This field is required when the Billing Type is 4 and the Billing Method is not 0, otherwise this field is optional.
◽ CUR DOC/SFX – Enter an eight-character Current Document Number and three-digit Current Document Suffix. When entered, the last three digits must be numeric. If the project is billed, the billing program increments the number by one each time a billing is generated.
◽ TC – Enter the three-digit Transaction Code. It must exist in the 28A and 28B profiles.
◽ INDEX – Enter a five-digit Index Code or leave blank. It identifies the Index to be charged. If entered, it must exist in the 24 profile if entered. Index or PCA is required for Billing Type 4.
◽ PCA – Enter a five-digit Program Cost Account number or leave blank. If entered, it must exist in the Buyer Agency’s 26 profile. Index or PCA is required for Billing Type 4.
◽ AY – Enter the two-digit Appropriation Year of the billing.
◽ COMP OBJ – Enter a four-digit Comptroller Object or leave blank. If entered, it must exist in the D10 profile. It is required for Billing Type 4.
◽ AGY OBJ – Enter a four-digit Agency Object or leave blank. If entered, it must be in D11 profile. It is required for Billing Type 4 for agencies using Agency Objects.
◽ FUND – Enter a four-digit Fund if it is not looked up by the Index or PCA. It must exist in the D23 profile.
◽ PROJ/PH – Enter a six-character Project Number and a two-digit Project Phase (or 00 when Phase is not used). These identify the Project and Phase to be charged during Project Billing if interagency expenditures are to be charged to another Project. If entered, the project must exist in the Buyer Agency’s 27 profile.
◽ GRANT/PH – Enter a six-character Grant Number and a two-digit Grant Phase (or 00 when Phase is not used). These identify the Grant and Phase to be charged if projects or work authorizations are to be charged to another Grant. If entered, the grant must exist in the Buyer Agency’s 29 profile.
◽ REF DOC/SFX – Enter an eight-character Reference Document Number and three-digit Reference Document Suffix. It identifies a previous document record to be matched. This will normally be the Encumbrance number.
◽ MP CODE – Enter a 10-character Multipurpose Code or leave blank.
◽ AGY CD 1– Enter a four-digit Agency Code 1 code or leave blank. If entered, it must exist in the Buyer Agency’s D26 profile.
◽ AGY CD 2 – Enter a four-digit Agency Code 2 or leave blank. If entered, it must exist in the Buyer Agency’s D27 profile.
◽ AGY CD 3 – Enter a five-digit Agency Code 3 or leave blank. If entered, it must exist in the Buyer Agency’s D36 profile.
◾ RECOVERY classification elements include the data to be used when building the transaction to record the revenue or expenditure reimbursement in the seller’s accounting records. For all billable projects, the Trans Code and COBJ are required. In addition to these elements, the Index or PCA is required for Billing Types 1, 2 and 5 when billable. This entire segment must be left blank if the Billing Method is 0.
◽ CUR DOC/SFX – Enter an eight-character Current Document Number and the three-digit Current Document Suffix or leave blank. If left blank, the system will generate a Current Document Number/Sfx on billing transactions. When entered, the last three digits must be numeric. If the project is billed, the billing program increments the number by one each time a billing is generated.
◽ TC – Enter a three-digit Transaction Code. If entered, it must be exist in the 28A and 28B profiles. It is required for billable projects.
◽ INDEX – Enter a five-digit Index Code of the account to be credited. Index or PCA is required for Billing Types 1, 2 and 5 when billable. Otherwise it is not allowed.
◽ PCA – Enter a five-digit Program Cost Account Code of the account to be credited. Index or PCA is required for Billing Types 1, 2 and 5 when billable. Otherwise it is not allowed.
◽ AY – Enter the two-digit Appropriation Year of the billing.
◽ COMP OBJ – Enter a four-digit Comptroller Object or leave blank. If entered, it must exist in the D10 profile.
◽ AGY OBJ – Enter a four-digit Agency Object Code or leave blank. If entered, it must exist in D11 profile.
◽ FUND – Enter a four-digit Fund Code if it cannot be looked up by the Index or PCA. If entered, it must exist in the D23 profile.
◽ REF DOC/SFX – Enter an eight-character Reference Document Number and the three-digit Reference Document Suffix Code.
◽ MP CODE – Enter a 10-character Multipurpose Code or leave blank.
◽ AGY CD 1 – Enter a four-digit Agency Code 1 or leave blank if Method = 0. If entered, it must exist in the D26 profile.
◽ AGY CD 2 – Enter a four-digit Agency Code 2 or leave blank if Method = 0. If entered, it must exist in the D27 profile.
◽ AGY CD 3 – Enter a six-digit Agency Code 3 or leave blank if Method = 0. If entered, it must exist in the D36 profile.
◾ RTI – Enter up to a six-character Recurring Transaction Index or leave blank. If entered, it must exist in the 550 profile.
◾ SPEC PURGE IND – Enter a one-character Special Purge Indicator of Y or N. This field is reserved for use with a future archive process.
◾ STATUS CODE – Enter a
one-character Status Code. It will default to Active if not entered. It may be
used to inactivate records no longer in use.
|
A |
– |
Active |
I |
– |
Inactive |
◾ EFF START DATE – Enter the eight-digit Effective Start Date (MMDDYYYY format). It identifies when the record becomes effective. This field can be left blank; it will default to the current date and cause the record to be immediately available.
◾ EFF END DATE – Enter the eight-digit Effective End Date (MMDDYYYY format) or leave blank. EFF END DATE identifies when the record is no longer effective.
Example:
|
S027 UC: 10 STATE OF OREGON 04/07/14 12:00 PM |
|
LINK TO: PROJECT CONTROL PROFILE NOTE: N PROD |
|
|
|
AGY: 631 PROJ NO/PH: 440095 00 AGY CD 2: |
|
TITLE: GRANT REVENUE |
|
PROJ TYPE: 2 CONTRACTOR/SFX: FINAL POST DATE: |
|
VALID PCAS: 13952 |
|
GRANT NO/PH: 011009 00 AGY CD 1: SERV DATE CTL IND: N GEOG CODE: |
|
SGL POST LVL IND: 2 EXP POST LVL IND: C REV POST LVL IND: C PROJ CTL TYPE: 0 |
|
BILLING TYPE: 5 METHOD: 0 CYCLE: 0 MMDD: 1 2 3 4 |
|
OBJ RANGE - LOW: HIGH: RATE: CUST NO/MC: |
|
|
|
BILLING - AGY: CUR DOC/SFX: TC: INDEX: |
|
PCA: AY: COMP/AGY OBJ: FUND: |
|
PROJ/PH: GRANT/PH: REF DOC/SFX: |
|
MP CODE: AGY CD - 1: 2: 3: |
|
RECOVERY - CUR DOC/SFX: TC: INDEX: PCA: |
|
AY: COMP/AGY OBJ: FUND: REF DOC/SFX: |
|
MP CODE: AGY CD - 1: 2: 3: |
|
RTI: SPEC PURGE IND: N STATUS CODE: A |
|
EFF START DATE: 07012013 EFF END DATE: 05312013 LAST PROC DATE: 03212014 |
|
Z06 RECORD SUCCESSFULLY RECALLED |
|
F1-HELP F3-DEL F5-NXT F6-D42 F9-INT F10-SAVE F11-SAVE/CLR ENTER-INQ CLEAR-EXIT |
28A
and 28B Transaction Code Profiles
The 28A and 28B profiles provide flexibility in defining how accounting events are to be recorded in R⋆STARS. DAS SFMS Operations maintains the Transactions Code (T-Code) Profiles.
A Transaction Code (T-Code) is a three-digit element that determines the accounting impact (debits and credits) of each financial transaction entered. Additionally, it determines which data elements are required, optional, or not allowed on each transaction. It is important to select the proper T-Code when entering transactions and to understand how the T-Code controls the transaction entry process.
T-Codes are established using the 28A and 28B profiles. The accounting event for every transaction entered/created is defined in these two profiles. A listing of all T-Codes may be requested with reports DAFQ28A0, DAFQ28B0, or DAFQ28C0. DAFQA010 lists T-Codes by D31 Comptroller General Ledger Accounts (Comp GLA) shown on the 28A profile. (All T-Codes that effect a specific Comp GLA may not be listed on this report as some T-Codes have blank Comp GLAs on the 28A Profile.)
28A Transaction
Code Decision Profile
The 28A profile consists of several distinct segments.
◾ The General Ledger Account segment of the profile is used to identify the D31 Comptroller General Ledger Account (Comp GLA) impact of the transaction. Up to four debit/credit pairs of Comp GLAs may be specified.
◾ The Transaction Edit Indicators segment of the profile is used to specify the data element coding requirements of an individual transaction.
◾ The Posting Sequence segment of the profile contains a variety of indicators that are used for system processing.
◾ The File Posting Indicators segment contains the rules for posting the transaction to the R⋆STARS financial tables. The indicators may be used to specify any Balance Type in the D05 – Balance Type Profile. However, care must be taken to ensure that the posting is consistent with the D31 Comp GLA being posted. R⋆STARS automatically edits the profile postings in the 28A profile against the profile posting requirements established in D31 profile to ensure they are consistent. For example, if the D31 profile is defined to post to a specific Balance Type in the Agency Budget Financial Table, then a T-Code posting to that Comp GLA can be defined to post to that specific Agency Budget Balance Type. Additionally, the same edits are performed when a Comp GLA is coded on the input accounting transactions, in cases where the 28A profile is set up to only post to one side of the debit/credit Comp GLA pair. The R⋆STARS financial tables which are impacted by accounting transactions are discussed in the R⋆STARS Reference Manual, Chapter 5.
There are several processes that are performed by the system when posting to key balances in the financial tables. These processes include:
◾ Encumbrance/Pre-encumbrance Postings – When posting to these D31 Comp GLAs in the financial tables, the system will use the computed liquidation amount if the account is coded in the fourth debit/credit pair.
◾ General Ledger Table – The posting to the General Ledger Table is automatic and cannot be specified.
◾ Accounting Event Table – The posting to this table is automatic and cannot be specified.
◾ Grant and Project Financial Tables – The posting to these tables is based on a combination of the table posting indicators and on the presence of a Grant or Project Number on the accounting transaction. Both must be present before a posting will occur. Therefore, if the transaction would normally post to the Grant or Project Financial Table, these indicators should always be coded.
In addition to determining the table to be posted, the file posting segment of the 28A profile determines:
◾ If the transaction is an increase or decrease to the normal balance.
◾ If the transaction requires a match (or a match is not allowed) to a previously entered record.
◾ The D31 Comp GLAs used to post the transaction.
◾ The document used to post the transaction (Current or Reference Document).
Control Key
◾ TRAN CODE – Enter a
three-digit Transaction Code. When assigning a T-Code, consideration should be given to how ranges are used in the D66 – User Class Profile Maintenance Profile.
The recommended ranges are as follows:
|
001 |
to |
099 |
Budgetary Transactions |
Information
Elements
◾ TITLE – Enter a Title of up to 40 characters.
◾ GENERAL LEDGER POSTING – Enter up to eight four-digit D31 Comp GLAs. Up to four pairs of debits and credits to D31 Comp GLAs can be entered to determine the General Ledger Accounting impact. The fourth pair is reserved for document liquidation – only pre-encumbrances, encumbrances and accounts receivable GL Accts may be coded here. Some T-Codes have one side of a debit / credit pair blank. The Comp GLA then has to be typed on the accounting transaction. If one part of a pair is blank, the GL Acct Edit Indicator (described below) must be set to I. The valid Comp GLA numbers for the transaction are listed on the corresponding 28B profile for the T-Code.
◾ TRANS EDIT INDS – Enter a
one-character Transaction Edit Indicator or leave blank for each of the below
listed elements. It controls whether data elements that impact a transaction
are Input, Required, Not allowed or optional (Blank) when doing data entry.
Valid values are as follows:
|
I |
– |
Required and must be input on the transaction: (the person entering the transaction must physically type in a value for this element or use F1 -HELP to access Help screens) |
|
R |
– |
Required on the transaction, but may either be typed in on input or looked up based on one of the other elements recorded on input. For example, PCAs may be set up to associate fund and appropriation number with program. |
|
N |
– |
Not allowed to be present on the accounting transaction regardless of whether the data element is typed in on input or looked-up from a system profile. |
|
Blank |
– |
Optional and may be typed in on input, looked-up from a profile or may be left blank. |
The Transaction Edit Indicators affect the following data
elements:
|
DOCD |
– |
Document Date is an informational field that allows a user to enter a date related to the document that represents the transaction. In Oregon, Document Date will be optional (blank) for most transactions. A possible use for it would be to input the date an order is placed. |
|
DUDT |
– |
Due Date is used to schedule payments/receipts for A/P and A/R transactions. For A/P, this date determines the date a warrant is to be written. For A/R, this date drives the A/R aging process. This element can be input, or, the system can calculate it by using the Effective Date and information from the 53 – Agency Document Control Profile. |
|
SVDT |
– |
Service Date is another informational date that can be used as needed by agencies. |
|
CDOC |
– |
Current Document Number is required to be input (I) on all transactions. The Document Number is a way to identify a transaction or a group of transactions. |
|
RDOC |
– |
Reference Document Number will be required (I) to be input for transactions that liquidate other transactions posted to the Document Financial (DF) Table. These include encumbrance/pre-encumbrance and billed accounts. For all other transactions, it is optional (blank) allowing agencies to reference another Document Number for informational purposes. |
|
MOD |
– |
The Modifier is the code used for liquidating an encumbrance or pre-encumbrance document. The logic for this indicator works from the DR-4/CR-4 pair of the General Ledger Posting Indicators. It enables R⋆STARS to liquidate an encumbrance/pre-encumbrance so that the document balance is zero. It can also be used to reactivate a previously closed or liquidated document. It must be input (I) when needed for these transactions. It is not allowed (N) for all other transactions. |
|
AGCY |
– |
Agency (D02) is required (R) but usually does not have to be input because it can be inferred from the user’s RACFID. |
|
IDX |
– |
Index (24) will be required (I) or (R) on an Agency by Agency basis depending upon each Agency’s Organization Structure and controls on the 25 profile. This allows agencies to decide how they want to use the coding structure. |
|
PCA |
– |
Program Cost Account (26) will be required (I) or (R) on an Agency by Agency basis depending upon each Agency’s Program Structure and controls on the 25 profile. This allows agencies to decide how they want to use the coding structure. |
|
COBJ |
– |
Comptroller Object (D10) is required (R) any time one of the DR/CR pairs in the General Ledger Posting Indicators contains a nominal account (such as revenue/expenditure control). Comptroller Object (COBJ) will not be required to be input because Agency Objects can look up Comptroller Objects. It will not be allowed unless a nominal account is in the DR/CR pair. The COBJ must be valid in the D10 profile. |
|
AOBJ |
– |
Agency Objects (D11) are optional (blank) if the COBJ is required. If the Agency is not using Agency Objects (AOBJ), the COBJ will be required for transactions that affect nominal accounts. If COBJ is not allowed (N), the AOBJ is not allowed (N). |
|
RVRS |
– |
Reverse Code allows the user to use a T-Code with an R. The R used on T-Codes will cause the general ledger and Financial Table postings to be the reverse of those shown on the 28A profile. For most transactions, the Reverse Code will be optional (blank). There are T-Codes that may not be reversed, such as the reimbursement of a suspense account by a receipted account. |
|
PDT |
– |
Payment Distribution Type (D50 – Payment Distribution Type Profile) identifies how R⋆STARS will combine transactions for warrants across documents or appropriated funds. This element is required (R) on Voucher Payable transactions and can be inferred from the 52 Profile. |
|
CI |
– |
Not Used in Oregon. Code N will be used as a default for all 28A Profiles. Capitalized Inventory Indicator relates to the fixed asset subsystem. Oregon did not implement this subsystem. |
|
1099 |
– |
The 1099 Indicator will be required (R) for disbursement transactions because it can be looked up from an object indicator on the D10 and 52 profiles. |
|
WARR |
– |
Warrant Number will be required (R) on certain payment transactions. It will be not allowed (N) for all other transactions. |
|
INVC |
– |
Invoice Number will be optional (blank) for most transactions. Agencies can enter an Invoice Number if they choose. The Invoice Number will display on the remittance advice. In revenue and receivable T-Codes, the invoice field on the 28A profile translates to the Deposit Number field on the 504 – Revenue/Receipts Transaction Entry Screen. |
|
VNUM |
– |
Vendor Number is required to be input on the establishment of all accounts payable and billed accounts receivable transactions. |
|
VNAM |
– |
Vendor Name can be inferred from the Vendor Number. |
|
VADD |
– |
Vendor Address can also be inferred from the Vendor Number. |
|
DMETH |
– |
Disbursement Method Indicator (DMI) is required (R) for payment processing. It identifies how disbursement transactions are processed. |
|
APN# |
– |
Appropriation Number (20) will be required (R) for most transactions. APN# can be looked up from the Index or PCA. True Treasury Suspense Accounts will not carry an Appropriation Number. |
|
FUND |
– |
The D23 Fund is required (R) and can either be input or inferred from the Index or PCA. This is the fund at the Agency level. |
|
GLA |
– |
Comptroller General Ledger Account (D31) is required to be input if either the DR or CR Comp GLA on the General Ledger Posting Indicators (DR/CR) pairs is blank. If the DR/CR pairs are complete (no blanks), Comp GLA is not allowed (N). |
|
AGL |
– |
Agency General Ledger (D32) will be optional (blank) if the D31 profile has an A in the GL Edit indicator field for one of the Comptroller GL DR/CR pairs. Agencies may elect to use AGL for specific purposes. Agency General Ledger in the form [agy][fund]0 will be required and must be input (I) if the D31 profile has a D in the GL Edit indicator field for one of the Comptroller GL DR/CR pairs. D Agency General Ledger accounts are not established in the D32 profile, but are entered on the transactions. If all the GL Edit indicators are S, the AGL indicator is not allowed (N). |
|
GRNT |
– |
Grant Number (29) will be optional (blank). Agencies will have Grant Numbers if they are using the Grant Structure to track specific sources of revenues, such as federal grants. This may be inferred by a PCA or Index. |
|
SUBJ |
– |
Subgrantee Number (31 Profile) will be optional (blank). Agencies may elect to use Subgrantees as part of the Grant Structure. |
|
PROJ |
– |
Project Number (27) will be optional (blank). Agencies will have Project Numbers if they are tracking revenue and expenditures for specific projects. A PCA or Index may infer the Project Number. |
|
MULT |
– |
Multipurpose Code is optional (blank). It may be used for informational purposes by agencies. For some budget transactions the Mult will be required (I) in order to automatically generate allotments. |
|
G38# |
– |
GASB 38 Transfer Number is entered when required (R) for reporting under GASB Statement 38 Para.14. It consolidates the Agency and the appropriate D23 fund elements. |
◾ Special Indicators – This segment of the 28A profile contains a variety of indicators that are used for special system processing. Oregon’s indicators include:
◽ POST SEQ – The Posting
Sequence is used for transactions posted in Batch Edit Mode 0 or 1. It
indicates the order in which R⋆STARS will post the
transactions within a batch. For example, a value of 1 will always post
before a value of 2, etc. Oregon’s posting sequence is as follows:
|
1 |
– |
Budget |
3 |
– |
Expenditures |
NOTE: The D53 Profile Table ID: BSOR determines which order batches are processed during a nightly batch cycle. The Posting Sequence Indicator on the 28A profile then determines the order transactions are processed within the batch.
◽ REG NO – Register Numbers are
set up in R⋆STARS and represent the transaction activity
register (control report) on which the transaction will appear. Oregon’s
register numbers are:
|
1 |
– |
Budgetary |
◽ WW IND – Warrant Writing
Indicator tells R⋆STARS if a warrant will be written from the
transaction. Valid values are:
|
0 |
– |
a warrant will not be written for the transaction |
◽ D/I – The Direct/Indirect Indicator field will have a D, I, or will be blank. All transactions entered by agencies are considered Direct. Transactions generated through the cost allocation subsystem are considered Indirect. If this is blank, the system assumes the transaction is Direct.
◽ WAR CNCL TC – The Warrant Cancellation Transaction Code field will contain a T-Code that will be used to cancel a written warrant. The Payment Processing Subsystem uses this field to generate cancellation transactions. SFMS Operations will initiate the system warrant cancellation transaction process.
◽ PYTC – Not used In Oregon. Enter a three-digit Prior Year Transaction Code or leave blank. If entered, must exist in 28A.
◽ FUTMY – Future/Month Year Indicator tells the system whether the transaction can be posted to a future month or year. Transactions such as budgets and encumbrances may be entered for future financial months or year. Valid values are Y yes or N no.
◽ GEN-TC – The Generate Transaction Code field determines if a second transaction is to be generated during the next batch cycle. A T-Code is entered here when four DR/CR pairs are not enough; when additional Balance Types need to be recorded; or when the generation of another transaction would reduce the overall number of T-Codes needed.
◽ DT – The (Generate) Document Type is the Document Type that will be used on the Generate Transaction Code (explained above) or Generate Accrual Transaction (explained below).
◽ ACCR TC – The (Generate) Accrual Transaction Code allows the user to enter the transaction. Then, on the first day of the next effective month, the system automatically reverses the transaction using the T-Code in this field. Note: On any given T-Code, there cannot be both a Generated Transaction Code and a Generate Accrual Transaction Code.
◽ TR TC – Not Used in Oregon. Enter a three-digit Treasurer’s Group Transaction Code or leave blank.
◽ INTERFACE IND – There are ten
Interface Indicator fields. Oregon is currently using two of them. The first
field (position) is a Treasury indicator. Not all T-Codes have a Treasury
indicator. This position indicator determines how and if the transaction
interfaces to the Treasury. Valid indicators for the first position are as
follows:
|
1 |
– |
Normal Interface to Treasury |
The second field (position) is the cash
reconciliation indicator. The cash reconciliation reports use this
indicator to separate and subtotal the different types of transactions. These
breakdowns then correspond to the reports Treasury produces for their indicator
types. Not all transaction codes need this indicator. Codes currently used are
as follows:
|
C |
– |
Warrant/Checks Cancelled |
◽ PAY LIQ TC – The Payment Liquidation Transaction Code field contains the T-Code generated by the Payment Processing Subsystem to liquidate the voucher payable and create a warrant.
◽ PAY RED TC – The Payment Redemption Transaction Code field contains the T-Code that will be generated when the warrant is redeemed at the bank.
◽ CUM POST IND – The Cumulative Post Indicator will be Y except when allocating encumbrance transactions. This determines if posting is to the current fiscal month only or if to the current fiscal month and all thereafter. A Y indicates that this transaction will post cumulatively to financial months. A value of N will post only to the month identified by the Effective Date on the transaction.
◽ BAL TC – The Balance Transaction Code designates the T-Code that must be entered in a second transaction in the same Batch and with the same Document Number to balance this transaction. T-Codes for transfers and Due To/From transactions will have a balancing T-Code.
◽ A/S DOC AMT – The Add/Subtract Amount will be either subtract (–) or add (+). This character sign indicates whether the transaction amount will be added or subtracted to calculate the Document Amount. This allows the Document Amount to be a net amount rather than an absolute value. If the transaction entered is reversed, this indicator will be reversed in the calculation of the Document Amount.
◾ File Posting Indicators – This segment of the 28A profile contains indicators that are used for posting to the Financial Tables. R⋆STARS stores financial information in Financial Tables for later retrieval. The T-Code determines the Financial Tables(s) to which the system will post a specific transaction. Though not listed on the 28A profile, each T-Code also posts to the General Ledger Table (GL), Summary General Ledger Table (GS), and Accounting Event Table (AE). With these tables, R⋆STARS maintains a complete audit trail. In addition to determining the financial field to be posted, this segment of the profile determines:
◽ If the transaction is an increase or decease to what Balance Type.
◽ If the transaction requires a match (or a match is not allowed) to a previously entered record in the table.
◽ The General Ledger Account used to post the transaction on the DF Table and the AGL.
◽ The document used to post the transaction (Current or Reference Document Number).
The Financial Tables listed on the 28A profile are:
|
DF |
– |
The Document Financial Table contains the balance of each outstanding pre-encumbrance, encumbrance, accounts receivable, and due to/from account. |
|
AP |
– |
The Appropriation Table contains appropriation, revenue, expenditure, and encumbrance balances. |
|
AB |
– |
The Agency Budget Table contains Agency budget, revenue, expenditure, and encumbrance balances. |
|
CC |
– |
The Cash Control Table contains the balance of available cash by fund. |
|
GP |
– |
The Grant Table contains the budgets, expenditures, and revenues of a grant. |
|
PJ |
– |
The Project Table contains the budgets, expenditures, and revenues of a project. |
In the File Posting Indicator segment of the 28A profile, there are ten columns (two sets) of indicators for each of the tables. This provides the ability to update the same table with two postings from one transaction. For example, an encumbrance can be liquidated and an expenditure recorded in the Appropriation Table (AP) by one transaction. These indicators are as follows:
◽ A/S – Indicates whether the amount of the transaction will be Added or Subtracted to the Financial Table amount.
◽ BT – Each Financial Table,
except the Accounting Event (AE) contains several Balance Types. The program
uses the Balance Types to accumulate all the financial data, regardless of
General Ledger Account. Balance Types for each table are
defined on the D05 – Balance Type Profile.
Some examples that are used on several tables include:
|
12 |
– |
Cash Revenue |
17 |
– |
Accrued Expenditures |
◽ MATCH – The Match Control
Table Posting Indicator is primarily used for the Document Financial (DF),
Appropriation (AP) and Agency Budget (AB) Tables to ensure that documents and
appropriations are correctly updated. For example, an encumbrance liquidation
must find the original encumbrance in the Document Financial Table (DF). Valid
values include:
|
M |
– |
Detail transaction must find a matching record |
◽ GLA – The Comptroller General
Ledger Account Posting Indicator determines which Comp GLA from the General
Ledger Posting section of the 28A profile will be used to post to the
designated table. This field is only used for the Document Financial Table (DF)
and Agency General Ledger (AGY GL). The values are as follows:
|
1 |
– |
DR-1 |
3 |
– |
DR-2 |
5 |
– |
DR-3 |
7 |
– |
DR-4 |
◽ DOC – The Posting Document
Number Indicator is only used with the Document Financial Table (DF). It
identifies which document number the system will use when posting to the DF
Table. Valid values are as follows:
|
1 |
– |
Current Document Number |
2 |
– |
Reference Document Number |
◽ AGY GL – The Agency General Ledger Account (AGL) determines which of the eight Comp GLAs above in the General Ledger Posting section will be supported by an AGL if entered on the transactions. The AGL contains a number 1 through 8 just like GLA above (corresponding to the four DR/CR pairs). If one of Comp GLA allows an AGL on their D31 profile (G/L Edit Type), the AGL above in the Transaction Edit Indicator segment will also have to be optional (blank) or input (I).
◾ STATUS CODE – Enter a
one-character Status Code. It will default to Active if not entered. It may be
used to inactivate records no longer in use.
|
A |
– |
Active |
I |
– |
Inactive |
◾ EFF START DATE – Enter the eight-digit Effective Start Date (MMDDYYYY format). It identifies when the record becomes effective. This field can be left blank; it will default to the current date and cause the record to be immediately available.
◾ EFF END DATE – Enter the eight-digit Effective End Date (MMDDYYYY format) or leave blank. EFF END DATE identifies when the record is no longer effective.
Example:
|
S28A UC: 10 STATE OF OREGON 04/04/14 11:44 AM |
|
LINK TO: TRANSACTION CODE DECISION PROFILE PROD |
|
|
|
TRAN CODE: 731 TITLE: QUASI-EXTERNAL REVENUE (A/R) |
|
GENERAL LEDGER DR-1: 0070 CR-1: 0501 DR-2: 3101 CR-2: 3100 |
|
POSTING DR-3: CR-3: DR-4: CR-4: |
|
TRANS DOCD DUDT SVDT CDOC I RDOC I MOD N AGCY R IDX PCA COBJ R |
|
EDIT AOBJ RVRS PDT N CI N 1099 N WARR N INVC VNUM R VNAM R VADD R |
|
INDS: DMETH N APN# R FUND R GLA N AGL GRNT SUBG PROJ MULT G38# N |
|
POST SEQ: 2 REG NO: 5 WW IND: 0 D/I: D WAR CANCL TC: PYTC: FUTMY: N |
|
GEN- TC: DT: ACCR TC: TR TC: INTERFACE IND: 1 T |
|
PAY LIQ TC: PAY RED TC: CUM POST IND: Y BAL TC: 730 A/S DOC AMT: + |
|
A/S BT MATCH GLA DOC A/S BT MATCH GLA DOC |
|
DF: + 03 M 2 2 + 04 M 2 2 |
|
FILE AP: + 12 – 14 |
|
POSTING AB: + 12 – 14 |
|
INDS: CC: + 12 |
|
GP: + 12 – 14 |
|
PJ: + 12 – 14 |
|
AGY GL: 2 STATUS CODE: A |
|
EFF START DATE: 04012014 EFF END DATE: LAST PROC DATE: 04022014 |
|
Z06 RECORD SUCCESSFULLY RECALLED |
|
|
|
F1-HELP F3-DEL F5-NEXT F6-28B F9-INT F10-SAVE F11-SAVE/CLEAR ENT-INQ CLEAR-EXIT |
28B Transaction
Code Description Profile
The 28B is essentially a page two of the 28A profile. Besides a free-form description of the T-Code, this screen defines what elements can be used with the T-Code:
Control Key
◾ TRANS CODE – Enter a three-digit Transaction Code. It must exist in the 28A profile.
Information Elements
◾ DESCRIPTION – Enter a description of the purpose of the T-Code on one or more of the five 50-character lines. There must be sufficient space available to describe all debit and credit GLA account codes listed on the 28A profile.
◾ GL I/E – Enter a one-character Comptroller General Ledger Include/Exclude Indicator (I for Include or E for Exclude) and up to ten Comp GLAs or Comp GLA ranges or leave these fields blank. Each range must be separated by commas and the ranges must be identified with a dash. If one of the debit or credit pairs is open (blank on the 28A profile), certain Comp GLAs or a range of values may be included or excluded here so that inappropriate entries are not made. This section would be empty if all pairs on the 28A profile have Comp GLAs.
◾ COMP OBJ I/E – Enter a one-character COBJ I/E Indicator (I for Include or E for Exclude) and up to ten four-digit D10 COBJs or COBJ ranges or leave blank. Each range must be separated by commas and the COBJ ranges must be identified with a dash. If COBJs are allowed per the 28A Profile’s Transaction Edit Indicator COBJ, the allowed COBJs or range of COBJs would be listed here as included. This section will be empty if COBJ is N.
◾ DOC TYPES – Enter up to ten two-character Document Types. The Document Type must exist in the 33 profile. A % in the first field means all Document Types are valid. If a % is placed in the first Document Type field, all other fields must be left blank. The Document Types define the first two characters of the Current Document Number.
◾ BATCH TYPES – Enter up to ten
one-character valid Batch Types. A % in the first field means all Batch
Types are valid. If a % is placed in the first batch type field, all
other fields must be left blank. Valid values are defined
in the D54 – System Parameters
Profile with Table ID BTYP. Batch Types are hard coded in
the system and determine the type of input screen that may be used for a
transaction. Some Batch Types are used exclusively for on-line financial entry
while others are system generated during batch processing. Examples of valid
Batch Types include:
|
1 |
– |
Budgetary |
5 |
– |
Journal Vouchers |
◾ TREAS CAT – Not Used in Oregon. Enter a two-character Treasury Category code or leave blank. This code is used by the output interface module.
◾ STATUS CODE – Enter a
one-character Status Code. It will default to Active if not entered. It may be
used to inactivate records no longer in use. On the 28B Profile this
code can show an A while the 28A Profile show an I. The
T-Code would be inactive.
|
A |
– |
Active |
I |
– |
Inactive |
◾ EFF START DATE – Enter the eight-digit Effective Start Date (MMDDYYYY format). It identifies when the record becomes effective. This field can be left blank; it will default to the current date and cause the record to be immediately available.
◾ EFF END DATE – Enter the eight-digit Effective End Date (MMDDYYYY format) or leave blank. EFF END DATE identifies when the record is no longer effective.
Example:
|
S28B UC: 10 STATE OF OREGON 04/04/14 11:46 AM |
|
LINK TO: TRANS CODE DESCRIPTION PROFILE PROD |
|
|
|
TRANS CODE: 731 (MUST BE IN 28A TRANSACTION CODE DECISION PROFILE) |
|
DESCRIPTION: RECORD THE RECEIPT ON ACCOUNTS RECEIVABLE FOR PYMT |
|
ON PURCHASE OF GOODS OR SVCS FROM ANOTHER AGENCY. |
|
USE W/TC730 AS A BAL ENTRY. IF NO A/R USE TC723. |
|
0070-CASH ON DEP W/TREAS;0501-A/R-OTHER-BILLED |
|
3101-REVENUE CTL-ACCRUE;3100-REVENUE CTL-CASH |
|
I/E (I=INCLUDE, E=EXCLUDE) ENTER GL ACCOUNT CODES SEPARATED WITH "-" OR ",". |
|
|
|
I/E (I=INCLUDE, E=EXCLUDE) ENTER COMPTROLLER OBJECTS SEPARATED WITH "-" OR ",". |
|
I 0111 - 1200 , 1501 - 1750 , 2000 - 2600 , |
|
|
|
ENTER UP TO 10 VALID DOC TYPES FOR THE TRANS CODE. ("%" IN #1 = ALL VALID) |
|
1: BT 2: BI 3: 4: 5: 6: 7: 8: 9: 10: |
|
ENTER UP TO 10 VALID BATCH TYPES FOR THE TRANS CODE. ("%" IN #1 = ALL VALID) |
|
1: G 2: 2 3: 4 4: 5: 6: 7 : 8: 9 : 10: |
|
TREAS CAT: STATUS CODE: A |
|
EFF START DATE: 04012014 EFF END DATE: LAST PROC DATE: 04022014 |
|
Z06 RECORD SUCCESSFULLY RECALLED |
|
|
|
F1-HELP F3-DEL F5-NEXT F6-28A F9-INT F10-SAVE F11-SAVE/CLEAR ENT-INQ CLEAR-EXIT |
29
Grant Control Profile
The 29 profile controls the grant cost accumulation and billing processes. It provides agencies with the flexibility to identify, account, and bill for grants in R⋆STARS. This profile is Agency maintained.
The 29 profile maintains a variety of information for each Grant and Phase. The Grant identification section includes elements, which, when included in the profile, will reduce coding on Grant related transactions. Other indicators define the level used to post financial information to the Grant Financial Table, the severity of budget control, and if billed, how and when the Grant will be billed. The recovery area defines the recovery transaction that is printed on the billing detail report. Included are the Transaction Code and classification elements used to record accounts receivable transactions.
For more information about grants in general, see Chapter 14 of this guide.
Control Key
◾ AGENCY – Enter the three-character Agency Code. It must exist in the D02 profile.
◾ GRANT NO – Enter a six-character Grant Number. It must exist in the D47 profile.
◾ GRANT PH – Enter a two-digit Grant Phase or enter zeros (00) if the Grant is not divided into Phases.
◾ AG CD 1 – Enter a four-digit Agency Code 1 or leave blank. If entered, it must exist in the D26 profile.
Information
Elements
◾ GRANT TYPE – system generated, two character field. Grant Type is identified on the D47 profile and is defined on the D35 – Grant Type Profile.
◾ TITLE – Enter a Phase Title of up to 40 characters.
◾ GEOGRAPHIC CODE – Not used in Oregon. Enter a two-character Geographic Code or leave blank. If entered, it must exist in the D53 profile with a table ID of CAGC.
◾ SGL POST LEVEL IND – Enter the
one-digit Summary General Ledger Post Level Indicator. It provides the ability
to maintain a Grant General Ledger and inquire on the balance sheet accounts
within a grant/phase. Valid indicators are as follows:
|
0 |
– |
Do not post Grant |
2 |
– |
Post Grant and Phase |
◾ LOC NO – Enter the 15-character Letter of Credit Number or leave blank. This field is used as the secondary sort (behind Agency) on the DAFR7870 Letter of Credit Draw Down Report.
◾ LOC AWARD NO – Enter the 15-character Letter of Credit Award Number or leave blank.
◾ EXP POST LEVEL IND – Enter a
one-character Expenditure Object Posting Level Indicator. It determines the
Expenditure Object and/or Fund level at which transactions are posted to the
Grant Financial Table. All transactions are recorded at the lowest level of
detail in the General Ledger Financial Table. This indicator controls the
posting of (expenditure) Object and Fund to the Grant Financial Table. For
example, if the value is 3 the grant object value (which is looked up
from the D10 Comptroller Object on the D48 profile) will be
posted to the control key of the Grant Financial Table. The Fund, Appropriated
Fund, Comptroller Object, and Agency Object fields would be blank. This would
control the grant by Grant Object. If the value is 0 the object and fund
fields of the Grant Financial Table are blank (control is without regard to
Object or Fund). Note that Grant billable and expendable budgets must be posted
at the level of detail identified by this indicator. When budgets are not used,
this indicator should be set at the level desired for on-line inquiry. The
valid indicators are as follows:
|
0 |
– |
No Object |
A |
– |
D23 Fund, No Object |
◾ REV POST LEVEL IND – Enter a one-digit Revenue Object Posting Level indicator. It identifies the level of Revenue Object at which a Grant will be posted in the Grant Financial Table. For example, if the value is 0 no Object information is posted to the control key Grant Financial Table. If the value is 1 the Comptroller Object on the transaction is posted to the control key of the Grant Financial Table. Valid indicators are identical to those for the EXP POST LEVEL IND.
◾ GRANT CTL TYPE IND – Enter a
one-digit Grant Control Type indicator as follows:
|
0 |
– |
None. Expenditures and encumbrances exceeding the expendable budget will not cause an error message |
|
1 |
– |
Absolute/Fatal. Expenditures or encumbrances greater than the expendable budget will not be posted. A Fatal message will be issued. |
|
2 |
– |
Advisory/Warning. Expenditures and encumbrances that exceed the expendable budget will be posted. A warning message will be issued. |
◾ CASH CTL POST IND – Enter a
one-character Cash Control Posting indicator. It determines whether the grant
structure is used to post to the Cash Control and Cash Balance (CB Not used
in Oregon) Financial Tables. For example, a value of N indicates
that the grant on the Cash Control and Cash Balance (CB Not used in Oregon)
Financial Tables will be blank (control is without regard to grant); whereas a
value of Y indicates that the grant will be posted to the Cash Control
and Cash Balance (CB Not used in Oregon) Financial Tables. Whether or
not the phase code is posted, is determined by the D47 profile Grant
Phase Budget Level indicator. Valid Cash Ctr Post
Indicators are as follows:
|
Y |
– |
Yes, exercise cash control for the Grant or Grant/Phase. |
◾ CASH CTL TYPE IND – Enter a
one-digit Cash Control Type indicator as follows:
|
0 |
– |
None. Over expended Grant cash will not be evidenced by an error message. |
|
1 |
– |
Absolute/Fatal. Expenditures and encumbrances greater than the available Grant Cash balance will not be posted. A fatal message will be issued. |
|
2 |
– |
Advisory/Warning. Expenditures and encumbrances that exceed the Grant Cash balance will be posted. A warning message will be issued. |
◾ PROJ NO/PH – Enter a six-character Project Number and the two-digit Project Phase or leave blank. The Project Number and Phase are used to associate a Project/Phase with the Grant/Phase. All budgetary, expenditure and revenue transactions recorded against this Grant/Phase will also post to the Project Table for the Project/Phase. If entered, it must exist on the 27 profile.
◾ AGY CD 2 – Enter a four-character Agency Code 2 code. If entered, it must exist in the D27 profile.
◾ SERV DATE CTL IND – Enter a
one-character Service Date Control Indicator as follows:
|
Y |
– |
Yes, service dates of transactions must occur prior to the Final
Post Date defined in this profile. |
◾ GRANT OBJ IND – Enter a
one-character Grant Object Indicator or leave blank. The Grant Object Indicator
determines what type of objects (Agency, Comptroller, or Grant) are being used
to manage this CMIA type grant. This indicator is only allowed for grants with
billing methods 7 and 8. For billing methods 7 and 8,
this indicator determines what types of objects may be entered in the 17
profile. For billing method 8, this indicator determines what types of
objects may be entered in the Object Ranges of this profile. Valid indicators
are as follows:
|
A |
– |
D11 Agency Objects |
◾ CONTRACTOR/SFX – Enter a 10-character Vendor ID Number and three-digit Mail Code of the primary contractor associated with this grant or leave blank. If entered, the Vendor Number and Mail Code must be defined in the 34 and 51 profiles.
◾ BILLING METHOD – Enter a
one-digit Billing Method indicator as follows:
|
0 |
– |
Grant Not Billed – Which is used for grants that do not require billing detail reports. Recovery Segment should be blank. |
|
1 |
– |
Standard Cost Per Unit – Billings are calculated by multiplying the Standard Billing Rate by the total units posted grant-to-date and subtracting previously billed amounts and advances made. |
|
2 |
– |
Standard Percentage – Billings are calculated by multiplying the Standard Billing Rate (percentage) by the total grant-to-date expenditures and subtracting previously billed amounts and advances made. |
|
3 |
– |
Standard Cost Per Unit to Budget – Billings are calculated by multiplying the Standard Billing Rate times the grant-to-date units. This method then bills the lower of the calculated bill less previously billed amounts or the billable budget less previously billed amounts and advances made. |
|
4 |
– |
Standard Percentage to Budget – Billings are calculated by multiplying the Standard Billing Rate (percentage) times grant-to-date expenditures. This method then bills the lower of the calculated bill less previously billed amounts or the billable budget less previously billed amounts and advances made. |
|
5 |
– |
Actual – Billings are generated for the actual expenditures grant-to-date less previously billed amounts and advances made. Billing Rate must be zero or blank. |
|
6 |
– |
Actual to Budget – Bills the lower of the billable budget less previously billed amounts or actual expenditures less previously billed amounts and advances made. Billing Rate must be zero or blank. |
|
7 |
– |
Auto Bill – Expenditures are selected that are final approved and charged to a grant for daily CMIA processing. If the grant category is subject to CMIA, then billing method must equal 7 or 8. |
|
8 |
– |
Auto Billing Plus Indirect – Expenditures plus indirect costs are selected that are final approved and charged to a grant for daily CMIA processing. If the grant category is subject to CMIA, then billing method must equal 7 or 8. |
◾ BILLING CYCLE – Enter a
one-digit Cycle indicator as follows:
|
0 |
– |
Grant Not Billed/Auto Bill – Grants Not Billed identifies grants that are not billed automatically for methods 1 through 6. These grants may only be billed manually. Auto Bill method bills grants automatically and is to be used when the billing method is 7 or 8. MMDD (1-4) must be blank. |
|
1 |
– |
(Non) Automatic During Month Close – Identifies the grants to be billed during the month closing process. MMDD (1-4) must be blank. Before month end close, agency needs to set the 92 and 25 profiles. If in current accounting month, the 92 = CM, if after month is over, then 92 = PM. |
|
2 |
– |
Automatic by Date – Identifies grants to be billed automatically on a specific cycle or date. If a cycle of 2 is used, the user must also specify the cycle to be billed on the 92 Grant/Project Billing Request Profile. MMDD is required. |
◾ BILLING MMDD (1-4) – Enter up
to four dates (MMDD or DD) or leave blank. At least one field is required when
the BILLING CYCLE equals 2. These fields allow up to four specific
billing dates for a grant by entering a month and a day (MMDD) for billing on
certain dates, or just a day (DD) for monthly or weekly billing. Valid MM
values are 01 through 12. Valid DD values are 01 through 31. Examples
are as follows:
|
|
MMDD1 |
MMDD2 |
MMDD3 |
MMDD4 |
|
Specific Date |
0928 |
|
|
|
◾ OBJECT RANGE LOW/HIGH – Enter a four-digit Object Range Low and High or leave both blank. For Billing Methods 1 and 3, this range identifies the statistical units (such as miles) to which to apply a Standard Rate. The Object Range Low and High are required. These objects must be in the D10, D11, or D48 profiles. For Billing Methods 2 and 4, this range identifies the Objects that are to be billed using Standard Percentage Methods. For Billing Methods 7 and 8, this range identifies the Objects that are to be billed using Auto Billing Methods. The Objects are optional for Billing Method 7 and required for billing method 8. For Billing Methods 5 and 6, this range is optional and identifies the Objects that will be billed. If used, maintain the Range at the Expenditure Object Posting Level indicator.
◾ RATE – Enter a 10-digit Rate in #####.#### format. It is required if Method equals 1, 2, 3, 4 or 8. It is not allowed if the Method is 0, 5, 6 or 7. How the rate is used depends on the Billing Method used. In Billing Method 1 or 3, the rate is used to compute Standard Cost Per Unit. In Billing Methods 2 or 4, the rate is the Standard Percentage. The rate is also used to compute the indirect costs for CMIA Auto Billing.
◾ COMP GLA TO INCLUDE – Enter up to 10 four-digit Billable General Ledger Accounts. Include at least one Billable D10 Comptroller General Ledger Account if billing Method is 7 or 8.
◾ CLEARANCE PATTERNS – Enter up to a four-character ( alpha/numeric) Clearance Pattern code or leave blank. If entered, it must exist in the 18 profile and can not exist in the 17 profile.
◾ RECOVERY SEGMENT – This portion of the Profile includes the data to be used on the transaction to record the revenue and accounts receivable for grant claims. For billable grants, the following recovery data must be coded: Current Document Number and Suffix, Transaction Code, Index, or PCA, and Comptroller Object or Agency Object. Note, though, if billing methods 7 or 8 are used, then the Current Document Number and Suffix must be left blank. The recovery segment information should be left blank if method 0 is chosen.
◽ CUR DOC/SFX – Enter an eight-character Current Document Number and the three-digit Suffix or leave blank. They are required if Grant is billable. When entered, the last three digits must be numeric. If the grant is billed, the billing program increments the number by one each time a billing transaction is billed. It is also required if methods 1 through 6 are selected. For Billing Methods 7 and 8, the Current Document Number/Suffix is generated by the CMIA billing process.
◽ TC – Enter a three-digit Transaction Code (T-Code) or leave blank. If entered, it must exist in 28A and 28B profiles. It is required if method 1 through 8 are selected. The commonly used T-Code records an accounts receivable and revenue billing. It is required if Grant is billable. This T-Code will appear on grant billing reports. The user must take care to select the appropriate T-Code when entering the receivable transaction into R⋆STARS.
◽ INDEX – Enter a five-digit Index code of the account to be credited or leave blank. Index or PCA is required if methods 1 through 8 are selected. If entered, it must exist in the 24 profile.
◽ PCA – Enter a five-digit Program Cost Account of the account to be credited or leave blank. Index or PCA is required if Methods 1 through 8 are selected. If entered, it must exist in the 26 profile.
◽ AY – Enter the two-digit Appropriation Year of the billing.
◽ COMP OBJ – Enter a four-character Comptroller Object or leave blank. If entered, it must exist in D10 Profile. Either the D10 Comptroller Object or the D11 Agency Object is required if Methods 1 through 8 are selected.
◽ AGY OBJ – Enter a four-digit Agency Object. If entered, it must exist in D11 profile. Either the D10 Comptroller Object or the D11 Agency Object is required if Methods 1 through 8 are selected.
◽ FUND – Enter a four-digit Fund if it is not looked up by the Index or PCA. It is required if Grant is billable. If entered, it must exist in the D23 profile.
◽ DESC – Enter a Description for the recovery of up to 30 characters.
◽ MPCODE – Enter a ten-character Multipurpose Code if method equals 1 through 8 or leave blank.
◽ AGY CD 1 – Enter a four-character Agency Code 1. If entered, it must exist in the D26 profile and Method must equal 1 through 8.
◽ AGY CD 2 – Enter a four-character Agency Code 2. If entered, it must exist in the D27 profile and Method must equal 1 through 8.
◽ AGY CD 3 – Enter a five-character Agency Code 3. If entered, it must exist in the D36 profile and Method must equal 1 through 8.
◾ FINAL POST DATE – Enter an eight-digit Final Post Date (MMDDYYYY format) or leave blank.
◾ RTI – Enter a six-character Recurring Transaction Index or leave blank. If entered, it must exist on the 550 profile.
◾ STATE MATCH % – Enter a six-digit State Match % or leave blank. Format is .#####.
◾ STATE MATCH AMOUNT – Enter a 13-digit State Match Amount or leave blank. Format is ###########.##.
◾ STATUS CODE – Enter a
one-character Status Code. It will default to Active if not entered. It may be
used to inactivate records no longer in use.
|
A |
– |
Active |
I |
– |
Inactive |
◾ EFF START DATE – Enter the eight-digit Effective Start Date (MMDDYYYY format). It identifies when the record becomes effective. This field can be left blank; it will default to the current date and cause the record to be immediately available.
◾ EFF END DATE – Enter the eight-digit Effective End Date (MMDDYYYY format) or leave blank. EFF END DATE identifies when the record is no longer effective.
Example:
|
S029 UC: 10 STATE OF OREGON 04/07/14 12:01 PM |
|
LINK TO: GRANT CONTROL PROFILE PROD |
|
AGENCY: 101 GRANT NO/PH: 809908 00 AG CD 1: GRANT TYPE: 04 (SYS-GEN) |
|
TITLE: MOTOR POOL GEOGRAPHIC CODE: |
|
SGL POST LEVEL IND: 2 LOC NO: LOC AWARD: |
|
EXP POST LEVEL IND: C REV POST LEVEL IND: C GRANT CTL TYPE IND: 0 |
|
CASH CTL POST IND: N CASH CTL TYPE IND: 0 PROJ/PH: AGY CD 2: |
|
SERV DATE CTL IND: N GRANT OBJ IND: CONTRACTOR/SFX: |
|
BILLING METHOD: 0 CYCLE: 0 MMDD: 1 2 3 4 |
|
OBJECT RANGE - LOW: HIGH: RATE: LOW: HIGH: RATE: |
|
1 00000.0000 2 00000.0000 |
|
3 00000.0000 4 00000.0000 |
|
5 00000.0000 CLEARANCE PATTERN: |
|
COMP GLA TO INCLUDE: |
|
* * * * * * RECOVERY SEGMENT * * * * * * |
|
CUR DOC/SFX: TC: INDEX: PCA: AY: |
|
COMP/AGY OBJ: FUND: DESC: |
|
MP CODE: AGY CD - 1: 2: 3: |
|
FINAL POST DATE: RTI: SPEC PURGE IND: N |
|
STATE MATCH%: .00000 STATE MATCH AMT: 00000000000.00 STATUS CODE: A |
|
EFF START DATE: 04012014 EFF END DATE: LAST PROC DATE: 04022014 |
|
Z06 RECORD SUCCESSFULLY RECALLED |
|
|
|
F1-HELP F3-DEL F5-NXT F6-D47 F9-INT F10-SAVE F11-SAVE/CLR ENTER-INQ CLEAR-EXIT |
30 Contract
Profile
The 30 profile is used to monitor contract expenditures to ensure that they do not exceed the contract budget. This profile is Agency maintained.
The DF Table was not used to monitor contract because multiple documents (encumbrances, pre-encumbrances, payables, and payments) may be related to a single contract. The Contract Financial (CF) Table maintains expenditure and encumbrance data. The budget amount is maintained on this Contract Profile.
Control Key
◾ AGENCY – Enter the three-character Agency Code. It must exist in the D02 profile.
◾ CONTRACT NO – Enter up to a ten-digit Contract Number.
Information
Elements
◾ AMENDMENT NO – Enter an eight-digit Amendment Number or leave blank.
◾ CHANGE NO – Enter a ten-digit Change Number or leave blank.
◾ TYPE – Enter a one-character Type or leave blank. An agency may want to establish groups of different contract types such as P (Personal Service Contracts), C (Construction Contracts), etc.
◾ COMP NO – Enter an eight-digit Comptroller Contract Number or leave blank. This is a number assigned by the Comptroller.
◾ DESCRIPTION – Enter a Contract Description of up to 5 lines.
◾ VENDOR NO/MC – Enter up to a 10-character Vendor Number and the three character Vendor Mail Code. The vendor mail code identifies the mailing address for the vendor. If leading or trailing blanks are input, the system left justifies and right blank-fills the Vendor Number. This Vendor Number and Mail Code must exist in the 51 Profile.
◾ NAME – The vendor’s name is looked up based on the VENDOR NO/MC.
◾ CONTACT – Enter up to a 20-character name of the Contact Person.
◾ EXPIRATION DATE – Enter an eight-digit Expiration Date (MMDDYYYY format) leave blank.
◾ RENEWAL DATE – Enter an eight-digit Renewal Date (MMDDYYYY format) or leave blank.
◾ CONTRACT AMOUNT – Enter up to a 14-digit Contract Amount.
◾ CONTINGENCY AMOUNT – Enter up to a 14-digit Contingency Amount or leave blank.
◾ RETAINAGE AMOUNT – Enter up to a 14-digit Retainage Amount or leave blank.
◾ BUDGET AMOUNT – Enter up to a 14-digit Budget Amount or leave blank.
◾ BUDGET CHECK IND – Enter a
one-character Budget Check Indicator. This determines whether expenditures and
outstanding encumbrances may exceed the Contract Budget. Valid indicators are
as follows:
|
Y |
– |
Yes, the budget will be checked. |
◾ REGISTER ID – Enter a 14-character Register Identification Request for Proposal code or leave blank.
◾ AWARD – Enter a ten-character Register Identification Award Code.
◾ AMEND – Enter a ten-character Register Identification Amendment Code or leave blank.
◾ CONTRACT STATUS – Enter a three-character Contract Status or leave blank. If entered, it must exist in the D53 profile with table ID of COST.
◾ STATUS CODE – Enter a
one-character Status Code. It will default to Active if not entered. It may be
used to inactivate records no longer in use.
|
A |
– |
Active |
I |
– |
Inactive |
◾ EFF START DATE – Enter the eight-digit Effective Start Date (MMDDYYYY format). It identifies when the record becomes effective. This field can be left blank; it will default to the current date and cause the record to be immediately available.
◾ EFF END DATE – Enter the eight-digit Effective End Date (MMDDYYYY format) or leave blank. EFF END DATE identifies when the record is no longer effective.
Example:
|
S030 UC: 10 STATE OF OREGON 04/04/14 11:57 AM |
|
LINK TO: CONTRACT PROFILE PROD |
|
|
|
AGENCY: 101 CONTRACT NO: 999999 |
|
AMENDMENT NO: CHANGE NO: TYPE: COMP NO: |
|
DESCRIPTION: DAS HEALTH CHECKS |
|
|
|
VENDOR NO/MC: 0000000000 000 |
|
NAME: BIG TOWN MEDICAL CENTER |
|
CONTACT: BOB HOPE EXP DATE: 06012003 RENEWAL DATE: |
|
CONTRACT AMOUNT: 00000000000.00 CONTINGENCY AMOUNT: |
|
RETAINAGE AMOUNT: |
|
BUDGET AMOUNT: 00000000000.00 BUDGET CHECK IND: Y |
|
REGISTER ID: AWARD: AMEND: |
|
CONTRACT STATUS: |
|
STATUS CODE: A |
|
EFF START DATE: 02032000 EFF END DATE: 12012002 LAST PROC DATE: 01152008 |
|
Z09 RECORD NOT FOUND - END OF FILE FOR AGENCY |
|
|
|
F1-HELP F3-DEL F5-NEXT F9-INT F10-SAVE F11-SAVE/CLEAR ENTER-INQ CLEAR-EXIT |
31
Sub Grantee Profile
The 31 profile establishes other agencies, localities, etc. who receive portions of pass-through grants as subgrantees, or in some cases subcontractors. In addition, a Grant Number and Phase may be entered in this profile for coding reduction purposes. This profile is Agency maintained.
A common requirement for governments receiving pass-through grants is to account for the advances made to subgrantees and the expenditures made by subgrantees. The R⋆STARS Reference Manual, Chapter 13, discusses Subgrant Accounting capabilities.
Control Key
◾ AGENCY – Enter the three-character Agency Number. It must exist in the D02 profile.
◾ SUBGRANTEE ID – Enter up to a 14-digit Subgrantee ID Code, which is greater than zero. The length of the subgrantee ID is the same length as the Vendor Number/Mail Code. This permits use of the same value for both the vendor and the subgrantee if desired.
Information
Elements
◾ NOTE – Located in Upper Right Corner. This is Y or N value to indicate Yes, there is a note or No, there is not a note for a particular profile record. The default will be N and once a note has been generated, R⋆STARS sets the indicator to Y. The User can access the notepad by keying Note in the Link To field and pressing F9 (Interrupt) to start an active interrupt.
◾ NAME – Enter up to a 40 character (numeric/alpha) Subgrantee Name.
◾ ADDR 1 – Enter Address 1 of up to 40 characters.
◾ ADDR 2 – Enter Address 2 of up to 40 characters or leave blank.
◾ ADDR 3 – Enter Address 3 of up to 40 characters or leave blank.
◾ CITY – Enter City of up to 20 characters.
◾ STATE – Enter a two-character State code.
◾ ZIP CD – Enter a nine-digit Zip Code. The first five digits must be greater than zero.
◾ CONTACT – Enter Subgrantee Contact of up to 30 characters.
◾ PHONE NO – Enter a ten-digit Subgrantee Contact Area Code and Phone Number or leave blank.
◾ SUBGRANTEE TYPE – Enter a
one-digit Subgrantee. The 90 profile Keyword DY8 lists the valid
codes:
|
1 |
– |
Federal |
3 |
– |
Local Government |
5 |
– |
Other |
◾ GRANT NO/PH – Enter a six-character Grant Number and a two-digit Grant Phase or leave blank. If entered, they must exist in the 29 profile.
◾ COMPLIANCE AUDIT DATE – Enter an eight-digit Compliance Audit Date (MMDDYYYY format)
◾ COMPLIANCE AUDIT STATUS – Enter a one-character Compliance Audit Status Code. If entered, it must exist in the D53 profile with a Table ID of CAST.
◾ REPORT DATES – Enter up to
four, four-digit Report Dates in one of the following formats:
|
MMDD |
– |
To identify the month and day reports are issued |
◾ LOCAL MATCH % – Enter a six-digit Local Match % or leave blank. Format is .#####.
◾ LOCAL MATCH AMOUNT – Enter a 13-digit Local Match Amount or leave blank. Format is ##########.##.
◾ AGY CD 1 – Enter a four-character Agency Code 1 code. If entered, it must exist in the D26 profile.
◾ STATUS CODE – Enter a
one-character Status Code. It will default to Active if not entered. It may be
used to inactivate records no longer in use.
|
A |
– |
Active |
I |
– |
Inactive |
◾ EFF START DATE – Enter the eight-digit Effective Start Date (MMDDYYYY format). It identifies when the record becomes effective. This field can be left blank; it will default to the current date and cause the record to be immediately available.
◾ EFF END DATE – Enter the eight-digit Effective End Date (MMDDYYYY format) or leave blank. EFF END DATE identifies when the record is no longer effective.
Example:
|
S031 UC: 10 STATE OF OREGON 04/04/14 12:00 PM |
|
LINK TO: SUBGRANTEE CONTROL PROFILE NOTE: N PROD |
|
|
|
AGENCY: 645 SUBGRANTEE ID: 0999 |
|
NAME: DBA TREASURE ISLANDER |
|
ADDR 1: 6083 NE GRAVELLY BLVD |
|
ADDR 2: J000 |
|
ADDR 3: |
|
CITY: PORTLAND STATE: OR ZIP CD: 97222 |
|
|
|
CONTACT: HUGO, VICTOR |
|
PHONE NO: 503 555 1234 SUBGRANTEE TYPE: 5 GRANT NO/PH: DL0000 00 |
|
|
|
COMPLIANCE AUDIT DATE: COMPLIANCE AUDIT STATUS: |
|
REPORT DATES: |
|
LOCAL MATCH %: .00000 LOCAL MATCH AMT: 00000000000.00 AGY CD 1: |
|
|
|
STATUS CODE: A |
|
EFF START DATE: 03011999 EFF END DATE: LAST PROC DATE: 01302014 |
|
Z07 NEXT RECORD SUCCESSFULLY READ |
|
|
|
F1-HELP F3-DEL F5-NEXT F9-INT F10-SAVE F11-SAVE/CLEAR ENTER-INQ CLEAR-EXIT |
33
Document Control Profile
The 33 profile allows the user to identify the required actions for each Document Type, defines the tracking and balancing rules for each Document Type, and defines payment tolerance limits. This profile provides on-line entry and inquiry of the processing rules for each type of document. DAS SFMS Operations maintains this profile.
Control Key
◾ DOCUMENT TYPE – Enter a two-character Document Type.
Information
Elements
◾ DESCRIPTION – Enter a Description of up to 40 characters.
◾ BALANCING INDICATOR – Enter a
one-character Balancing Indicator or leave blank. If the Balancing Indicator is
Y, the Document Amount must be entered on the financial transactions for
each document. In Oregon, Y will be used on all document types except
where tracking indicator is N. Valid indicators are as follows:
|
Y |
– |
The entered amount of the document must equal the computed
amount of the document to give final approval to this document. |
This is a required field when the Tracking Indicator is Yes. Otherwise, this field must be blank.
◾ TRACKING INDICATOR – Enter a
one-character Tracking Indicator. Valid indicators are as follows:
|
Y |
– |
Yes, tracking is required on this document type. |
◾ REQ APPROVAL ACTION – Not Used in Oregon. Enter up to 20 three-digit Action codes required for the Document Type. Action Codes when entered must exist in the D44 – Action Code Profile using Agency 000. Connectors and Action Codes must be entered contiguously; embedded blank action codes or connectors are not allowed. The connector identifies any groups of action codes if applicable. For Example:
01 100 01 050 02 111 03 201 04 002
Connector 01 identifies that Action Code 100 or 050 is required, while Action Codes 111, 201 and 002 are all required.
◾ NORMAL HR – Not Used in Oregon. Enter up to 20 three-digit Normal Hours or leave blank. Normal Hours are not required for each Action Code. However, an action code is required for each Normal Hours status. If entered, the Normal Hours represents the acceptable number of hours a document should remain in the status identified by its Action Code.
◾ CONTROL AGY – Not Used in Oregon. Enter a three-digit Control Agency Action Code if Control Agency approval is required for this Document Type or leave blank. If entered, it must exist in the D44 Profile. If entered, there must be a "Threshold Amount" entered also.
◾ THRESHOLD AMOUNT – Not Used in Oregon. User must enter a Threshold Amount if Control Agency is entered. Otherwise, leave blank. For a document type that requires a Control Agency Action Code, the document amount will be compared to the Threshold Amount. If the Document Amount meets or exceeds the Threshold Amount, then the Control Agency's Action Code will be required for that document to be approved for processing. When the field is left blank, the system populates the entire field with zeros and a decimal point.
◾ LOW NORMAL $ AMT – Not Used in Oregon. Enter up to 13 digits with two digits of decimal places of Low Normal $ Amount or leave this field blank. The Low Normal $ Amount provides exception reporting for those documents that do not meet a minimum $ amount. When the field is left blank, the system populates the entire field with zeros and a decimal point.
◾ HIGH NORMAL $ AMT – Not Used in Oregon. Enter up to 13 digits with two digits of decimal places of High Normal $ Amount or leave this field blank. The High Normal $ Amount provides exception reporting for those documents that exceed a maximum $ amount. When the field is left blank, the system populates the entire field with zeros and a decimal point.
◾ TOLERANCE $ – Not Used in Oregon. Enter up to four digits or leave blank the Tolerance Dollar Amount. All zeros in this field is acceptable. The Tolerance Dollar Amount establishes liquidation tolerance limits for encumbrances and pre-encumbrances (e.g., if an encumbrance is entered for $100 and the tolerance is $50 (0050), the encumbrance cannot be paid for more than $150).
◾ TOLERANCE % – Not Used in Oregon. Enter up to four digits or leave blank. This field when entered, must be in #.## format. Zeros entered 0.00 in this field are acceptable. The Tolerance Percentage establishes liquidation tolerance limits for encumbrances and pre-encumbrances (i.e., if an encumbrance is entered for $100 and the tolerance is 10% (0.10), the encumbrance cannot be paid for more than $110). When the field is left blank, the system populates the entire field with zeros and a decimal point.
◾ STATUS CODE – Enter a
one-character Status Code. It will default to Active if not entered. It may be
used to inactivate records no longer in use.
|
A |
– |
Active |
I |
– |
Inactive |
◾ EFF START DATE – Enter the eight-digit Effective Start Date (MMDDYYYY format). It identifies when the record becomes effective. This field can be left blank; it will default to the current date and cause the record to be immediately available.
◾ EFF END DATE – Enter the eight-digit Effective End Date (MMDDYYYY format) or leave blank. EFF END DATE identifies when the record is no longer effective.
Example:
|
S033 UC: 10 STATE OF OREGON 04/04/14 01:06 PM |
|
LINK TO: DOCUMENT CONTROL PROFILE PROD |
|
|
|
DOCUMENT TYPE: EE |
|
DESCRIPTION: ENCUMBRANCE (non-ADPICS) |
|
BALANCING INDICATOR: Y (Y/N) |
|
TRACKING INDICATOR: Y (Y/N) |
|
REQ APPROVAL ACTION: |
|
|
|
NORMAL HR: |
|
|
|
CONTROL AGY: THRESHOLD AMOUNT: 00000000000.00 |
|
|
|
LOW NORMAL $ AMT: 00000000000.00 HIGH NORMAL $ AMT: 00000000000.00 |
|
TOLERANCE $: (FORMAT 9999; BLANK MEANS NO CONTROL) |
|
TOLERANCE %: 0.00 (FORMAT 9.99; BLANK MEANS NO CONTROL) |
|
STATUS CODE: A |
|
EFF START DATE: 03022014 EFF END DATE: LAST PROC DATE: 03022014 |
|
Z06 RECORD SUCCESSFULLY RECALLED |
|
|
|
F1-HELP F3-DEL F5-NEXT F9-INT F10-SAVE F11-SAVE/CLEAR ENTER-INQ CLEAR-EXIT |
34
Agency Vendor Profile
The 34 profile is used to view agency-defined vendor information for accounts receivable only. The Vendor Profile control key specifically identifies each vendor by Vendor Number and Mail Code. The Vendor Number is used to uniquely identify the vendor associated with a transaction. The Mail Code identifies the mailing address. Therefore, a single vendor with multiple mailing addresses may appear in the Vendor Profile multiple times. This profile is Agency maintained.
Control Key
◾ AGENCY – Enter the three-character Agency Code. It must exist in the D02 profile.
◾ VENDOR NO/MAIL CODE – Enter up to a ten-character Vendor Number and a three-digit Vendor Mail Code. This identifies each vendor by a unique number. The Vendor Mail Code identifies multiple mailing addresses for a single vendor. If leading or trailing blanks are input, R⋆STARS left justifies and right blank-fills the Vendor Number. The first digit of the Vendor Number must be 0(zero). The following digits can be the agency’s choice.
Information
Elements
◾ VENDOR TYPE – Enter a
one-digit Vendor Type:
|
1 |
– |
Employee |
4 |
– |
Local Government |
6 |
– |
Vendor-Individual |
◾ UPDATE REASON CODE – Enter up to a four-character Update Reason Code if the Vendor Name or any part of the vendor address is changed. The Update Reason Code entered must be defined in the D53 profile with Table ID VURC.
◾ VENDOR NAME – Enter a Vendor Name of up to 50 characters (first name first).
◾ ALT NAME – Enter up to twenty characters for the Alternate Name. The first three characters must not be blank. This field is used to prepare a listing of vendors in alphabetical order such as on the 3A – Vendor Alpha Inquiry Screen. Vendor Name is not used in the alphabetical sort of the Vendor File. See instructions for Search Name in the 51 profile.
◾ ALT # – Enter up to 10 characters to identify the Alternate Customer Number. This alternate number will be used for the accounts receivable transactions when matching Accounts Payable. In Oregon, this should be the same number established for the Vendor Number in the 52 profile.
◾ ADDRESS1 – Enter Address line 1 of up to 50 characters. This field is required and is normally used to contain the first line of the vendor address. See recommendations for coding the address fields in the 51 profile.
◾ ADDRESS2 – Enter Address Line 2 of up to 50 characters or leave blank.
◾ ADDRESS3 – Enter Address Line 3 of up to 50 characters or leave blank.
◾ ADDRESS4 – Enter Address Line 4 of up to 50 characters or leave blank.
◾ CITY – Enter City of up to 20 characters.
◾ STATE – Enter a two-character State abbreviation. All of the valid state abbreviations are stored in the 90 profile with the keyword STATE. If the vendor is not one of the 50 states or District of Columbia, the state code should be XX.
◾ ZIP CODE – Enter a nine-digit Zip Code. The first five digits are required; the last four are optional. This field may be used for foreign zip codes (alphanumeric) when e3wcountry is not USA.
◾ COUNTRY – Enter a Country of up to 20 characters or leave blank.
◾ PHONE – Enter an Area Code and Phone Number.
◾ OWNERSHIP CODE – Enter a
one-character Ownership Code as follows:
|
E |
– |
State Employee |
O |
– |
Corporation |
◾ TAX OFFSET EXEMPT – Enter a
one-character Tax Offset Exempt Indicator. Valid indicators are as follows:
|
Y |
– |
Vendor is exempt from tax offset |
◾ HOLD REASON CODE – Enter a three-character Hold Reason Code. It is used to identify vendors that owe money to the state. Must be in D53 profile with Table ID 5200.
◾ PAYMENT DISTRIBUTION TYPE – Enter a two-character PDT. It must exist in the D50 profile. The PDT indicates how the vendor usually receives payments and how payments are consolidated.
◾ 1099 IND – Enter a
one-character 1099 Indicator. It identifies whether the vendor is subject to
1099 Reporting. Since the 34 profile is used for accounts receivable
only, 1099 report is not triggered by this flag. Valid indicators are as follows:
|
N |
– |
1099 Exempt vendor |
◾ FEI/SSN IND – Enter a
one-character FEI/SSN Indicator that identifies if the Vendor Number is a
Federal Employer Identification number or an individual's Social Security Number.
The valid indicators are as follows:
|
F |
– |
Federal ID Number |
◾ BANK INFORMATION (Not used on this screen) can only be viewed or maintained by personnel with appropriate Security authorization. If the user does not have authorization for these fields, the fields are not shown on the screen. If the View Bank Info Indicator on the 96A Profile is blank, the four fields (ABA NUMBER, DIRECT DEPOSIT EFF DATE, ACCOUNT NO/TYPE) are not displayed. If the indicator is set to Y, bank information is displayed.
◾ ABA NUMBER – Enter a nine-digit ABA Number or leave blank. It is required if the PDT has a Payment Method Code of D (Direct Deposit) in the D50 profile.
◾ DIRECT DEPOSIT EFF DATE – Enter an eight-digit Direct Deposit Effective Date (MMDDYYYY format) or leave blank. It is required if the PDT has a Payment Method Code of D (Direct Deposit) in the D50 profile..
◾ ACCOUNT NO/TYPE – Enter a 17-digit Bank Account Number and a two-digit Bank Account Type or leave blank. Both fields are required if the PDT has a Payment Method Code of D (Direct Deposit) in the D50 profile.
◾ BU/WH EFF DATE – (Not used on this screen) Enter an eight-digit Backup Withholding Effective Date (MMDDYYYY format) or leave blank. This indicates when backup withholding began. If the date indicated is in the future, backup withholding will begin on that date.
◾ W9 REQUEST DATE – (Not used on this screen) Enter an eight-digit W9 Request Date (MMDDYYYY format) or leave blank. It indicates the date the W9 was sent to a vendor because the IRS indicated problems with the 1099 issued.
◾ STATUS CODE – Enter a
one-character Status Code. It will default to Active if not entered. It may be
used to inactivate records no longer in use.
|
A |
– |
Active |
I |
– |
Inactive |
◾ EFF START DATE – Enter the eight-digit Effective Start Date (MMDDYYYY format). It identifies when the record becomes effective. This field can be left blank; it will default to the current date and cause the record to be immediately available.
◾ EFF END DATE – Enter the eight-digit Effective End Date (MMDDYYYY format) or leave blank. EFF END DATE identifies when the record is no longer effective.
Example:
|
S034 UC: 10 STATE OF OREGON 04/04/14 01:09 PM |
|
LINK TO: AGENCY VENDOR PROFILE PROD |
|
|
|
AGENCY: 101 |
|
VENDOR NO/MAIL CODE: 0000000000 000 VENDOR TYPE: 7 UPDATE REASON CODE: CHG |
|
VENDOR NAME: WATER RESOURCES\ LOAN PROGRAM |
|
ALT NAME: WATER RESOURCES LOAN ALT #: 0000000000 |
|
ADDRESS1: ATTN: MIKE MEYERS |
|
ADDRESS2: 725 SUMMER ST NE SUITE A |
|
ADDRESS3: |
|
ADDRESS4: |
|
CITY: SALEM STATE: OR ZIP CODE: 97301 4172 |
|
COUNTRY: PHONE: |
|
OWNERSHIP CODE: TAX OFFSET EXEMPT: HOLD REASON CODE: |
|
PAYMENT DIST TYPE: 1099 IND: FEI/SSN IND: |
|
|
|
BU/WH EFF DATE: |
|
W9 REQUESTED DATE: |
|
STATUS CODE: A |
|
EFF START DATE: 01112012 EFF END DATE: LAST PROC DATE: 01152014 |
|
Z06 RECORD SUCCESSFULLY RECALLED |
|
|
|
F1-HELP F3-DEL F5-NEXT F9-INT F10-SAVE F11-SAVE/CLEAR ENTER-INQ CLEAR-EXIT |
36
Vendor Amount Limit Profile (Not Used in Oregon)
The 36 profile is used by the Payment Processing Subsystem. DAS SFMS Operations maintains this profile.
Control Key
◾ VENDOR NO/MAIL CODE – Enter a ten-digit Vendor Number and a three-digit Mail Code. The Vendor Number identifies each vendor by a unique number. The Vendor Mail Code identifies multiple mailing addresses for a single vendor.
Information
Elements
◾ VENDOR NAME – This is system generated from the Vendor No/Mail Code. Up to 50 characters are displayed for the Vendor Name.
◾ AGENCY – Enter a three-character Agency Code. It must exist in the D02 profile.
◾ AMOUNT LIMIT – Enter up to an eight-digit Amount Limit. Only whole numbers are allowed.
◾ STATUS CODE – Enter a
one-character Status Code. It will default to Active if not entered. It may be
used to inactivate records no longer in use.
|
A |
– |
Active |
I |
– |
Inactive |
◾ EFF START DATE – Enter the eight-digit Effective Start Date (MMDDYYYY format). It identifies when the record becomes effective. This field can be left blank; it will default to the current date and cause the record to be immediately available.
◾ EFF END DATE – Enter the eight-digit Effective End Date (MMDDYYYY format) or leave blank. EFF END DATE identifies when the record is no longer effective.
Example:
|
S036 UC: 10 STATE OF OREGON 04/04/14 01:16 PM |
|
LINK TO: VENDOR AMOUNT LIMIT PROFILE PROD |
|
|
|
VENDOR NO/MAIL CODE: |
|
VENDOR NAME: |
|
AGENCY: (MUST BE IN D02 PROFILE) |
|
AMOUNT LIMIT: |
|
|
|
STATUS CODE: A |
|
EFF START DATE: 04042014 EFF END DATE: LAST PROC DATE: 04042014 |
|
Z08 RECORD NOT FOUND – END OF FILE |
|
|
|
F1-HELP F3-DEL F5-NEXT F9-INT F10-SAVE F11-SAVE/CLEAR ENTER-INQ CLEAR-EXIT |
43M
On‑Line 1099 Miscellaneous Summary Profile
The purpose of this profile is to provide the ability to view 1099‑M summary transactions for a 1099 reportable vendor loaded to R⋆STARS DAFTIM 1099‑M Vendor Summary Table through the DAFJ793 program. Additionally, it provides the ability to change the amounts in each of the 1099 boxes if adjustments must be made for a 1099 reportable vendor. This DAFTIM table is used to generated the vendor 1099‑MISC form and prepare the 1099‑M tape that is sent to the IRS.
The program updates the DAFTIM Table and allows for the inactivation of a vendor and the addition of new vendors. It provides for error correction through the use of reason codes which are used to reset indicators on the DAFTIM Table. These indicators provide the batch process with the ability to correctly prepare vendor information for the IRS 0tape.
This profile is maintained by DAS/SFMS Operations.
Control Key
◾ PAYMENT YEAR – two-digit code. Tax year.
Information
Elements
◾ VENDOR NUMBER – Ten-digit number. Any 1099
reportable Vendor/Individual.
◾ TIN – 9-digit Vendor Tax Identification Number
Note: The vendor name will be retrieved from the 52 – Systemwide Vendor Profile . If the name does not appear, the vendor is not active. Either the VENDOR NUMBER or the TIN field can be used as the search criteria.
◾ REASON CODE – three-character code. See
description below:
|
Reason |
D54 |
Description |
(B)efore/ |
|
|
NEW |
001 |
Adding a New Record |
B |
|
|
1. |
Added to the table through the batch program DAFM795. |
|||
|
2. |
An old record was inactivated and a new vendor was added to the table prior to creating the first tape. |
|||
|
3. |
A vendor was initially omitted and then added after the first tape is sent to the IRS (indicates the information is not an error but newly added information) |
|||
|
ADJ |
002 |
1. |
Any Agency adjustment made from the Vendor 1099 Worksheet prior to creating the first tape. |
B |
|
2. |
Any Vendor adjustments made after Vendor receives 1099 Form (in January): but prior to creating first tape. |
|||
|
RP1 |
003 |
Vendor requests reprint of 1099 Form prior to creating the first tape with no changes. |
B |
|
|
ADD |
004 |
Vendor requests reprint of 1099 Form prior to creating the first tape with no changes. |
A |
|
|
AMT |
005 |
Change amount boxes only. First Record Change only. Otherwise use CM1 or CM2. |
A |
|
|
CM1 |
006 |
Both the vendor address and amount fields (one or more) were changed only. If other changes were made prior to this change, this reason code cannot be used. Use CM2. |
A |
|
|
INA |
007 |
Inactivating a Vendor # and adding a new one after the 1099 tape was created. The old (alternate) Vendor # must be used to write the first B record with zeros in the amount fields and the new Vendor must be shown as a correction. Only used for Alternate Vendor |
A |
|
|
CM2 |
008 |
Any combination of errors involving an incorrect payee name and address, name and amount field(s) or all three. |
A |
|
|
NAM |
009 |
Vendor Name Correction Only. First Record Change only. Otherwise use CM1 or CM2. |
A |
|
|
ERR |
010 |
Inactivate a Vendor. Should not have been reported. Zero Amount fields prior to inactivation. Send to IRS. |
A |
|
|
END |
011 |
Process Complete. |
A |
|
|
RP2 |
012 |
Vendor Request for a duplicate 1099 Form. |
A |
|
◾ REFERENCE NO – Anything is valid – the standard is the user initials and 3 numbers beginning with 001 and incrementing for each request (ex: TSP001)
◾ FORM 1099-MISC BOX ELEMENTS – These items are taken directly from the 1099-MISC Form (See Example Below).
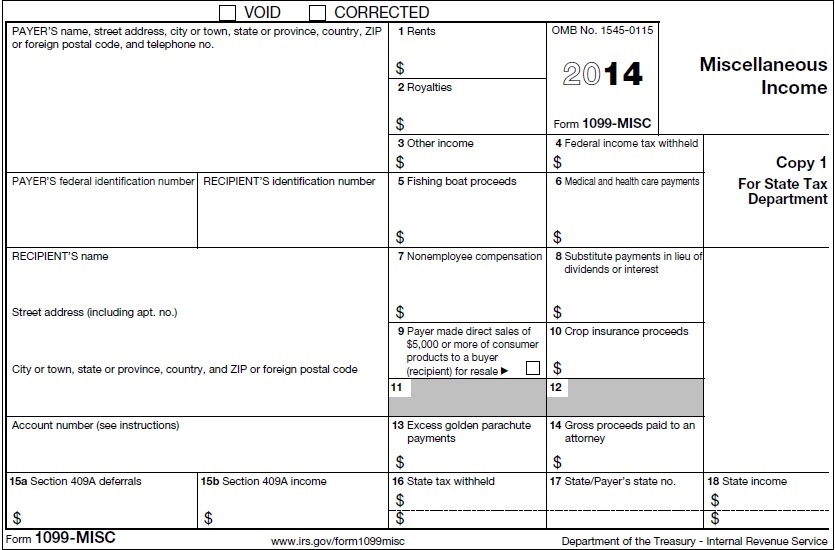
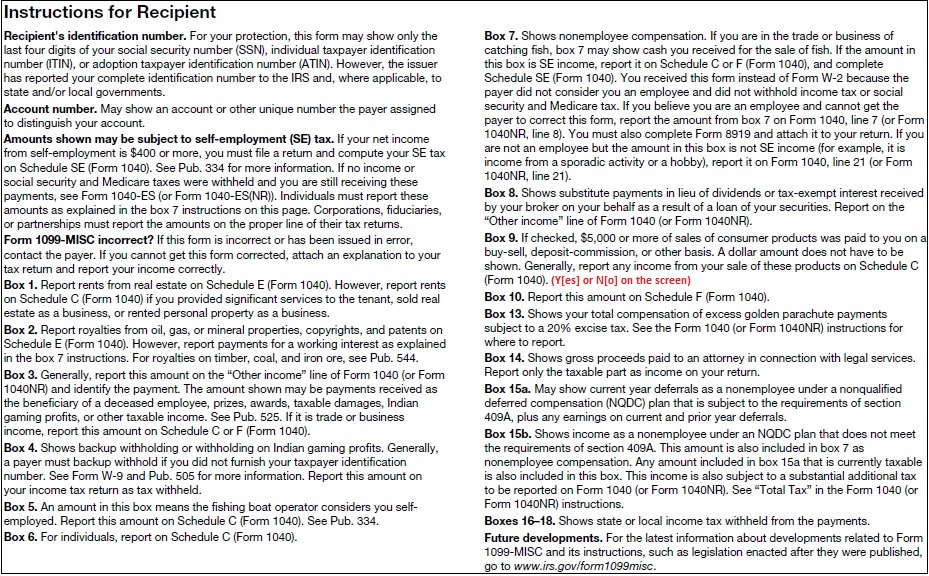
◾ LAST USER ID – This element is system generated from the security table. Up to seven characters are displayed. This element is automatically populated when updates are made to the DAFTIM table either through batch process or online entry.
◾ STATUS CODE – This element is
required. Enter a one-character Status Code as follows:
|
A |
– |
Active |
I |
– |
Inactive |
This code will default to an Active status if not entered. It may be used to inactivate records no longer in use.
Example:
|
S43M UC: 10 STATE OF OREGON 04/04/14 10:09 AM |
|
LINK TO: 1099 MISCELLANEOUS SUMMARY PROD |
|
|
|
PAYMENT YR: 14 VENDOR NO: 0000000000 TIN: 000000000 REASON CODE: NEW |
|
NAME: ACME CO, INC. REFERENCE NO: ZZ000 |
|
TRANS SUMMARY: 1099 ACTUAL: |
|
1 RENTS: 0.00 0.00 |
|
2 ROYALTIES: 0.00 0.00 |
|
3 OTHER INCOME: 0.00 20500.00 |
|
4 FEDERAL TAX: 0.00 0.00 |
|
5 FISHING BOAT: 0.00 0.00 |
|
6 MED/HEALTH: 0.00 0.00 |
|
7 NON/EMP COMP: 0.00 0.00 |
|
8 SUB DIV/INT: 0.00 0.00 |
|
9 DIRECT SALE OF 5000?: |
|
10 CROP INS: 0.00 0.00 |
|
13 GOLD PARA: 0.00 0.00 |
|
14 ATTY PROCEED: 0.00 0.00 |
|
16 STATE TAX: 0.00 0.00 |
|
STATUS CODE: A |
|
LAST USER ID: DAS0000 LAST PROC DATE: 04012014 |
|
Z26 RECORD NOT FOUND - NEXT RECORD RECALLED |
|
|
|
F1-HELP F2-52 F5-NEXT F9-INT F10-SAVE F11-SAVE/CLEAR ENTER-INQ CLEAR-EXIT |
51
Vendor Mail Code Profile
The 51 profile is used to create, maintain, and view vendor information at the address level. Systemwide vendors requiring multiple mail codes are first added to the 52 profile. The additional Vendor Mail Codes are established in the 51 profile using Mail Codes 001 to 499. Agency staff may add new vendor profiles. DAS SFMS Operations activates, changes and deletes the profiles.
Control Key
◾ VENDOR NO – Enter up to a ten-character Vendor Number. It must exist in the 52 profile.
◾ MAIL CODE – Enter a three-digit Vendor Mail Code that identifies each vendor address. The Mail Code must not be 000. A vendor mail code record of 000 is established by the system when the vendor record is entered on the 52 profile. When adding new vendors directly to R⋆STARS, use the next consecutive mail code within the "001-499" range. Mail codes within the range "500-699" are mail codes reserved to be added from ADPICS. Mail code numbers 400-409 are reserved for employee office addresses. These are used to produce reimbursement warrants that are to be returned to the agency for hand delivery to the affected employees. They should contain a return to agency PDT value (begins with an R) to indicate the warrant is to be drawn for the individual transaction and returned to the originating agency for delivery. Valid values 001-999 may be used when changing or deleting the record.
Information
Elements
◾ NAME – Enter up to a 50-character Vendor Name. The Payment Processing Subsystem, warrants, remittance advices, and many R⋆STARS reports display the first 40 characters.
◾ SEARCH NAMES – Enter up to three additional twenty-character Search Names (or Alternative Names). R⋆STARS generates and protects a search name identical to the first 25 characters of the Vendor Name. These fields are used by the 3A screen. For example, the business “KWIK Copy” may have alternate names of “Quick Copy”, “KWIK Copy”, “Copy Services”, etc. This would permit a user to find the Vendor Number/Mail Code by entering any of these names in the 3A screen. The Search Name field is used for conducting searches of a vendor. The following conventions have been adopted for creating search names and alternate vendor names:
◾ Persons – In the fourth search name field, enter the following format required by the IRS for 1099 electronic reporting: [LAST NAME],[FIRST NAME],[MIDDLE NAME (or) INITIAL]. Both commas are required even if no middle name or initial is used. No spaces or other punctuation marks are permitted. The last name must have at least 1 and not more than 13 characters, the first name may have up to 10 characters, the middle name up to 7.
◾ Organizations – The second search name field will contain the first five characters of the organization name (including spaces), a space, and the zip code (i.e., for Pitney Bowes, Pitne xxxxx) . The third and fourth search name fields may include another name or set of initials which may facilitate finding the vendor on any alphabetic search (i.e., IBM for International Business Machines, UPS for United Parcel Service, etc.).
◾ Sole Proprietorships – These entities are a sort of cross between persons and organizations. Because the proprietor is the person responsible for paying taxes, the vendor name and the last search name are entered as for a Person. The business name is entered in the second search name field as for an organization. The business name is also entered in the third search name field and as the first line in the address field.
◾ Partnerships – Enter the business name in the second search name field as for an organization. In addition two partners names (if known) are entered in the third and fourth search name fields as for a Person.
◾ Government Agencies and Political Subdivision – There are a number of special codes pertaining to these entities that are entered in place of certain search names. Oregon State government agencies and political subdivisions are generally entered only in R⋆STARS, although certain entities (i.e. water districts) are also entered in ADPICS to facilitate routine payments such as utility bills. Certain conventions have been adopted with respect to vendor names and search names in these records to assure consistency of format and completeness of information.
◾ Political Subdivision – Political subdivisions are counties, cities, and special districts that either have taxing authority or receive tax distributions from the State. Vendor names for counties and cities will begin with County of or City of respectively on the 52 profile record and the 001 mail code 51 profile record. Vendor Names for all Oregon school districts will begin with the name of the related county (i.e. Marion Co Sch Dist 24J) in the 52 profile record and the 000 mail code 51 profile record. Additional 51 profile mail codes may contain other appropriate vendor names and addresses.
◽ Each political subdivision is assigned a political subdivision (PSD) number. This number, with the prefix PSD, will become the second search name (the first enterable search name) in every record for that vendor (i.e., for Marion County School District 24J, PSD240340). Each PSD number is composed of three pairs of digits. The first pair indicates the county in which the subdivision is found (i.e. 24xxxx is in Marion County). The second pair indicates what type of subdivision is represented (i.e. xx03xx is a school district). The final pair of digits is a sequence number to differentiate similar subdivisions in the same county. A listing of PSD numbers may be obtained from SFMS Operations.
◽ Cities and counties have special codes on the 001 mail code 51 profile record. The prefix CCC plus the assigned city/county code will be entered in the third search name field (i.e., for Salem, CCC2470). The prefix OLCC plus the assigned Oregon Liquor Control Commission numbers will be entered in the fourth search name field (i.e., for Woodburn, OLCC2473).
◽ Many political subdivisions also participate in the Local Government Investment Pool. These vendors will have their account numbers entered with the prefix Lgip in the License field of the 001 mail code 51 profile record (i.e., for Marion County, Lgip04007) and the value 0.0 in the Tax Rate field.
◾ OREGON STATE GOVERNEMNT AGENCIES – Oregon state government agencies are assigned numbers for identification in interagency transactions. Vendor records for state agencies will include the appropriate agency number with the prefix Agy in the fourth search name field (i.e., for DAS, Agy107). Records for agencies whose status has changed will contain the obsolete agency number with the prefix Obagy in the fourth search name field (i.e., for Department of General Services, Obagy125).
◾ LIENS, LEVIES, GARNISHMENTS, AND ASSESSMENTS – Mail codes 410-499 are reserved for mail codes resulting from compliance with one of these court orders. They will be input only with the approval of the DAS SFMS Operations vendor staff and must contain the agency number and the name and telephone number of the individual entering the record. Records entered without this information will be deleted. In the second Search Name field, enter the first five characters of the claimants name, a space, the zip code. In the third Search Name field, enter the type of legal document received, ie., garnishment, child support order, tax levy, other. In the fourth field, enter the taxpayer's name. See examples provided below.
◾ POST OFFICE AND POSTMASTERS – Enter US PO, space, zip code in the fourth search name field.
◾ OREGON UNIVERSITY SYSTEM – Enter the university acronym in a search field. If possible, include the department in a search field.
◾ ADDRESS – R⋆STARS contains four address fields. The address fields should be coded to conserve the number of characters required and to provide consistency for all vendors recorded in the system. The 90 profile keyword ADDRESS ABBR lists abbreviations for Street Indicators, Secondary Addresses Indicators, Canadian Provinces, US Possessions, and overseas Military Postal Codes.
◾ ADDRESS 1 – Enter up to a 50-character Address on the first line. It is normally used to contain the first line of the vendor mailing address. The Payment Processing subsystem, warrants, remittance advices, and many R⋆STARS reports display the first 40 characters.
◾ ADDRESS 2 – Enter up to a 50-character Address on the second line or leave blank. It is normally used to contain the second line of the vendor address. The Payment Processing subsystem, warrants, remittance advices, and many R⋆STARS reports display the first 40 characters.
◾ ADDRESS 3 – Enter up to a 50-character Address on the third line or leave blank. The Payment Processing subsystem, warrants, remittance advices, and many R⋆STARS reports display the first 40 characters.
◾ ADDRESS 4 – Enter up to a 50-character Address on the fourth line or leave blank. The Payment Processing subsystem, warrants, remittance advices, and many R⋆STARS reports display the first 40 characters.
◾ CITY – Enter up to a 20-character City. If the city is not in the United States, it should be coded with the city name and country. For example, Vancouver, British Columbia is coded Vancouver, BC, CAN; Mexico City, Mexico is coded Mexico City, Mexico.
◾ ST – Enter the two-character State abbreviation: All 50 states, the District of Columbia (DC), and military address codes are assigned a two-character abbreviation. All of the valid state abbreviations are stored in the 90 News/Help Profile with the keyword State. If the vendor is not one of the 50 states, the District of Columbia, or a military address code, the State code should be XX.
◾ ZIP – Enter the nine-digit Zip Code. The first five digits are required; the last four are optional. This field may be used for foreign zip codes (alphanumeric) when country is not USA.
◾ COUNTRY – Enter up to a 20-character Country. (Does not print on warrant for mailing purposes).
◾ REGION – Enter the two-character Region or leave blank. If entered, it must be a valid value in the D53 profile with keyword 5750.
◾ TAX RATE – Enter the vendor’s Tax Rate in nnn.nn format or leave blank. This field is related to the Tax License Number. If the License is entered, the Tax Rate is required.
◾ UPDATE REASON – Enter up to a four-character Update Reason Code if the Vendor Name or any part of the vendor address is changed. If entered, it must be defined in the D53 profile with Table ID VURC.
◾ OWNERSHIP CODE – Enter the one-character
Ownership Code as follows:
|
E |
– |
State Employee |
O |
– |
Corporation |
◾ LICENSE – Enter the nine-character Tax License Number for the vendor or leave blank. If the Tax Rate field is entered, the Tax License Number is required.
◾ VENDOR CONTACT – Enter up to a 40-character Vendor Contact name.
◾ FAX – Enter the Area Code and Phone Number for Fax transmission.
◾ TELEPHONE – Enter the Area Code and Phone Number. If a phone number is not known, leave the field blank.
◾ EXT – Enter up to a four-digit Extension Number or leave blank.
◾ ALT VEND NAME - Enter a one-character
indicator in the Alternate Vendor Name field. This field is used by SFMS Operations
staff to indicate if the vendor has approved in writing an alternate name for
payment purposes. All alpha characters are allowed. Currently used indicators
are:
|
D |
– |
Vendor desk denied or on hold |
◾ LTR DATE – Enter an eight-digit Letter Date (MMDDYYYY format) or leave blank. This date can be used to indicate the date a vendor approved an alternate name for payment purposes.
◾ PDT – Enter the two-character Payment Distribution Type. It indicates how the vendor usually receives payments and how payments are consolidated. The PDT entered must exist in the D50 profile. This field is set to default to MA and can only be overridden by SFMS Operations staff.
◾ EMAIL - Enter up to a 50-character Email Address or leave blank. If a vendor is set up for direct deposit and an email address is entered, payment information will automatically be emailed to the vendor.
◾ PNI – The Pre Note Indicator will be set to Y as default for all 51 profiles. If a vendor is set up for direct deposit, this field will automatically switch to N during batch cycle until the pre-note has processed through the bank.
◾ AGY -Enter a three-character Agency Number identifying the agency initiating the request for approval of this vendor record.
◾ CONTACT -Enter up to a 25-character Contact name. It identifies the agency individual to contact to resolve questions on the vendor record.
◾ PHONE -Enter the three-digit Area Code, seven-digit Phone Number and up to a four-digit Extension for the Contact name.
◾ DIRECT DEPOSIT DATE – Enter an eight-digit Direct Deposit Effective Date (MMDDYYYY format) or leave blank. The date is automatically filled in when the PDT field is set to DA. It is required if the PDT has a Payment Method Code of D (Direct Deposit).
◾ BANK INFORMATION can only be viewed and maintained by personnel with appropriate Security authorization. If the user does not have authorization for these fields, the fields are not shown on the screen. If the View Bank Info Indicator on the 96A profile is N, the four fields (ABA Number, Account Number/Type and Format) are not displayed. If the indicator is set to Y, bank information is displayed.
◾ ABA NUMBER – Enter a nine-digit ABA Number or leave blank. It is required if the PDT has a Payment Method Code of D (Direct Deposit).
◾ ACCOUNT NUMBER/TYPE – Enter a 17-digit Bank Account Number or leave blank. Enter a two digit Bank Account Type or leave blank. Both fields are required if the PDT has a Payment Method Code of D (Direct Deposit).
◾ FORMAT – Enter the four-character Nacha Format or leave blank. It is required if the PDT has a Payment Method Code of D (Direct Deposit).
◾ HOLD RSN CODE – Enter the three-character Hold Reason Code or leave blank. It is used to identify vendors that owe amounts to the user. If entered, it must exist in D53 profile with Table ID 5200.
◾ STATUS CODE – Enter a
one-character Status Code. It will default to Active if not entered. It may be
used to inactivate records no longer in use.
|
A |
– |
Active |
|
I |
– |
Inactive |
|
P |
– |
Partial Record from ADPICS. DAS SFMS Operations must change Status Code to A before payment can be made. |
|
R |
– |
Indicates agency personnel have added a new record and are requesting DAS SFMS Operations review and activate the record. |
◾ EFF START DATE – Enter the eight-digit Effective Start Date (MMDDYYYY format). It identifies when the record becomes effective. This field can be left blank; it will default to the current date and cause the record to be immediately available.
◾ EFF END DATE – Enter the eight-digit Effective End Date (MMDDYYYY format) or leave blank. EFF END DATE identifies when the record is no longer effective.
Example:
|
S051 UC: 10 STATE OF OREGON 04/04/14 01:25 PM |
|
LINK TO: VENDOR MAIL CODE PROFILE PROD |
|
VENDOR NO: 0000000000 ACME CO., INC |
|
MAIL CODE: 000 NAME: ACME CO., INC |
|
SEARCH NAMES: ACME CO., INC COYOTE’S BANE, INC. |
|
DESERT FLOWER BOMB
CO, LTD. |
|
ADDRESS: C/O BUGS BUNNY |
|
123 WARNER AVE |
|
|
|
CITY: HOLLYWOOD ST: CA ZIP: 90078-1234 |
|
COUNTRY: REGION: TAX RATE: |
|
UPDATE REASON: ADD OWNERSHIP CODE: C LICENSE: |
|
VENDOR CONTACT: FAX: |
|
TELEPHONE: 898 459 0006 EXT: 7827 ALT VEND NAME: V LTR DATE: |
|
PDT: MA EMAIL: PNI: |
|
AGY: 998 CONTACT: TWEETY BIRD PHONE: 898 459 0007 |
|
DIR DEP DATE: |
|
|
|
HOLD REASON CODE: STATUS CODE: A |
|
EFF START DATE: 06112013 EFF END DATE: LAST PROC DATE: 07022013 |
|
Z07 NEXT RECORD SUCCESSFULLY READ |
|
|
|
F1-HELP F3-DEL F5-NXT F6-52 F9-INT F10-SAVE F11-SAVE/CLR ENTER-INQ CLEAR-EXT |
52
Systemwide Vendor Profile
The 52 profile is used to create, maintain, and view vendor information. All systemwide vendors must be established in this profile first. When establishing systemwide vendors, the system assigns a mail code of 000 which is not shown on this screen. It adds this record to the 51 Vendor Mail Code Profile. Users establish additional vendor mail codes (mail addresses) on the 51 profile. The system prevents deleting a vendor record on the 52 profile if additional mail codes exist on the 51 profile.
Control Key
◾ VENDOR NO – Enter up to a ten-digit Vendor Number. If leading or trailing blanks are input, the system left justifies and right blank-fills the Vendor Number. The first digit of the Systemwide Vendor must be greater than 0. The Vendor Number usually represents the vendor's Federal Employer Identification Number (FEIN) or a system-generated number based on information used to establish the vendor profile.
Information
Elements
◾ NAME CONTROL – Enter the first four characters of the business name or the first 4 characters of the payee’s last name. Do not leave spaces. An ampersand (&) and a dash (-) are the only special characters allowed. When two last names are listed, derive the name control from the first last name. If the Vendor Name is not unique, include a middle name or initial if possible.
◾ VENDOR NAME – Enter up to a 50-character Vendor Name. The Payment Processing Subsystem, warrants, remittance advices, and many R⋆STARS reports display the first 40 characters.
◾ SEARCH NAMES – Enter up to three 25-character Search Names. The system generates and protects a search name identical to the first 25 characters of the Vendor Name. For example, the business“KWIK Copy” may have alternate names of“Quick Copy”,“Kwik Copy”,“Copy Services”, etc. This would permit the user to find the Vendor Number/Mail Code by entering any of these names in the 3A screen. See recommendations for coding the search name in the 51 profile Coding Instructions.
◾ ALT VENDOR/FID – This field may be used to identify an Alternate Vendor or Federal ID number where the actual value of the vendor number in the key to the 52 profile is an incorrect FEIN or SSN. If the Vendor Number is correct (the last 9 characters correctly identifies the FEIN or SSN) the Alt Vendor ID is blank. If entered, the Alternate Vendor/FID will be used for 1099 reporting.
◾ 1099 IND – Enter the
one-character 1099 Indicator. It identifies whether the vendor is subject to
1099-MISC Reporting. For example, a vendor such as a state agency or a county
is not subject to 1099 reporting. If the vendor is not subject to 1099
reporting, payment transactions are not reported to the Internal Revenue
Service (IRS). If the vendor is subject to 1099 reporting, each financial
transaction for the vendor is examined to determine whether it is 1099
reportable. At the end of the calendar year, each vendor that is subject to
1099 reporting will have the amounts summarized by 1099 category for reporting
to the IRS (on electronic media) as well as to the vendor (a hard copy) on the
1099 form. Valid indicators are as follows:
|
N |
– |
1099 Exempt vendor |
◾ FEI/SSN IND – Enter the
one-character FEI/SSN Indicator that identifies if the Vendor Number is a FEIN
or an individual's SSN. Valid indicators are as follows:
|
F |
– |
Federal Employer Identification Number |
◾ REASON CODE – Enter up to a four-character Update Reason Code if the Vendor Name or any part of the vendor address is changed. If entered, it must be defined in the D53 profile with Table ID VURC.
◾ VENDOR TYPE – Enter the
one-digit Vendor Type as follows:
|
1 |
– |
Employee |
7 |
– |
Individual / Client |
◾ OWNERSHIP CODE – Enter the one-character
Ownership Code as follows:
|
E |
– |
State Employee |
O |
– |
Corporation |
◾ TIN MATCH – Enter the one-character IRS TIN Match Code or leave blank. This field is used by SFMS Operations when a vendor’s FEIN/SSN has been verified with IRS records.
◾ ADDRESS – R⋆STARS contains four address fields. The address fields should be coded to conserve the number of characters required and to provide consistency for all vendors recorded in the system. The 90 profile keyword ADDRESS ABBR lists abbreviations for Street Indicators, Secondary Addresses Indicators, Canadian Provinces, US Possessions, and overseas Military Postal Codes.
◾ ADDRESS 1 – Enter up to a 50-character Address on the first line. It is normally used to contain the first line of the vendor mailing address. The Payment Processing subsystem, warrants, remittance advices, and many R⋆STARS reports display the first 40 characters.
◾ ADDRESS 2 – Enter up to a 50-character Address on the second line or leave blank. It is normally used to contain the second line of the vendor address. The Payment Processing subsystem, warrants, remittance advices, and many R⋆STARS reports display the first 40 characters.
◾ ADDRESS 3 – Enter up to a 50-character Address on the third line or leave blank. The Payment Processing subsystem, warrants, remittance advices, and many R⋆STARS reports display the first 40 characters.
◾ ADDRESS 4 – Enter up to a 50-character Address on the fourth line or leave blank. The Payment Processing subsystem, warrants, remittance advices, and many R⋆STARS reports display the first 40 characters.
◾ CITY – Enter up to a 20-character City. If the city is not in the United States, it should be coded with the city name and country. For example, Vancouver, British Columbia is coded Vancouver, BC, CAN; Mexico City, Mexico is coded Mexico City, Mexico.
◾ ST – Enter the two-character State abbreviation: All 50 states, the District of Columbia (DC), and military address codes are assigned a two-character abbreviation. All of the valid state abbreviations are stored in the 90 News/Help Profile with the keyword State. If the vendor is not one of the 50 states, the District of Columbia, or a military address code, the State code should be XX.
◾ ZIP – Enter the nine-digit Zip Code. The first five digits are required; the last four are optional. This field may be used for foreign zip codes (alphanumeric) when country is not USA.
◾ CNTRY – Enter up to a 20-character Country. (Does not print on warrant for mailing purposes).
◾ VENDOR CONTACT – Enter up to a 40-character Vendor Contact name.
◾ TAX OFFSET EXEMPT – Enter the
one-character Tax Offset Exempt indicator. Valid indicators are as
follows:
|
Y |
– |
Vendor is exempt from tax offset |
◾ TELEPHONE – Enter the Area Code and Phone Number. If a phone number is not known, leave the field blank.
◾ EXT – Enter up to a four-digit Extension Number or leave blank.
◾ FAX – Enter the Area Code and Phone Number for Fax transmission.
◾ HOLD RSN – Enter the three-character Hold Reason Code or leave blank. It is used to identify vendors that owe amounts to the user. If entered, it must exist in D53 profile with Table ID 5200.
◾ PDT – Enter the two-character Payment Distribution Type. It indicates how the vendor usually receives payments and how payments are consolidated. The PDT entered must exist in the D50 profile. This field is set to default to MA and can only be overridden by SFMS Operations staff.
◾ EMAIL – Enter up to a 50-character Email Address or leave blank. If a vendor is set up for direct deposit and an email address is entered, payment information will automatically be emailed to the vendor.
◾ PNI – The Pre Note Indicator will be set to Y as default for all 51 profiles. If a vendor is set up for direct deposit, this field will automatically switch to N during batch cycle until the pre-note has processed through the bank.
◾ AGY – Enter a three-character Agency Number identifying the agency initiating the request for approval of this vendor record.
◾ CONTACT – Enter up to a 25-character Contact name. It identifies the agency individual to contact to resolve questions on the vendor record.
◾ PHONE – Enter the three-digit Area Code, seven-digit Phone Number and up to a four-digit Extension for the Contact name.
◾ DIRECT DEPOSIT DATE – Enter an eight-digit Direct Deposit Effective Date (MMDDYYYY format) or leave blank. It is required if the PDT has a Payment Method Code of D (Direct Deposit).
Bank Information can only be viewed and maintained by personnel with appropriate Security authorization. If the user does not have authorization for these fields, the fields are not shown on the screen. If the View Bank Info Indicator on the 96A profile is N, the four fields (ABA Number, Account Number/Type and Format) are not displayed. If the indicator is set to Y, bank information is displayed.
◾ ABA NUMBER – Enter a nine-digit ABA Number or leave blank. It is required if the PDT has a Payment Method Code of D (Direct Deposit).
◾ ACCOUNT NUMBER/TYPE – Enter a 17-digit Bank Account Number or leave blank. Enter a two digit Bank Account Type or leave blank. Both fields are required if the PDT has a Payment Method Code of D (Direct Deposit).
◾ FORMAT – Enter the four-character Nacha Format or leave blank. It is required if the PDT has a Payment Method Code of D (Direct Deposit).
◾ W9 REQUEST DATE – Enter the W9 Request Date (MMDDYYYY format) or leave blank. This indicates the date the W9 request for information was sent to a vendor.
◾ BU/WH EFF DATE – Enter the Backup Withholding Effective Date (MMDDYYYY format) or leave blank. This indicates when backup withholding began. If the date indicated is in the future, backup withholding will begin on that date.
◾ STATUS CODE – Enter a
one-character Status Code. It will default to Active if not entered. It may be
used to inactivate records no longer in use.
|
A |
– |
Active |
|
I |
– |
Inactive |
|
P |
– |
Partial Record from ADPICS. DAS SFMS Operations must change Status Code to A before payment can be made. |
|
R |
– |
Indicates agency personnel have added a new record and are requesting DAS SFMS Operations review and activate the record. |
◾ EFF START DATE – Enter the eight-digit Effective Start Date (MMDDYYYY format). It identifies when the record becomes effective. This field can be left blank; it will default to the current date and cause the record to be immediately available.
◾ EFF END DATE – Enter the eight-digit Effective End Date (MMDDYYYY format) or leave blank. EFF END DATE identifies when the record is no longer effective.
Example:
|
S052 UC: 10 STATE OF OREGON 04/08/14 01:42 PM |
|
LINK TO: SYSTEMWIDE VENDOR PROFILE PROD |
|
VENDOR NO: 0000000000 NAME CONTROL: ACME |
|
VENDOR NAME: ACME CO., INC |
|
SEARCH NAMES: ACME CO., INC COYOTE’S BANE, INC. |
|
DESERT FLOWER BOMB CO, LTD. |
|
ALT VENDOR/FID: 1099 IND: N FEI/SSN IND: F REASON CODE: ADD |
|
VENDOR TYPE: 5 OWNRSHP CD: O TIN MATCH: |
|
ADDRESS: C/O BUGS BUNNY |
|
123 WARNER AVE |
|
|
|
CITY: HOLLYWOOD ST: CA ZIP: 90078 1234 CNTRY: |
|
VENDOR CONTACT: TAX OFFSET EXMPT: N |
|
TELEPHONE: 898 459 0006 EXT: 7827 FAX: HOLD RSN: |
|
PDT: MA EMAIL: PNI: |
|
AGY: 998 CONTACT: TWEETY BIRD PHONE: 898 459 0007 |
|
DIR DEP DATE: |
|
|
|
W9 REQUEST DATE: 06122013 BU/WH EFF DATE: STATUS CODE: A |
|
EFF START DATE: 06112013 EFF END DATE: LAST PROC DATE: 07022013 |
|
Z06 RECORD SUCCESSFULLY RECALLED |
|
|
|
F1-HELP F3-DEL F5-NXT F6-51 F9-INT F10-SAVE F11-SAVE/CLR ENTER-INQ CLEAR-EXT |
The 53 profile supports the receivable collection process by automatic accumulation of interest and/or late charges. The collection process is controlled by each Agency and by document type. Agencies determine when to initiate collection procedures and the interest rate and/or late fee charged to delinquent accounts. This profile is Agency maintained.
The overnight batch process of DAFM310 reviews accounts receivable documents in the Document Financial Table for eligibility for interest and/or late charge calculation. The Interest Calc Run / Month control indicator in the 25 profile determines if/when the interest calculation process is performed and for which month the interest and fees are posted. In the 53 profile, the interest rate is taken from this profile if the Document Type is subject to interest. The interest rate is taken from the 54 – Agency Receivable Document Exemption Profile if a particular document (whose Document Type is in the 53 profile) is subject to a different interest rate.
Accounts Receivable Interest is calculated and an accounting transaction generated for recording the interest and/or late charge amounts. This process is executed for documents meeting the following eligibility criteria:
◾ The document has been given final approval.
◾ There is an entry in the 53 profile for the Agency and Document Type.
◾ The document balance is greater than zero.
◾ There is no interest activity for the document in the month specified in the 25 profile.
◾ The Document Due Date, compared to the Current Date, is equal to or greater than the number of days past due on the 53 profile, i.e., the number of days before calculating interest have expired.
◾ There is not an entry in the 54 profile for the document with an override Interest and Late Fee Calculation indicator of Y.
Control Key
◾ AGENCY – Enter the three-character Agency Code. It must exist in the D02 profile.
◾ DOC TYPE – Enter the two-character Document Type. It must exist in the 33 profile.
Information
Elements
◾ INTEREST AND LATE FEE CALCULATION – Each agency defines receivable collection procedures using the 53 profile. To apply the interest and/or late fee, set the Interest Fee Calculation Run Month indicator on the 25 Profile Y. If this indicator is Y, the system applies the interest and/or late fee during the IEU (Input, Edit, Update) process.
◾ DAYS PAST DUE DATE – Enter up to a three-digit figure for number of Days Past Due Date. This field determines the number of days after the payment due date before interest and/or late fees can be applied.
◾ TRANSACTION CODE – Enter the three-character Transaction Code (T-Code). It must exist in the 28A and 28B T-Code profiles. The T-Code posts the interest and/or late fee to the account.
◾ INTEREST RATE – Enter the Interest Rate charged to the delinquent receivable. Enter the interest rate as a percentage. If the interest rate is 8.25%, enter the percentage as 8.25 (not .0825). The maximum interest rate is 99.999%.
◾ COMP OBJ – Enter the four-digit Comptroller Object (COBJ) or leave blank. This is the COBJ used in the interest calculation. Either the COBJ or AOBJ (below) is entered for the posting of the interest. If both the COBJ and AOBJ are entered, then the COBJ looked up by the AOBJ in the D11 profile must be left blank or must be equal to the COBJ entered. If COBJ is entered, it must exist in the D10 profile and it must be a revenue COBJ.
◾ AGENCY OBJ – Enter the four-digit Agency Object (AOBJ) if the agency uses AOBJs or leave blank. This is the AOBJ used in the interest calculation. Either the COBJ (above) or AOBJ is entered for the posting of the interest. If both the COBJ and AOBJ are entered, then the COBJ looked up by the AOBJ in the D11 profile must be left blank or must be equal to the COBJ entered. If AOBJ is entered, it must exist in the D11 profile and it must be a revenue AOBJ.
◾ LATE FEE – Enter up to an eight-digit Late Fee amount to be charged to a past due receivable. This is the dollar amount charged to the receivable for being overdue. This amount may be as large as $9999.99.
◾ COMP OBJ – Enter the four-digit COBJ. It must exist in the D10 profile and it must be a revenue COBJ. This is the COBJ used in the late fee calculation.
◾ AGENCY OBJ – Enter the four-digit AOBJ if the agency uses AOBJs. If entered, it must exist in the D11 profile and it must be a revenue AOBJ. This is the AOBJ used in the late fee calculation.
◾ COMPOUND INTEREST – Enter the
one-character Compound Interest indicator:
|
Y |
– |
Yes |
This field determines if interest is compounded.
◾ TRANSFER TO COLLECTIONS – Not Used in Oregon.
◾ SUBJECT TO TRANSFER – Not Used in Oregon. Code N will be used as default for all 53 profiles
◾ DAYS BEFORE TRANSFER – Not Used in Oregon.
◾ A/R DEF DUE DAYS – Enter up to a three-digit number for the Accounts Receivable Default Due Days or leave blank. This field determines how many days past the due date a payment may be received before penalty interest and/or late fees are added to the account.
◾ STATUS CODE – Enter a one-character
Status Code. It will default to Active if not entered. It may be used to
inactivate records no longer in use.
|
A |
– |
Active |
I |
– |
Inactive |
◾ EFF START DATE – Enter the eight-digit Effective Start Date (MMDDYYYY format). It identifies when the record becomes effective. This field can be left blank; it will default to the current date and cause the record to be immediately available.
◾ EFF END DATE – Enter the eight-digit Effective End Date (MMDDYYYY format) or leave blank. EFF END DATE identifies when the record is no longer effective.
Example:
|
S053 UC: 10 STATE OF OREGON 04/04/14 01:56 PM |
|
LINK TO: AGENCY DOCUMENT CONTROL PROFILE PROD |
|
|
|
AGENCY: 101 DOC TYPE: AR |
|
|
|
INTEREST AND LATE FEE CALCULATION |
|
DAYS PAST DUE DATE: TRANSACTION CODE: |
|
INTEREST RATE: COMP OBJ: AGENCY OBJ: |
|
LATE FEE: COMP OBJ: AGENCY OBJ: |
|
COMPOUND INTEREST: N (Y/N) |
|
|
|
TRANSFER TO COLLECTIONS |
|
SUBJECT TO TRANSFER: N (Y/N) |
|
DAYS BEFORE TRANSFER: |
|
|
|
A/R DEF DUE DAYS: 030 |
|
|
|
STATUS CODE: A |
|
EFF START DATE: 01041995 EFF END DATE: LAST PROC DATE: 12112013 |
|
Z06 RECORD SUCCESSFULLY RECALLED |
|
|
|
F1-HELP F3-DEL F5-NEXT F9-INT F10-SAVE F11-SAVE/CLEAR ENTER-INQ CLEAR-EXIT |
54
Agency Receivable Document Exemption Profile
The purpose of the 54 profile is to exempt specific documents from the standard delinquent collection procedures applicable to their document type. The standard procedures to be applied to a delinquent receivable are defined by document type in the 53 profile. The 54 profile can only be used to exempt a document from existing collection procedures that apply to its document type. This screen can not be used to add delinquent procedures to a specific document that are not applicable to its document type. This profile is Agency maintained.
The overnight batch process of DAFM310 reviews accounts receivable documents in the Document Financial Table for eligibility for interest and/or late charge calculation. The Interest Calc Run / Month control indicator in the 25 profile determines if/when the interest calculation process is performed and for which month the interest and fees are posted.
The interest rate is taken from the 53 profile if the Document Type is subject to interest. The interest rate is taken from the 54 profile if a particular document (whose Document Type is in the 53 Profile) is subject to a different interest rate.
Accounts Receivable Interest is calculated and an accounting transaction generated for recording the interest and/or late charge amounts. This process is executed for documents meeting the following eligibility criteria:
◾ The document has been given final approval.
◾ There is an entry in the 53 profile for the Agency and Document Type.
◾ The document balance is greater than zero.
◾ There is no interest activity for the document in the month specified in the 25 profile.
◾ The Document Due Date, compared to the Current Date, is equal to or greater than the number of days past due on the 53 profile, i.e., the number of days before calculating interest have expired.
◾ There is not an entry in the 54 profile for the document with an override Interest and Late Fee Calculation indicator of Y.
Control Key
◾ AGENCY – Enter the three-character Agency Code that identifies the Document Agency of a valid record in the 53 profile.
◾ DOC NO – Enter the eight-character Document Number that identifies the document to be added to or changed on the 54 profile. The first two characters of the Document Number must represent a valid Document Type in the 53 profile.
◾ FY – Enter the two-digit Fiscal Year that identifies when the document was created.
Information
Elements
The following indicators allow the user to suppress or change the collection procedures that are in-place for the document selected as a result of its document type.
◾ INTEREST AND LATE FEE CALCULATION – Enter
the one-character indicator that determines if the document will be exempt from
being charged the interest and late fees specified on the 53 profile for
this Document Type. Valid indictors are as follows:
|
Y |
– |
Yes – the interest rate and fees on the 53
Profile should be suppressed and should not be applied to the document. |
◾ TRANSFER TO COLLECTIONS – Not Used in Oregon. Code N will be used as default for all 54 profiles.
◾ DUNNING NOTICE PREPARATION – Enter
the one-character indicator that determines if the document is exempt from a
prearranged series of Dunning Letters that will be sent as the invoice reaches
certain stages of delinquency.
|
Y |
– |
Yes – the procedure should be suppressed and
should not be applied to the document. |
◾ INTEREST RATE – Enter the Interest Rate to be charged to this specific delinquent receivable or leave blank. This interest rate overrides the interest and late fees listed on the 53 Profile for this Document Type. Enter the interest rate as a percentage. If the interest rate is 8.25%, enter the percentage as 8.25 (not .0825). The maximum interest rate is 99.999%. If an interest rate is entered in this field, the Interest and Late Fee Calculation indicator above must be Y.
◾ STATUS CODE – Enter a
one-character Status Code. It will default to Active if not entered. It may be
used to inactivate records no longer in use.
|
A |
– |
Active |
I |
– |
Inactive |
◾ EFF START DATE – Enter the eight-digit Effective Start Date (MMDDYYYY format). It identifies when the record becomes effective. This field can be left blank; it will default to the current date and cause the record to be immediately available.
◾ EFF END DATE – Enter the eight-digit Effective End Date (MMDDYYYY format) or leave blank. EFF END DATE identifies when the record is no longer effective.
Example:
|
S054 UC: 10 STATE OF OREGON 04/04/14 01:58 PM |
|
LINK TO: AGENCY RECEIVABLE DOCUMENT EXEMPTION PROFILE PROD |
|
|
|
AGENCY: 101 DOC NO: TA000999 FY: 14 |
|
|
|
EXEMPT FROM: |
|
|
|
INTEREST AND LATE FEE CALCULATION: N (Y/N) |
|
TRANSFER TO COLLECTIONS: N (Y/N) |
|
DUNNING NOTICE PREPARATION: N (Y/N) |
|
INTEREST RATE: |
|
|
|
STATUS CODE: A |
|
EFF START DATE: 11211995 EFF END DATE: LAST PROC DATE: 01152008 |
|
Z08 RECORD NOT FOUND - END OF FILE |
|
|
|
F1-HELP F3-DEL F5-NEXT F9-INT F10-SAVE F11-SAVE/CLEAR ENTER-INQ CLEAR-EXIT |
82
Comptroller Relationship Edit Profile
The 82 profile is used to edit accounting transactions to ensure that the codes entered are appropriate in relation to other codes entered.This profile is maintained by the agency.
Control Key
Either Agency, or Appropriated Fund, or Appropriation Year and Comptroller Object must be entered. Only one of the three combinations is allowed.
◾ AGENCY – Enter the three-character Agency Code. It must exist in the D02 profile. AGENCY may only be entered if APPROP FUND and COMP OBJ are blank.
◾ APPROP FUND – Enter the four-digit Appropriated Fund or leave blank. If entered, it must exist in the D22 profile. APPROP FUND may only be entered if AGENCY and COMP OBJ are blank.
◾ APPN YEAR – Enter the two-digit Appropriation Year or leave blank. It is required if COMP OBJ is entered. APPN YEAR is not allowed if AGENCY and APPROP FUND are entered.
◾ COMP OBJ – Enter the four-digit Comptroller Object or leave blank. If entered, it must exist in the D10 profile. APPN YEAR is required if COMP OBJ is entered. COMP OBJ may only be entered if AGENCY and APPROP FUND are blank.
Information
Elements
The next seven elements determine which codes can be entered on an accounting transaction in conjunction with the code(s) in the key.
◾ AGENCY I/E – Enter a
one-character Agency Include/Exclude code or leave blank. Valid codes are as
follows:
|
I |
– |
Include |
E |
– |
Exclude |
◾ AGENCY – Enter up to 10 three-character Agency numbers or Agency ranges per line or leave these fields blank. Each agency or agency range must be separated by commas, and agency ranges must be identified with a dash. If entered, agency must exist in D02 profile.
◾ APPROP FUND I/E – Enter
a one-character Appropriated Fund Include/Exclude or leave blank. Valid codes
are as follows:
|
I |
– |
Include |
E |
– |
Exclude |
◾ APPROP FUND – Enter up to 10 four-digit Appropriated Funds numbers or Appropriated Fund ranges per line or leave these fields blank. Each Appropriated Fund or Appropriated Fund range must be separated by commas, and Appropriated Fund ranges must be identified with a dash. If entered, Appropriated Fund must exist in the D22 profile.
◾ AY – Enter a two-digit Appropriated Year if Comptroller Objects are to be entered. Otherwise, leave blank.
◾ COBJ I/E – Enter a
one-character Comptroller Object I/E or leave blank. Valid codes are as
follows:
|
I |
– |
Include |
E |
– |
Exclude |
◾ COBJ – Enter up to 10 four-digit COBJ numbers or ranges per line or leave these fields blank. Each COBJ number or range must be separated by commas, and COBJ ranges must be identified with a dash. If entered, COBJ must exist in D10 profile.
◾ STATUS CODE – Enter a
one-character Status Code. It will default to Active if not entered. It may be
used to inactivate records no longer in use.
|
A |
– |
Active |
I |
– |
Inactive |
◾ EFF START DATE – Enter the eight-digit Effective Start Date (MMDDYYYY format). It identifies when the record becomes effective. This field can be left blank; it will default to the current date and cause the record to be immediately available.
◾ EFF END DATE – Enter the eight-digit Effective End Date (MMDDYYYY format) or leave blank. EFF END DATE identifies when the record is no longer effective.
Example:
|
S082 UC: 10 STATE OF OREGON 04/04/14 02:01 PM |
|
LINK TO: COMPTROLLER RELATIONSHIP EDIT PROFILE PROD |
|
|
|
AGENCY: APPROP FUND: APPN YEAR: 15 COMP OBJ: 4002 |
|
|
|
I/E (I=INCLUDE, E=EXCLUDE) |
|
ENTER CODES SEPARATED WITH EITHER '-' OR ','. |
|
EXAMPLE: I 088-099,198-269,299,300-399 |
|
|
|
I/E ---------------------CODES---------------------------------- |
|
AGENCY I 459 , |
|
|
|
APPROP FUND |
|
|
|
AY COBJ |
|
|
|
STATUS CODE: A |
|
EFF START DATE: 07012013 EFF END DATE: LAST PROC DATE: 01152008 |
|
Z08 RECORD NOT FOUND - END OF FILE |
|
|
|
F1-HELP F3-DEL F5-NEXT F9-INT F10-SAVE F11-SAVE/CLEAR ENTER-INQ CLEAR-EXIT |
90
News/Help Table
The 90 table is a profile providing an online source of current information. It provides definitions for terms and explains error codes. It displays lists of data elements used to perform R⋆STARS functions. It also provides users with information regarding changes or updates to R⋆STARS by the SFMS Team. Keywords are used to access information from the profile.
The 90 profile can be accessed by entering 90 in the LINK TO: field or by pressing F1 -HELP. When errors occur in processing, pressing F1 -HELP while in the error field fills in the error code as the keyword.
Current news items from the 90 profile (keyword: NEWS) are also displayed on the screen when the user logs into R⋆STARS. DAS SFMS Operations maintains this profile.
Control Key
◾ KEYWORD – Enter up to a twelve-character Keyword. The first character must be non-blank. Blanks are allowed in positions two through twelve.
◾ PAGE – Enter a numeric page number. Page number for the first screen of information for a Keyword is 01.
Information
Elements
◾ DESCRIPTION – Enter up to 14 lines of descriptive information. Each line may contain up to 79 characters.
◾ STATUS CODE – Enter a
one-character Status Code. It will default to Active if not entered. It may be
used to inactivate records no longer in use.
|
A |
– |
Active |
I |
– |
Inactive |
◾ EFF START DATE – Enter the eight-digit Effective Start Date (MMDDYYYY format). It identifies when the record becomes effective. This field can be left blank; it will default to the current date and cause the record to be immediately available.
◾ EFF END DATE – Enter the eight-digit Effective End Date (MMDDYYYY format) or leave blank. EFF END DATE identifies when the record is no longer effective.
Examples:
|
S002 UC: 10 STATE OF OREGON 04/04/14 02:03 PM |
|
NEWS DISPLAY PROD |
|
|
|
WELCOME TO R⋆STARS - OREGON PRODUCTION REGION |
|
HOURS: MON-FRI 7:00 AM-6:00 PM / SAT 7:00 AM-3:30 PM/ MONTH-END CLOSE @ 5:30 PM |
|
VENDOR DESK: 503-373-1044 X 240 WARRANT PICKUP: REGULAR 12:30 |
|
SFMS FAX: 503-378-8940 EXPEDITE 3:30 |
|
VENDOR ACTIVATION/CHANGE REQUESTS RECEIVED BY: |
|
9:00 AM WILL BE PROCESSED BY 12:00 PM |
|
2:00 PM WILL BE PROCESSED BY 5:00 PM |
|
|
|
SFMS WEBSITE:HTTP://WWW.DAS.STATE.OR.US/DAS/SCD/SFMS/INDEX.SHTML ANALYST= PG05 |
|
*** *** *** *** *** DAILY NEWS *** *** *** *** *** |
|
SFMA HAS BEEN MODIFIED TO CLOSE THE AY07 BIENNIUM ON CALENDAR DAY DECEMBER 31, |
|
2007. WHAT DOES THIS MEAN FOR AGENCIES? |
|
ALL AY07 VOUCHERS PAYABLE, BALANCED TRANSFERS,FINANCIAL STATEMENT ADJUSTMENTS, |
|
AND PAYROLL TRANSACTIONS NEED TO CLEAR THE 530 SCREEN BY DECEMBER 31, 2007. |
|
|
|
CLEAR-EXIT PRESS (ENTER) TO CONTINUE |
|
S090 UC: 10 STATE OF OREGON 04/04/14 02:05 PM |
|
LINK TO: NEWS/HELP TABLE PROD |
|
|
|
KEYWORD: PROFILE PAGE: 01 |
|
PROFILE (DEFINITION) |
|
A GROUPING OF DATA ELEMENTS INTO LOGICAL DATA ENTITIES. |
|
PROFILES, ALSO CALLED TABLES IN SOME SYSTEMS, PROVIDE |
|
SIGNIFICANT FLEXIBILITY IN SFMA. THE PROFILES ARE A DISTINCTIVE |
|
FEATURE OF SFMA. |
|
|
|
STATUS CODE: A |
|
EFF START DATE: 07011990 EFF END DATE: LAST PROC DATE: 01042013 |
|
Z06 RECORD SUCCESSFULLY RECALLED |
|
|
|
F3-DELETE F5-NEXT RECORD F8-NEXT ERROR F9-INTERRUPT F10-SAVE |
|
F11-SAVE/CLEAR ENTER-INQUIRE CLEAR-EXIT |
|
S090 UC: 10 STATE OF OREGON 04/04/14 02:07 PM |
|
LINK TO: NEWS/HELP TABLE PROD |
|
|
|
KEYWORD: FL1
PAGE: 01 |
|
|
|
CODE: FL1 CM APPN OVRBDG ACCR D02 FUND ERROR-POS. 01 |
|
|
|
DATA ELEMENT: APPROPRIATION |
|
|
|
EXPLANATION: A TRANSACTION CANNOT BE POSTED TO THE APPROPRIATION FINANCIAL |
|
TABLE (AP) IF IT WILL CAUSE A NEGATIVE ACCRUED-BASIS BUDGET |
|
APPROPRIATION BALANCE. THE TRANSACTION YOU ARE ATTEMPTING TO |
|
SAVE WOULD MAKE THE 'ACCR-BASIS BUD' BALANCE NEGATIVE. |
|
TO EXAMINE THE APPROPRIATION BALANCE FOR THE TRANSACTION, |
|
PRESS F9 FROM HERE TO RETURN TO THE DATA ENTRY SCREEN; |
|
ENTER '62' (APPROPRIATION FINANCIAL INQUIRY) IN THE |
|
'LINK TO:' FIELD, AND PRESS F9 AGAIN. |
|
(CONTINUED ON PAGE 2; PRESS F5) |
|
STATUS CODE: A |
|
EFF START DATE: 11292014 EFF END DATE: LAST PROC DATE: 03081996 |
|
Z06 RECORD SUCCESSFULLY RECALLED |
|
|
|
F3-DELETE F5-NEXT RECORD F8-NEXT ERROR F9-INTERRUPT F10-SAVE |
|
F11-SAVE/CLEAR ENTER-INQUIRE CLEAR-EXIT |
|
S090 UC: 10 STATE OF OREGON 04/04/14 02:19 PM |
|
LINK TO: NEWS/HELP TABLE PROD |
|
|
|
KEYWORD: FL1 PAGE: 02 |
|
|
|
CODE: FL1 CUM APPN OVRBDG ACCR |
|
|
|
DATA ELEMENT: APPROPRIATION |
|
|
|
EXPLANATION: ACCRUED-BASIS BUDGET APPROPRIATION BALANCE IS THE SUM OF THE |
|
FOLLOWING BALANCE TYPES: |
|
|
|
+01 ORIGINAL APPN BUDGET -07 APPN LAPSE AMOUNT |
|
+02 APPN REVISIONS -08 UNSCHEDULED APPN |
|
-03 APPN TRANSFER OUT -15 CASH EXPENDITURES |
|
+04 APPN TRANSFER IN -17 ACCRUED EXPENDITURES |
|
-05 RE-APPROPRIATE OUT -16 BL-REDUCE GF APPN |
|
+06 RE-APPROPRIATE IN |
|
STATUS CODE: A |
|
EFF START DATE: 11292014 EFF END DATE: LAST PROC DATE: 02171995 |
|
Z06 RECORD SUCCESSFULLY RECALLED |
|
|
|
F3-DELETE F5-NEXT RECORD F8-NEXT ERROR F9-INTERRUPT F10-SAVE |
|
F11-SAVE/CLEAR ENTER-INQUIRE CLEAR-EXIT |
91
Report Request Profile
The 91 profile enables a user to request and customize reports based on the options available on the D64 – Report Control Profile for that report. Detail instructions on each area of the 91 profile is covered in the R⋆STARS Report Guide Chapter 1.
Control Key
The Control Key uniquely identifies each Report Request. Whenever a report is generated, the Control Key (Agency, Requester, Request No and Report ID) is printed in the top left corner.
◾ AGENCY – Enter the three-character Agency Code. It must exist in the D02 profile.
◾ REQUESTER – Enter up to a four-character Requester code. It identifies the Requester for which the report is to be generated. This code is normally the user's initials or first name. It is used to assist in report routing. Oregon has not identified a specific standard.
◾ REQUEST NO – Enter the two-digit Request Number. It identifies multiple report requests with the same Agency/Requester/Report ID. This enables agencies to request the same standard financial report with different levels of detail or reporting periods.
◾ REPORT ID – Enter the eight-digit Report ID. It identifies the standard financial report to be generated. The first four characters of this field are generally DAFR, but may be other values for non-standard reports. The first four characters for profile listings are DAFQ.
Information
Elements
◾ APPN YEAR – Enter a two-digit Appropriation Year to restrict the report to a particular Appropriation Year. Effective in May 2000, Service Request # 706 set limits on how many years worth of data can be requested. If the Appropriation Year is left blank and it is a required field for the report being request and it is restricted by Service Request # 706, fatal error 807 Request Year Not Authorized will be received. To complete the 91 Profile an Appropriation Year meeting the criteria will need to be entered. (The default will allow requestable data for two closed fiscal years.) Leave APPN YEAR blank if the field is not allowed per the requested report’s D64 profile.
◾ PERIOD – Enter the
two-character Period code that indicates the period of data that the financial
report covers. Service Request #706 also effects Period. Valid Period codes are
as follows:
|
PM |
– |
Prior Month |
CC |
– |
Last Month Closed |
◾ FY – Must enter two-digit Fiscal Year if a specific fiscal month (i.e. 01-13) is entered and a period is required or optional on the D64 profile. Service Request #706 also effects Fiscal Year.
◾ FREQUENCY – Enter an eight-digit date (MMDDYYYY format) for a specific day or enter Daily, Weekly, Monthly, Quartrly (intentionally abbreviated) or Annually.
◾ FREQ CONTROL – Enter a one-digit Frequency Control indicator of S or A. The S Frequency Control value designates the 97 profile will control the running of this report request. Either by the user entering:a specific date for Frequency, a Frequency of Daily, or a Frequency of Weekly, Monthly, Quartrly or Annually, and the corresponding Reporting Indicator is set to Y in the 97 profile. The A Frequency Control value designates the 25 profile will control the generation of the report via the setting of the Reporting Indicators. The Frequency for the report on the 91 profile record would need to be set to Weekly, Monthly, Quarterly, Annually with the corresponding Reporting Indicator set to Y the 25 profile.
◾ RANGE-FROM DATE/THRU DATE – Enter a two-digit month and a four-digit year, MMYYYY, in FROM DATE and THRU DATE for the report to be run for some portion of the biennium, for a federal fiscal year, or for any other user defined period of time. The month and year entered relate to fiscal month and year. These fields will be entered only if the D64 profile range indicator is set to R (required) or O (optional).
◾ LEVEL – Agencies can choose several Level options to help define their reports. R Required, O Optional, and N Not Allowed options are listed on each requestable reports D64 profile. Note: Whenever a report indicates a specific level on the D64, 0 (zero) is a valid entry. Entering a 0 will ignore that level option.
◾ ORG – Enter the one-digit
Organization Level from the D03 profile that identifies the level
of Organization Detail to be printed on the requested report. Requestable Levels are defined for each report ID in the D64
profile.
|
0 |
– |
None |
4 |
– |
Level 3 |
8 |
– |
Level 7 |
◾ PROGRAM – Enter the one-digit
Program Level from the D04 profile that identifies the level of Program
Detail to be printed on the requested report. Requestable
Levels are defined for each report ID in the D64 profile.
|
0 |
– |
None |
4 |
– |
Level 4 |
7 |
– |
Level 7 |
◾ OBJECT – Enter the one-digit
Object Level from the below listed profiles that identify the level of Object
Level to be printed on the requested report. Requestable
Levels are defined for each report ID in the D64 profile.
|
0 |
– |
None |
3 |
– |
D10 Comptroller Object |
|
2 |
– |
D08 Gaap Source/Object / D48 Grant Object |
|||
◾ FUND – Enter the one-digit
Fund Level from the below listed profiles that identify the level of Fund
Detail to be printed on the requested report. Requestable
Levels are defined for each report ID in the D64 profile.
|
0 |
– |
None |
◾ NACUBO FUND – Not Used in Oregon.
◾ GL ACCT – Enter the one-digit
General Ledger Account from the below listed profiles that shows what account
level is be be printed on the requested report. Requestable Levels are defined for each report ID in the D64
profile.
|
0 |
– |
None |
3 |
– |
D31 Comptroller GL Account |
◾ SPECIAL SELECTS – Appropriate for many reports. These options allow the user to limit the report to a single classification value or a range of values (i.e., a single D10 Comptroller Object or range of Comptroller Objects). There are two fields for each option. To designate a single value, enter the value in the first field. To designate a range of values, enter the starting value in the first field and the ending value in the second field. Each of these options are described below:
◾ AGENCY – Enter a three-character Agency or Agency range. The Agency must exist in the D02 profile. As a result of SR #706, this field is required for most reports. Requiring an Agency entry here helps to avoid a user accidentally ordering a report not just for their agency but for the whole State.
◾ AGENCY GROUP – Enter a two-character Agency Group or leave blank. If entered, it must exist in the D12 – Agency Group Profile. This field must be blank if an Agency or Agency range is entered.
◾ ORG CODE – Enter a four-digit Organization Code or Organization Code range or leave blank. If entered, ORG CODE must exist in the D03 profile.
◾ PROGRAM CODE – Enter a four-digit Program Code or Program Code range or leave blank. If entered, PROGRAM CODE must exist in the D04 profile.
◾ NACUBO FUND – Not Used in Oregon.
◾ APPROP FUND – Enter a four-digit Appropriated Fund or Appropriated Fund range or leave blank. If entered, APPROP FUND must exist in the D22 profile.
◾ FUND – Enter a four-digit Fund or Fund range or leave blank. If entered, FUND must exist in the D23 profile.
◾ COMP OBJECT – Enter a four-digit Comptroller Object or Comptroller Object range or leave blank. If entered, COMP OBJECT must exist in the D10 profile.
◾ AGY OBJECT – Enter a four-digit Agency Object or Agency Object range or leave blank. If entered, AGY OBJECT must exist in the D11 profile.
◾ GL ACCT – Enter a four-digit General Ledger Account or General Ledger Account range or leave blank. If entered, Gl Acct must exist in the D31 profile.
◾ AGY GL ACCT – Enter a four-digit Agency General Ledger or Agency General Ledger Range or leave blank. If entered, AGY GL ACCT must exist in the D32 profile.
◾ SPEC SEL 1 – Enter up to 10 digits in Special Selection 1 (SS1) or range of SS1 or leave blank. The Special Select fields have a low and a high field that is most often used for entering ranges (Vendor Numbers, Grant Numbers, or Project Numbers). These fields are referred to as SS1 LO and SS1 HI. Note: The Special Select codes for each report (if applicable) are specifically defined in the R⋆STARS Report Guide for that report and in the 90 profile under the Keyword for that Report ID (i.e., DAFR9210).
◾ SPEC SEL 2 – Enter up to 10 digits in Special Selection 2 (SS2) or range of SS2 or leave blank. The Special Select fields have a low and a high field that is most often used for entering ranges (Vendor Numbers, Grant Numbers, or Project Numbers). These fields are referred to as SS2 LO and SS2 HI. Note: The Special Select codes for each report (if applicable) are specifically defined in the R⋆STARS Report Guide - R⋆STARS Reports Section by report and in the 90 profile under the Keyword for that Report ID (i.e., DAFR9210).
◾ STATUS CODE – Enter a
one-character Status Code. It will default to Active if not entered. It may be
used to inactivate records no longer in use.
|
A |
– |
Active |
I |
– |
Inactive |
◾ EFF START DATE – Enter the eight-digit Effective Start Date (MMDDYYYY format). It identifies when the record becomes effective. This field can be left blank; it will default to the current date and cause the record to be immediately available.
◾ EFF END DATE – Enter the eight-digit Effective End Date (MMDDYYYY format) or leave blank. EFF END DATE identifies when the record is no longer effective.
Example:
|
S091 UC: 10 STATE OF OREGON 04/04/14 02:23 PM |
|
LINK TO: REPORT REQUEST PROFILE PROD |
|
|
|
AGENCY: 101 REQUESTER: A&RS REQUEST NO: 02 REPORT ID: DAFR6610 |
|
|
|
APPN YEAR: PERIOD: FY: FREQUENCY: 10042013 FREQ CONTROL: S |
|
RANGE - FROM
DATE: 01 2013 THRU DATE: 13 2013 |
|
LEVEL - ORG: 0 PROGRAM: OBJECT: 3 FUND: 3 NACUBO FUND: GL ACCT: |
|
|
|
SPECIAL SELECTS - |
|
AGENCY: 000 999 OR AGENCY GROUP: ORG CODE: |
|
PROGRAM CODE: NACUBO FUND: |
|
APPROP FUND: FUND: |
|
COMP OBJECT: AGY OBJECT: |
|
GL ACCT: AGY GL ACCT: |
|
SPEC SEL 1: SE SPEC SEL 2: |
|
|
|
STATUS CODE: A |
|
EFF START DATE: 10012013 EFF END DATE: LAST PROC DATE: 10032013 |
|
Z07 NEXT RECORD SUCCESSFULLY READ |
|
|
|
F1-HELP F3-DEL F5-NEXT F9-INT F10-SAVE F11-SAVE/CLEAR ENTER-INQ CLEAR-EXIT |
92
Grant/Project Billing Request Profile
The 92 profile is used to request the billings for Grants and/or Projects that are not scheduled for automatic billing at month end. This Profile provides the ability to request a selected cycle of Grants and/or Projects. It also contains the cycle selection that is used by the Project Billing Subsystem to select Grants and/or Projects that have billing schedule dates in the 27 or 29 profiles that fall within the cycle selection.This profile is maintained by the agency.
The billing capabilities in R⋆STARS may be selected on a Project or Grant Phase-BY-Phase basis and include these two primary options.
◾ CYCLE SELECTION – Billing transactions may be calculated at each period end or on specific dates or other cycles such as monthly, quarterly, etc.
◾ BILLING METHOD – Bills may be calculated with or without regard to billable budgets and may be calculated using actual costs, standard percentages or standard costs per unit.
All grants/projects with a Billing Cycle of 2 (bill on specific date) and MMDD values on 27 or 29 profiles that fall within the Grant/Project Billing cycle selection are printed on the Grant/Project Billings Detail Report.
Control Key
◾ AGENCY – Enter the three-character Agency Code. It must exist in the D02 profile.
◾ PERIOD – Enter the
two-character Fiscal Period code. It identifies the month for which billings
should be printed on proof lists and/or generated. Valid codes are as follows:
|
CM |
– |
Current Month – through the current date |
Information
Elements
◾ FROM DATE/TO DATE – Enter up
to six ranges of Transaction Schedules in the MMDD format. It identifies ranges
of dates to be included in the transaction cycle. From Date must be less than
or equal to the To Date. Example: From Date = 0701; To Date = 0703. All
grants/projects with the following MMDD dates in the Grant/Project Control
Table would be selected in this example.
|
AGENCY: 342 |
|
PERIOD: CM (CM=CUR MONTH, PM=PRIOR MONTH) |
|
BILLING CYCLE 1 TRANS IND: (P=PROOF LIST, G=GENERATE TRANS) |
|
BILLING CYCLE 2 FROM DATE TO DATE TRANS FROM DATE TO DATE TRANS |
|
SELECTION MMDD MMDD IND MMDD MMDD IND |
|
1 0507 0507 P 4 0428 0428 P |
|
2 0514 0514 P 5 |
|
3 0421 0421 P 6 |
◾ TRANS IND – Enter a one-character
Transaction Indicator or leave blank. It identifies the system action to be
taken for each range of transaction schedules. The Transaction Indicator must
be blank if the corresponding FROM DATE/TO DATE is blank. Valid indicators are
as follows:
|
Blank |
– |
No system action |
◾ GRANTS TO EXCLUDE – Enter the six-character Grant Number and the two-digit Grant Phase. These identify Grants to be excluded from the cycle selection. List up to five Grant/Phases.
◾ PROJECTS TO EXCLUDE – Enter the six-character Project Number and the two-digit Project Phase. These identify Projects to be excluded from the cycle selection. List up to five Project/Phases.
◾ GRANTS TO INCLUDE – Enter the six-character Grant Number and the two-digit Project Phase. They identify Grants to be included in the cycle selection. List up to five Grant/Phases. Leaving these fields blank will allow selection of all grants.
◾ PROJECTS TO INCLUDE – Enter the six-character Project Number and the two-digit Project Phase. They identify Projects to be included in the cycle selection. List up to five Project/Phases. Leaving these fields blank will allow selection of all projects.
◾ STATUS CODE – Enter a
one-character Status Code. It will default to Active if not entered. It may be
used to inactivate records no longer in use.
|
A |
– |
Active |
I |
– |
Inactive |
◾ EFF START DATE – Enter the eight-digit Effective Start Date (MMDDYYYY format). It identifies when the record becomes effective. This field can be left blank; it will default to the current date and cause the record to be immediately available.
◾ EFF END DATE – Enter the eight-digit Effective End Date (MMDDYYYY format) or leave blank. EFF END DATE identifies when the record is no longer effective.
Example:
|
S092 UC: 10 STATE OF OREGON 04/04/14 03:21 PM |
|
LINK TO: GRANT/PROJECT BILLING REQUEST PROD |
|
|
|
AGENCY: 342 |
|
PERIOD: CM (CM=CUR MONTH, PM=PRIOR MONTH) |
|
BILLING CYCLE 1 TRANS IND: (P=PROOF LIST, G=GENERATE TRANS) |
|
BILLING CYCLE 2 FROM DATE TO DATE TRANS FROM DATE TO DATE TRANS |
|
SELECTION MMDD MMDD IND MMDD MMDD IND |
|
1 0507 0507 P 4 0428 0428 P |
|
2 0514 0514 P 5 |
|
3 0421 0421 P 6 |
|
|
|
GRANTS TO EXCLUDE |
|
1 2 3 4 5 |
|
PROJECTS TO EXCLUDE |
|
1 2 3 4 5 |
|
GRANTS TO INCLUDE |
|
1 400012 07 2 400013 07 3 4 5 |
|
PROJECTS TO INCLUDE |
|
1 350001 07 2 3 4 5 |
|
Z06 RECORD SUCCESSFULLY RECALLED |
|
|
|
F1-HELP F3-DELETE F9-INTERUPT F10-SAVE F11-SAVE/CLEAR
ENTER-INQUIRE CLEAR-EXIT |
93
Recurring Transaction Request Profile
The 93 profile is used to control when recurring transactions will generate. This is only used with the 550 profile records that have an RTI Type of R. This profile enables users to request proof lists of transactions scheduled to be generated during a specified period of time. Once the proof lists are reviewed, the profile is again used to request generation of those transactions.
Each Agency has only one record in the 93 profile. The Agency should assign one employee the responsibility for maintaining this profile to ensure that only authorized transactions are generated.
When the 93 profile is used to either request proof lists or generate transactions, the Recurring Transaction Subsystem generates the DAFR4200 Recurring Transactions Detail Report (Control Report). A field on the report indicates whether the transactions were generated or not. The P indicates that a proof list was generated. Proof lists should be reviewed prior to requesting the generation of the transactions. The value G indicates that the transactions were generated and posted as shown on the report. When the report is for generated transactions, as opposed to a proof list, this report serves as the primary audit trail for the subsystem-generated transactions.
Control Key
◾ AGENCY – Enter the three-character Agency Code. It must exist in the D02 profile.
Information
Elements
◾ CYCLE SELECTION:
◾ FROM DATE/TO DATE – contains six FROM DATE and TO DATE fields that are used to identify the time frames for which proof lists or posted transactions are to be generated. The range of dates entered in this segment are used to select the transactions recorded in the 550 profile. For example, the monthly lease payment scheduled for the first day of each month would be selected if the FROM DATE/TO DATE range in the 93 profile included the first day of the month.
◾ TRANS IND – Enter a
one-character Transaction Indicator or leave blank. It identifies the system
action to be taken for each range of FROM DATE/TO DATE. Each FROM
DATE/TO DATE range may have a unique Transaction Indicator. For example,
the user can select proof lists for transactions scheduled for 0707 to 0714 and
generate transactions for those scheduled for 0701 to 0706. The Transaction
Indicator must be blank if the corresponding FROM DATE/TO DATE is blank.
|
Blank |
– |
No system action |
◾ TRANSACTIONS TO EXCLUDE – Enter up to ten six-character RTIs. These identify transactions to be excluded from the cycle selection. The RTIs must exist on the 550 profile. Transactions to Exclude are used to modify the transaction selection identified by the FROM/TO Date ranges. An example for use of the Exclude fields is when, after review of a proof list, it is determined that one of the transactions listed cannot be generated because the required supporting documentation has not been submitted for approval. In this case, the transaction that was not approved could be excluded from being generated by entering the RTI in the Exclude field.
◾ TRANSACTIONS TO INCLUDE – Enter up to ten six-character RTIs. These identify transactions to be included in the cycle selection. The RTIs must exist on the 550 profile. Transactions to Include are used to modify the transaction selection identified by the FROM/TO Date ranges. For example, when requesting proof lists for this week, a user may also request a transaction scheduled for the following week to be included on the proof lists.
◾ STATUS CODE – Enter a
one-character Status Code. It will default to Active if not entered. It may be
used to inactivate records no longer in use.
|
A |
– |
Active |
I |
– |
Inactive |
◾ EFF START DATE – Enter the eight-digit Effective Start Date (MMDDYYYY format). It identifies when the record becomes effective. This field can be left blank; it will default to the current date and cause the record to be immediately available.
◾ EFF END DATE – Enter the eight-digit Effective End Date (MMDDYYYY format) or leave blank. EFF END DATE identifies when the record is no longer effective.
Example:
|
S093 UC: 10 STATE OF OREGON 04/04/14 03:24 PM |
|
LINK TO: RECURRING TRANSACTION REQUEST PROD |
|
|
|
AGENCY: 101 |
|
CYCLE FROM DATE TO DATE TRANS FROM DATE TO DATE TRANS |
|
SELECTION: MMDD MMDD IND MMDD MMDD IND |
|
1: 0404 0404 4: |
|
2: 5: |
|
3: 6: |
|
|
|
TRANSACTIONS TO EXCLUDE: |
|
1: 2: 3: 4: 5: |
|
6: 7: 8: 9: 10: |
|
|
|
TRANSACTIONS TO INCLUDE: |
|
1: 2: 3: 4: 5: |
|
6: 7: 8: 9: 10: |
|
STATUS CODE: A |
|
EFF START DATE: 04042014 EFF END DATE: LAST PROC DATE: 04042014 |
|
Z07 NEXT RECORD SUCCESSFULLY READ |
|
|
|
F1-HELP F3-DEL F5-NEXT F9-INT F10-SAVE F11-SAVE/CLEAR ENTER-INQ CLEAR-EXIT |
94
Agency Message Profile
The 94 profile is used to attach standard messages to invoices that are sent to customers or vendors. The 94 profile is Agency maintained.
The 94 profile messages are used in conjunction with the 515 – Invoice Entry Screen. While at the 515 screen, a user can press the F2 -MSG function key and interrupt to the 94 profile, or the user can type an Agency and Keyword of a previously saved message. If F2 is pressed, the user is taken to the 94 profile. A new message may be added or old messages may be updated. For a new message, Agency and Keyword and text must be entered and saved. The Agency and Keyword are then displayed when interrupting back to the 515 screen. After the invoice and message are saved, and if enter (inquire) is pressed, the first line of the message associated with the Keyword is displayed on the 515 screen.
New messages can also be created without going through the 515 screen. To review or create a new message, the user can go to the Link To field, enter 94, and press Enter. Or, from the FIN menu, press F11 -AGENCY MESSAGE PROFILE.
Control Key
◾ AGY – Enter the three-character Agency Code. It must exist in the D02 profile.
◾ KEYWORD – Enter up to a 20-character Keyword.
Information
Elements
◾ PAGE – Enter up to a two-digit Page number. It must be in the format of 01 to 99.
◾ MESSAGE AREA – Though not labeled Message Area, the area below the AGY, KEYWORD, and PAGE is reserved for message context. Enter up to 13 lines per page of up to a 79-character message. If more then 13 lines are needed for the message, then a Page 02 would need to be created.
◾ STATUS CODE – Enter a
one-character Status Code. It will default to Active if not entered. It may be
used to inactivate records no longer in use.
|
A |
– |
Active |
I |
– |
Inactive |
◾ EFF START DATE – Enter the eight-digit Effective Start Date (MMDDYYYY format). It identifies when the record becomes effective. This field can be left blank; it will default to the current date and cause the record to be immediately available.
◾ EFF END DATE – Enter the eight-digit Effective End Date (MMDDYYYY format) or leave blank. EFF END DATE identifies when the record is no longer effective.
Example:
|
S094 UC: 10 STATE OF OREGON 04/04/14 03:26 PM |
|
LINK TO: AGENCY MESSAGE PROFILE PROD |
|
|
|
AGY: 101 KEYWORD: DUNN60 PAGE: 01 |
|
|
|
THE FOLLOWING UNPAID INVOICES ARE 60 DAYS OR OLDER. YOUR PROMPT ATTENTION IN |
|
GETTING THESE PAID WOULD BE APPRECIATED. PLEASE CALL JANE DOE AT |
|
(503) 378-2349 X 999 IF YOU HAVE ANY QUESTIONS. |
|
|
|
STATUS CODE: A |
|
EFF START DATE: 03271995 EFF END DATE: LAST PROC DATE: 01222001 |
|
Z06 RECORD SUCCESSFULLY RECALLED |
|
|
|
F1-HELP F3-DEL F5-NEXT F9-INT F10-SAVE
F11-SAVE/CLEAR ENTER-INQ CLEAR-EXIT |
95
Report Distribution Profile
The 95 profile controls the distribution of financial reports. This profile allows the user to do the following:
◾ Identify the person/organization who will receive the report
◾ Describe the report recipient's name, address, telephone, and any delivery instructions
◾ Describe the media on which the report will be produced (hard copy or microfiche)
◾ Identify the printer on which the report will be produced
◾ Specify the number of copies
The R⋆STARS Report Guide Chapter 1
has detailed instructions and suggestions on how to complete the 95
profile. Included in the Guide are instructions on how to set up a 95
profile as a default for all reports. Reports that are separately requested
will automatically be distributed under the default setting unless a separate 95
profile is created. Defaults may be set at the Requester or Report level. The
elements required for each of these defaults are as follows:
|
Agency |
Requester |
Request # |
Report ID |
Dist Code |
|
|
Requester |
R |
R |
N |
N |
R |
|
R=Required, N=Not Required |
|||||
Requester level defaults are set up by agency personnel. Requester level defaults are used to consistently route reports requested by the same requester. Requester level defaults are used if no specific report distribution record exists for a request number and no report level default exists for the requester/report ID combination.
Report level defaults are used to route all requests made by a requester for a report to the same distribution. This capability allows a user to set up one distribution for all request numbers for a report. Multiple copies of a report should be requested on the 95 profile versus separate 91 profiles. When the report job runs, it reads each 91 profile, downloads the information, sorts the information, then prints the report based on the 95 profile. It does this for each 91 profile. If the 95 profile requests 4 copies, the 91 profile is only read once. If the 91 profile is used to create the 4 copies (separate 91 profiles), the system reads, downloads, sorts, and prints 4 separate times. This is much more time consuming and costly.
The combination of Agency, Requester, Request Number, and Report ID identifies each report produced by the system and provides the link to the report designated in the 91 profile.
The 91 profile is also related to the D63 – Device ID Profile. When RJE is the Media Type, the Device ID must be a valid Device ID identified in the D63 profile.
Control Key
The Control Key uniquely identifies each Report generated by the system. The Agency, Requester, Request No, and Report ID combination must match a report designated in the Report Request Profile.
◾ AGENCY – Enter the three-character Agency Code. It must exist in the D02 profile.
◾ REQUESTER – Enter up to a four-character Requestor Code from the 91 profile.
◾ REQUEST NO – Enter the two-digit Request No from the 91 profile or leave blank.
◾ REPORT ID – Enter the eight-digit Report ID from the 91 profile or leave blank.
◾ DISTRIBUTION CODE – Enter a four-character Distribution Code. It identifies the person or organization receiving the report. This could be the receiver's name, initials, or code.
Information
Elements
◾ MEDIA TYPE – Enter the four-character Media Type. It identifies the desired output media for the requested report. Valid types are as follows:
◾ ERPT – Creates and transmits print files for control reports centrally maintained on CD.
◾ SPL1 – Prints at the Print Plant on standard gray bar paper, portrait style – 2 up duplex.
◾ SPL2 – Prints at the Print Plant on standard gray bar paper, portrait style – 2 up simplex.
◾ SPL3 – Prints at the Print Plant on standard gray bar paper, landscape style – 1 up duplex.
◾ SPL4 – Prints at the Print Plant on white paper, portrait style, for A/R Invoices and Statements.
◾ SPL5 – Prints at the Print Plant on standard gray bar paper, landscape style – 1 up simplex.
◾ RJE – Remote Printer Reports. The specific printer for which RJE media based reports are routed is the device ID and must be valid on the D63 Profile.
◾ COM – Standard Computer Output Microfiche. One microfiche with breaks by requesting agency and requester. Device ID is not used with Com.
◾ IMG – Imaging. New as of April 2000. Originated by Department of Human Services who has an electronic imaging system (called Mobius). It reads DAFR reports and once extracted and sorted by someone at the agency, reports are made available in an electronic format to each of their agencies on-line.
◾ WRP1 – Produces Electronic Reports in an Adobe PDF file in landscape format for view on the internet.
◾ WRP2 – Produces Electronic Reports in an Adobe PDF file in portrait format for view on the internet.
◾ DEVICE ID – Enter the four-digit Device Id if the Media Type is RJE, otherwise leave blank. It identifies the printer for the requested report. If entered, it must exist in the D63 profile.
◾ COPIES – Enter the two-digit number of Copies. It identifies the number of report copies to be generated. This field is not be used to request multiple copies of microfiche.
◾ NAME – Enter up to a 30-character Name or leave blank. It identifies the person or organization to receive the report.
◾ ADDRESS 1 – Enter up to a 40-character Address or leave blank. It identifies the Address for the report distribution.
◾ ADDRESS 2 – Enter up to a 40-character Address or leave blank. It allows additional room for large Address identification for the report distribution.
◾ CITY – Enter up to a 30-character City or leave blank.
◾ STATE – Enter a two-character State code or leave blank.
◾ ZIP – Enter a five-digit or the extended nine-digit Zip Code or leave blank.
◾ MAIL CODE – Enter a three-character Mail Code or leave blank. It identifies an internal mail routing designation at the agency.
◾ PHONE – Enter up to a ten-character Telephone Number or leave blank. It identifies the Telephone Number of the individual to receive the report. Format is Area Code, Exchange, and Number sequentially (No spaces or other editing).
◾ INSTRUCTIONS – Enter up to 40 characters of any special Instructions. It identifies any special delivery instructions or other descriptive data.
◾ STATUS CODE – Enter a
one-character Status Code. It will default to Active if not entered. It may be
used to inactivate records no longer in use.
|
A |
– |
Active |
I |
– |
Inactive |
◾ EFF START DATE – Enter the eight-digit Effective Start Date (MMDDYYYY format). It identifies when the record becomes effective. This field can be left blank; it will default to the current date and cause the record to be immediately available.
◾ EFF END DATE – Enter the eight-digit Effective End Date (MMDDYYYY format) or leave blank. EFF END DATE identifies when the record is no longer effective.
Example:
|
S095 UC: 10 STATE OF OREGON 04/04/14 03:28 PM |
|
LINK TO: REPORT DISTRIBUTION PROFILE PROD |
|
|
|
AGENCY: 101 REQUESTER: A&RS REQUEST NO: 02 REPORT ID: DAFR6610 DIST CODE: 4608 |
|
|
|
MEDIA TYPE: SPL5 |
|
DEVICE ID: |
|
COPIES: 01 |
|
NAME: CHRISTINA AGUILERA - A&RS |
|
ADDRESS 1: 3RD FLOOR - DAS WEST |
|
ADDRESS 2: 155 COTTAGE ST NE U50 |
|
CITY: SALEM |
|
STATE: OR ZIP: 97301 3969 MAIL CODE: |
|
PHONE: 373-7277 |
|
INSTRUCTIONS: PLEASE DELIVER TO THIRD FLOOR |
|
|
|
STATUS CODE: A |
|
EFF START DATE: 04142014 EFF END DATE: LAST PROC DATE: 04162014 |
|
Z26 RECORD NOT FOUND - NEXT RECORD RECALLED |
|
|
|
F1-HELP F3-DEL F5-NEXT F9-INT F10-SAVE F11-SAVE/CLEAR ENTER-INQ CLEAR-EXIT |
96A
/96B Security profile
The Security Profile is divided into two screens, 96A and 96B. The 96A profile screen controls the User Level security capabilities of the system, while the 96B profile screen controls the Function Level Security of the system. DAS SARS Security Officers maintain this two-screen profile and the corresponding R⋆STARS Security Manual. The R⋆STARS Security Manual has detail information about the 96A and 96B profile plus specific examples by D66 User Class.
The 96A and 96B profile is associated directly with the D66 profile. The two-digit User Class identifies the transaction codes (T-Codes) or ranges of T-Codes that can be processed with that User Class. Each 96A and 96B profile requires a User Class. A user’s activity on-line is determined by their User Class and Security Profile.
96A Profile
The 96A profile screen identifies the agencies and actions a user has access to. The F6 key will move a user between the 96A to 96B screens.
Control Key
◾ USER ID / CLASS – Enter an up to eight-character User ID (RACIF ID) and a two-digit User Class. The RACIF ID is assigned by Personnel when an employee starts in a new position. DAS Security uses the RACIF ID as the User ID. The User Class must exist in the D66 profile.
Information
Elements
◾ AGENCY – Enter the three-character Agency Code. It must exist in the D02 profile. This identifies the agency for which the user may perform system functions. (This is the batch default agency, and is known as the Batch Agency).
If the ACCOUNTING TRANS indicator (below) is 2 or 4, the user will be allowed to access multiple agencies if listed in AGENCY RANGE 1 and AGENCY RANGE 2 or in AGENCY GROUP.
If ACCOUNTING TRANS is 1 or 3, the user will be allowed access to the agency coded in the SECURITY AGENCY FIELD (below).
If further restriction is desired, the SECURITY ORG fields may be coded. These fields are only used if a user has access to a single agency, and if the user's activities need to be restricted to an organization level lower than Agency. This will limit report requests, transaction input, and financial inquiries where Agency and Organization Code are in the key.
◾ NAME – Enter up to a 20-character user Name.
◾ ACCOUNTING TRANS – Enter a
one-digit Accounting Transaction indicator. Valid indicators are as follows:
|
Blank |
– |
No access to accounting transactions. |
|
0 |
– |
Inquire only for Security Agency, Batch Agency, or Range of Agencies, or Agency Group. |
|
1 |
– |
Entry and changes allowed for agency specified in Security Agency. |
|
2 |
– |
Entry and changes allowed for Security Agency, Batch Agency or Range of Agencies, or Agency Group. |
|
3 |
– |
Same authorization as 1 plus ability to change transactions on approved documents, released batches and Batch Type G’s for Security Agency. |
|
4 |
– |
Same authorization as 2 plus ability to change transactions on approved documents, released batches and Batch Type G’s for Batch Agency, Security Agency and agencies specified in Agency Ranges or Agency Group. |
◾ BATCH EDIT MODE – Enter the
one-digit Batch Edit Mode for the user:
|
0 |
– |
User can only use Edit Mode of 0. Transactions are captured, but data and financial elements are not edited or posted until released to a batch cycle. |
|
1 |
– |
User can use Edit Modes of 0 or 1; default is 1. Performs data edits on-line, but does not perform financial edits or post until released to a batch cycle. |
|
2 |
– |
User can use Edit Modes of 0, 1 or 2; default is 2. Edits and posts to tables on-line. |
◾ RELEASE FLAG – Enter the
one-digit Release Flag code as follows:
|
0 |
– |
User cannot release batches on-line |
◾ DISBURSEMENT METHOD – Enter
the one-digit Disbursement Method Indicator (DMI) as follows:
|
Blank |
– |
Cannot enter a DMI on accounting transactions |
◾ AGENCY GROUP – Enter a two-digit Agency Group Code or leave blank. If entered, it must exist the D12 profile. Agency group is a grouping of selected agencies. This element is used when AGENCY RANGE 1 and 2 are not adequate for agency access or when cash is affected in multiple agencies. If ACCOUNTING TRANS is 1 or 3, this field is not allowed to be entered.
◾ WORK HOUR – Enter the range of hours that the user can access the system. Maximum range allowed is: 0000 – 2400
◾ AGENCY RANGE 1 – Enter an Agency Range, consisting of two three-character Agency codes or leave blank. AGENCY RANGE identifies the agencies to which the user is restricted for entering accounting transactions, performing profile maintenance, ordering reports, or viewing financial data. If ACCOUNTING TRANS equals 1 or 3, this field is not allowed. The user has the ability to reduce cash in an agency that falls within AGENCY RANGE 1.
◾ WORK DAY – Enter the Work Day
indicator as follows:
|
W |
– |
Weekday access only |
◾ AGENCY RANGE 2 – Enter an Agency Range, consisting of two three-character Agency codes. AGENCY RANGE identifies the agencies to which the user is restricted for entering accounting transactions, ordering reports, or viewing financial data. AGENCY RANGE 1 is required before AGENCY RANGE 2 can be used. User cannot reduce cash in an Agency that falls within AGENCY RANGE 2. For User Class 8, AGENCY RANGE 1 must be filled in as AAA-ZZZ to allow viewing of both sides of the transfer and the AGENCY RANGE 2 field with 001-999 to prevent a user in one agency from reducing cash in another agency.
◾ PRINTER ID – Not Used in Oregon.
◾ SECURITY AGENCY – Enter a three-digit Security Agency. It must exist in the D02 profile. This is the user’s default agency for accounting transactions, profile maintenance, and financial inquiry. If the security agency is not 000, it defaults to the financial agency field on transaction entry screens. In most cases, the Financial Agency and Security Agency will be the same except in the case where an agency has one or more batch agencies.
◾ DEFAULT ACTION CODE AGENCY – Not Used in Oregon.
◾ SECURITY ORG (first) – Enter a four-digit Security Organization Code that identifies the organization within the agency for which access is desired, or leave blank. If entered, it must exist in the D03 profile. If entered, the user is restricted to the organization represented by the Organization Code and all levels below that Organization Code. Additionally, SECURITY AGENCY must be entered.
◾ DEFAULT ACTION CODE – Not Used in Oregon
◾ SECURITY ORG (second) – Enter another four-digit Security Organization Code that identifies an additional organization within the agency for which access is desired, or leave blank. If entered, it must exist in the D03 profile.
◾ PRIOR MO POST IND – Enter
the one-character Prior Month Posting Indicator to determine whether the user
can post transactions to the prior accounting month:
|
Y |
– |
The user is allowed to post transactions to the prior accounting
month |
◾ PRIOR YR POST IND – Enter the
one-character indicator to determine whether the user can post transactions to
the prior year:
|
Y |
– |
The user is allowed to post transactions to the prior year |
◾ VIEW TIN INFO – Enter the
one-character View TIN Information indicator. It controls whether EIN/SSN
information is displayed on the 52 vendor profiles. Valid indicators are as
follows:
|
Y |
– |
TIN information is displayed – central staff
& agency payable staff |
◾ VIEW BANK INFO – Enter the one-character
View Bank Information indicator. It controls whether vendor bank information is
displayed on the vendor profiles. Valid indicators are as follows:
|
Y |
– |
Vendor bank information is displayed – central
staff only |
◾ FUND OVERRIDE – Enter the
one-digit Fund Override indicator or leave blank:
|
Blank |
– |
No fund override allowed |
◾ STATEWIDE REPORTING – Enter a
one character Statewide Reporting indicator:
|
Y |
– |
Yes, Allows Printing of Statewide Reports. Authorization given
by SFMS Operations. |
◾ STATUS CODE – Enter a
one-character Status Code. It will default to Active if not entered. It may be
used to inactivate records no longer in use.
|
A |
– |
Active |
I |
– |
Inactive |
◾ EFF START DATE – Enter the eight-digit Effective Start Date (MMDDYYYY format). It identifies when the record becomes effective. This field can be left blank; it will default to the current date and cause the record to be immediately available.
◾ EFF END DATE – Enter the eight-digit Effective End Date (MMDDYYYY format) or leave blank. EFF END DATE identifies when the record is no longer effective.
Example:
|
S96A UC: 10 STATE OF OREGON 04/04/14 03:43 PM |
|
LINK TO: SECURITY PROFILE PROD |
|
|
|
USER ID/CLASS: NEWUSER 27 AGENCY: 101 NAME: DOE, JOHN Q |
|
|
|
ACCOUNTING TRANS: 4 BATCH EDIT MODE: 2 |
|
RELEASE FLAG: 1 DISBURSEMENT METHOD: |
|
AGENCY GROUP: 50 WORK HOUR: 0000 2400 |
|
AGENCY RANGE
1:
WORK DAY: A |
|
AGENCY RANGE 2: PRINTER ID: |
|
SECURITY AGENCY: 101 DEFAULT |
|
SECURITY ORG: ACTION CODE AGENCY: |
|
SECURITY ORG: ACTION CODE: |
|
PRIOR MO POST IND: Y VIEW TIN INFO: N (Y/N) |
|
PRIOR YR POST IND: Y VIEW BANK INFO: N (Y/N) |
|
FUND OVERRIDE: STATEWIDE REPORTING: N (Y/N) |
|
|
|
STATUS CODE: A |
|
EFF START DATE: 01072002 EFF END DATE: LAST PROC DATE: 01142008 |
|
Z06 RECORD SUCCESSFULLY RECALLED |
|
|
|
F1-HELP F3-DELETE F5-NEXT F6-96B F9-INTERRUPT F10-SAVE F11-SAVE/CLEAR |
|
ENTER-INQUIRE CLEAR-EXIT |
96B Profile
The 96B profile identifies the individual R⋆STARS profiles a user may have authority to view or update. The F6 key will move a user between the 96A to 96B screens.
Control Key
◾ USER ID / CLASS – Enter an up to eight-character User ID (RACIF ID) and a two-digit User Class. The RACIF ID is assigned by Personnel when an employee starts in a new position. DAS Security uses the RACIF ID as the User ID. The User Class must exist in the D66 profile.
Information
Elements
◾ FUNCTIONS – Enter the
one-digit Function code as follows in each field denoted by the screen ID or
leave blank. Not all R⋆STARS screens are shown on the 96B. Some
screens are accessed only through a drill down process (such as 11 and 60),
others are information only screens (such as 13, 3A, 3N). Valid codes for the
screens on the 96B are as follows:
|
Blank |
– |
No Access (will not see screen ID on menu) |
As of 12/06/2011 new screen ID, WRP was added to allow access to electronic web reports via the internet. Function 0 in this screen ID allows access to authorized reports based on 96A Security Agency or Agency Group.
◾ STATUS CODE – Enter a
one-character Status Code. It will default to Active if not entered. It may be
used to inactivate records no longer in use.
|
A |
– |
Active |
I |
– |
Inactive |
◾ EFF START DATE – Enter the eight-digit Effective Start Date (MMDDYYYY format). It identifies when the record becomes effective. This field can be left blank; it will default to the current date and cause the record to be immediately available.
◾ EFF END DATE – Enter the eight-digit Effective End Date (MMDDYYYY format) or leave blank. The Eff End Date identifies when the record is no longer effective.
Example:
|
S96B UC: 10 STATE OF OREGON 04/04/14 03:43 PM |
|
LINK TO: SECURITY PROFILE PROD |
|
USER ID/CLASS: NEWUSER 27 AGY: 101 NAME: DOE, JOHN Q |
|
D01 0 D02 0 D03 2 D04 2 D05 0 D06 2 D08 0 D09 0 D10 0 D11 2 D12 0 |
|
D13 0 D14 0 D15 0 D16 0 D17 0 D18 0 D19 2 D20 0 D21 0 D22 0 D23 0 |
|
D24 0 D25 2 D26 2 D27 2 D28 2 D30 0 D31 0 D32 2 D33 0 D34 0 D35 0 |
|
D36 2 D37 0 D38 0 D39 0 D40 0 D41 0 D42 2 D43 0 D44 0 D45 0 D46 0 |
|
D47 2 D48 2 D49 0 D50 0 D51 0 D52 2 D53 0 D54 0 D55 0 D56 0 D57 0 |
|
D59 2 D61 0 D62 0 D63 0 D64 0 D66 0 D67 0 D71 0 D73 0 D80 0 010 0 |
|
012 0 014 0 017 2 018 0 020 0 021 2 022 2 023 0 024 2 025 2 026 2 |
|
027 2 28A 0 28B 0 029 2 030 2 031 2 033 0 034 2 035 0 036 0 037 0 |
|
038 0 039 0 041 2 042 0 043 0 43M 0 044 0 045 0 046 0 047 0 048 0 |
|
049 0 051 0 052 0 053 2 054 2 055 2 056 0 057 0 058 0 059 0 061 0 |
|
062 0 063 0 064 0 065 0 066 0 067 0 068 0 069 0 077 2 078 2 079 2 |
|
080 0 081 2 082 0 084 0 085 0 086 0 087 0 088 0 089 0 090 0 091 2 |
|
092 2 093 2 094 2 095 2 096 0 097 0 101 0 102 0 103 2 105 0 106 0 |
|
515 2 518 2 540 2 550 2 |
|
|
|
EFF START DATE: 01072002 EFF END DATE: LAST PROC DATE: 01142008 |
|
Z06 RECORD SUCCESSFULLY RECALLED |
|
|
|
F1-HELP F3-DEL F5-NXT F6-96A F9-INT F10-SAVE F11-SAVE/CLR ENTER-INQ CLEAR-EXT |
97
System Management Profile
The 97 profile controls a variety of system processes, including the execution of many of R⋆STARS subsystems. DAS SFMS Operations maintains the 97 profile. By making simple on-line changes to this profile, SFMS Operations provides system-level (statewide) control over processing. To provide this control, the 97 profile maintains a variety of information regarding:
◾ Accounting periods that are available for posting
◾ System-level process control indicators – such as Cost Allocation Run Indicator and Requestable Reports
◾ System-level process dates – such as Current Effective Date
◾ Current and prior processing Cycle Numbers, Dates, and Times
Another important relationship is between the 97 profile and the 25 profile. Both profiles contain indicators that control the processing of the Cost Allocation, Grant/Project Billing, and Reporting subsystems. The 97 profile controls the subsystem processes at the statewide level where the 25 profile controls processing for each agency. The Cost Allocation Subsystem is run whenever the 97 profile COST ALLOCATION RUN is set to Y.
Through the use of indicators on the 25 profile, agencies may choose when to generate monthly or yearly requestable reports. These indicators must be consistent with the reporting indicators on the 97 profile in order for the reports to run. Agencies can also choose to run on the 97 profile only.
The interrelationship between the 25 and 97 profiles dictates that similar indicators in each profile must both be set to Y for the associated subsystem to run. If either profile's indicators are set to N– Do Not Run Cycle, the subsystem will not run. Therefore, it is important for agencies to establish subsystem schedules that are consistent with the statewide schedule defined by SFMS Operations.
Control Key
The Control Key for this profile identifies the single record that is contained in the 97 profile. The Control Key consists of a record number identifier that is always set to a value of 1. The Control Key cannot be changed, nor can a second 97 profile record be added. Accordingly, the Control Key is not shown on the 97 profile screen; therefore, it is not entered in order to recall the profile.
Information
Elements
Note that the 25 profile provides additional control at the agency level over many of the processes controlled by the 97 profile.
◾ CURRENT INDICATORS – this segment identifies the current status of the system. These indicators are maintained and automatically updated by R⋆STARS based on information contained in the D61 – Current Date Profile profile. An important relationship exists between the 97 profile and the D61. The data elements in this segment are as follows:
◾ FISCAL YEAR – two digit protected field that is looked up from the D61 profile. This field identifies the Fiscal Year to which the current Effective Date belongs.
◾ MONTH – two digit protected field that is looked up from the D61 profile. This field identifies the fiscal Month to which the current Effective Date belongs.
◾ AY – Enter the last two digits of the Appropriation Year. For Oregon, the appropriation year is the second fiscal year of each biennium.
◾ EFF DATE – Enter the eight-digit current Effective Date (MMDDYYYY format). It identifies the date for which the system is currently processing. This date is normally the current date, but may be set to any date that falls within the parameters defined in the D61 profile for Agency 000 (DAS Central Agency). The last program in the processing cycle retrieves the NEXT EFF DATE from the D61 profile record and places it in this field to prepare for the next day's processing. If the information contained in the D61 profile is not correct, the new EFF DATE in the 97 profile will also be incorrect. It may be changed manually to any valid date in the D61 profile. However, care must be taken to ensure that the months and years open are consistent with the Effective Date, and that payment dates are acceptable. If on-line update is required, it should be performed before starting the new day’s processing.
System processes which are date oriented use this date as the current date. Some examples are as follows:
◾ The execution of month-end and year-end processing as well as the generation of reports is based on this date, and on other indicators in the D61 profile.
◾ It is the default Effective Date on accounting transactions if the user does not enter a date.
◾ The 97 profile Current Effective Date is printed on warrants when they are generated.
◾ PRIOR EFF DATE – Enter the eight-digit Prior Effective Date (MMDDYYYY format). It identifies the previous date for which system processing was performed. The final end of processing cycle program moves the Current Effective Date to the Prior Effective Date. This field is not normally updated manually. This date is for information purposes only.
◾ TIME – Enter the four-digit Time (0000‑2400). This field sets a standard time for the batch cycle for document tracking exception reports. This field is not normally updated manually.
◾ LAST CLOSED INDICATORS – this segment identifies the last closed month and year. It provides the ability to keep multiple months and years open for processing financial transactions. SFMS Operations can update these values.
◾ FISCAL YEAR – Enter the two-digit Last Closed Fiscal Year. It identifies the last year that is closed to posting. This will prevent any further postings to that year.
◾ MONTH – Enter the two-digit Last Closed Month. It identifies the last month that is closed to posting. Note that in order to close a month for the Current Fiscal Year the Last Closed Fiscal Year is not changed.
◾ REPORTING INDICATORS – this segment contains indicators that the reporting subsystem accesses to determine which reports to generate. For example, if the Month Indicator is set to Y (Yes), then all Statewide report requests identified as being Monthly with Frequency Control of S in the 91 profile will run. Reports identified for a specific date are automatically generated on that date. Requestable reports are only run on Fridays. Except for the INAE indicator below, these indicators are used to trigger the execution of reports identified as being Weekly, Monthly, Quartrly, or Annually in the 91 profile. The valid indicators for each fields are as follows:
◾ WEEK – Enter a one-character
Week indicator. It allows report requests specified as being Weekly to run.
|
Y |
– |
Run Reports |
◾ YEAR – Enter a one-character
Year indicator. It allows report requests specified as being Annually to run.
|
Y |
– |
Run Reports |
◾ INAE – Enter a one-character
Inactive Accounting Event (INAE) indicator. It indicates whether the INAE Table
is swept during the reporting cycle
|
Y |
– |
INAE Table is passed for financial reporting |
◾ MONTH – Enter a
one-character Month indicator. It allows report requests specified as being
Monthly to run.
|
Y |
– |
Run Reports |
◾ QUARTER – Enter a
one-character Quarter indicator. It allows report requests specified as being Quartrly to run.
|
Y |
– |
Run Reports |
◾ RPTS – Enter a one-character
Reports indicator. It determines whether reports including requestable
reports will run.
|
F |
– |
Full Run – All eligible reports will produce |
◾ ADVANCE PAYMENT DAYS – The number of days in advance (transaction due date) of the 97 Current Effective Date that a transaction is selected for payment.
◽ WARR/CHK – Not Used in Oregon. Code 00 will be used as default on the 97 profile.
◽ DIR DEP – Not Used in Oregon. Code 00 will be used as default on the 97 profile.
◾ BACKUP WITHHOLDING PCT – If the State is obligated to withhold a percentage of each payment to the vendor. These field is used to calculate the vendor’s tax liability.
◽ Field 1: Enter the Backup Withholding Percentage in ##.## format. 99.99 is the maximum percentage that can be entered. Vendors who fail to provide a valid Taxpayer Identification Number (TIN) to the State are subject to backup withholding.
◽ Field 2: Enter the Foreign Withholding Percentage in ##.## format. 99.99 is the maximum percentage that can be entered. Vendors from foreign countries that perform services in the United States and do not have a Taxpayer Identification Number (TIN) are subject to withholding.
◾ CONTROL INDICATORS – these Indicators are accessed by various R⋆STARS subsystems to determine if the subsystem is to be executed, or to obtain information required for the subsystem to process. The setting of these indicators is closely related to the job scheduling functions performed by data processing. In those cases where data processing schedules the jobs (subsystems) to be run on selected days only, the setting of these indicators must be coordinated with the scheduled dates.
◾ NEXT DIR DEP SEQ NO – Enter the nine-digit Next Available Direct Deposit Sequence Number. It may be changed manually, but typically the payment processing subsystem updates it at the end of each cycle. It increments the last direct deposit sequence number by one.
◾ NEXT AVAILABLE WARRANT NO – Enter the nine-digit Next Available Warrant Number. It may be changed manually, but typically the payment processing subsystem updates it at the end of each cycle. It increments the last warrant number by one.
◾ LABOR DISTRIBUTION RUN IND – Not Used in Oregon. Code N will be used as default on the 97 profile.
◾ LABOR DISTRIBUTION PAY DATE – Not Used in Oregon. Field will be blank on the 97 profile
◾ YEAR END CLOSING RUN – Not Used in Oregon. Code N will be used as default on the 97 profile.
◾ NEW YEAR INITIALIZATION – Not Used in Oregon. Code N will be used as default on the 97 profile.
◾ COST ALLOCATION RUN – Enter
the one-character Cost Allocation Run indicator. The Cost Allocation Subsystem
can run whenever the Cost Allocation Run Indicator in the 97 profile is
set to Y. It may be run at any time, however, it will only include those
agencies that have indicated on their 25 profile that they are ready to
run cost allocation. The agencies indicate this by changing their Cost
Allocation Run Indicator to Y on their 25 profile. The cost
allocation process allocates expenditures for those periods specified by each
agency’s 25 profile. Valid indicators for the Cost Allocation Run
are as follows:
|
Y |
– |
Run Cost Allocation |
◾ GRANT/PROJ BILLING RUN – Enter
the one-character Grant/Project Billing Run indicator. The Grant/Project
Billing process is designed to accumulate cost information for various types of
grants and projects and to automatically generate accounting transactions that
record the effect of cost transfers. SFMS Operations initiates the
Grant/Project Billing process through the Grant/Project Billing Run Indicator
in the 97 profile. This indicator is normally set to N, and must
be changed to Y to run the Grant/Project Billing Subsystem. When set to Y,
R⋆STARS
selects Grants/Projects based on payment schedules established in the 27,
29, and 92 profiles established by each agency. Valid indicators
are as follows:
|
Y |
– |
Run Grant/Project Billing |
◾ RECURRING TRANS RUN – Enter
the one-character Recurring Transaction Run indicator. It identifies whether
the Recurring Transaction Subsystem is to be run. The Recurring Transactions Subsystem
provides for automatic posting of recurring type transactions based on
transaction schedules established in each agencies 550 and 93
profiles. Valid indicators for the Recurring Trans Run indicator are as
follows:
|
Y |
– |
Run recurring transactions (Default per SFMS Operations) |
◾ FIXED ASSET DEPRECIATION RUN – Not Used in Oregon. Code N will be used as default on the 97 profile.
◾ FIXED ASSET SUSPENSE RECONC – Not Used in Oregon. Code N will be used as default on the 97 profile.
◾ FIXED ASSET SUSPENSE POST – Not Used in Oregon. Code N will be used as default on the 97 profile.
◾ TAX OFFSET RUN – Not Used in Oregon. Code N will be used as default on the 97 profile.
◾ MAX CHG TRANS – Enter the four-digit Maximum Change Transactions. This identifies the maximum number of transactions within a batch that can be updated on-line using the mass change option on the Batch Correction Screen. The Batch Error Correction process allows for mass change of all transactions in a batch. The number entered here controls whether the mass change is handled as an on-line or batch function. If a mass change is initiated and the number of transactions in the batch exceed this number, the change occurs as a background function; otherwise it occurs on-line.
◾ NEXT AVAIL ARCH REF NO (XMITL) – Not Used in Oregon. Code 000001 will be used as default for both current and prior years on the 97 profile.
◾ NEXT AVAIL ARCH REF NO (non-XMITL) – Not Used in Oregon. Code A00001 will be used as default for both current and prior years on the 97 profile.
◾ BATCH RESTORE INDICATOR – A
one-character Batch Restore Indicator that is set by the system to identify
when secondary posting fails. (It identifies whether the batch cycle needs to
restore (or re-post) the secondary financial tables due to an on-line
failure.) When this occurs, the batch restore process is automatically
run prior to the beginning of the nightly cycle. This indicator should be reset
to N at the successful completion of the nightly batch cycle. If it is
not N at the beginning of the day, Data Processing should be consulted
to determine if new transactions may be entered. Valid indicators are as
follows:
|
Y |
– |
Restore |
◾ ON-LINE AVAILABLE – A one-character On-Line System Available indicator that identifies whether the on-line system is available. At the start of the nightly batch cycle, this indicator is automatically set to N – On-line system not available. At the end of a system processing cycle, the Final End of Processing Cycle program sets this indicator to Y – On -line system available. Users cannot access the on-line system while the nightly batch cycle is running. Careful analysis must be performed if a batch process is not completed during the night. Data Processing analysts should be consulted to determine if new transactions may be entered. This field is not normally updated by SFMS Operations.
◾ PROCESSING CYCLE INFORMATION: (system generated) – this segment of the profile identifies current and prior processing cycle information. This data is accessed by the system during batch update to verify that the correct versions of the system tables are being used. The processing cycle date and time is stored on each transaction in the History File. The Current Cycle Date, Time, and Number are printed on control and requestable reports to uniquely identify the reports to a specific batch cycle. The processing cycle date and time is stored on each transaction in the History File. These indicators are automatically updated by the system and cannot be set manually by SFMS Operations.
◾ CURRENT DATE/TIME – identifies the date (MMDDYYYY format) and time (HHMM format) at the beginning of the current system processing cycle. At the start of the daily batch IEU, the system date and time are moved into these data fields. At the end of a system processing cycle, the program moves the system date and time into the Current Date and Time to document the start of a new cycle. Any report generated by the batch IEU process uses the Current Date/Time to identify that it belongs to that cycle.
◾ CURRENT CYCLE – four-digit number identifies the Current Processing Cycle. At the end of a system processing cycle, the Final End of Processing Cycle program increments the Current Cycle Number by one.
◾ PRIOR DATE/TIME – identifies the beginning of the previous system processing cycle date (MMDDYYYY format) and time (HHMM format). The Final End of Processing Cycle program moves the Current Cycle Date and Time into the Prior Cycle Date and Time. A processing cycle starts one minute after the end of the previous processing cycle.
◾ PRIOR CYCLE – identifies the Prior Processing Cycle Number. At the end of a system processing cycle, and before the Current Cycle Number is incremented, the Current Processing Cycle Number is moved to this field.
Example:
|
S097 UC: 10 STATE OF OREGON 04/04/14 03:47 PM |
|
LINK TO: SYSTEM MANAGEMENT PROFILE PROD |
|
CONTROL INDICATORS - NEXT DIR DEP SEQ NO: 950157553 |
|
CURRENT INDICATORS- NEXT AVAILABLE WARRANT NO: 120452912 |
|
FISCAL YEAR: 14 MONTH: 10 AY: 15 LABOR DISTRIBUTION RUN: N |
|
EFF DATE: 04042014 LABOR DISTRIBUTION PAY DATE: |
|
PRIOR EFF DATE: 04032014 YEAR END CLOSING RUN: N |
|
TIME: 1200 NEW YEAR INITIALIZATION: N |
|
LAST CLOSED- COST ALLOCATION RUN: N |
|
FISCAL YEAR: 14 MONTH: 08 GRANT/PROJ BILLING RUN: N |
|
REPORTING INDICATORS- RECURRING TRANS RUN: Y |
|
WEEK: N YEAR: N INAE: N FIXED ASSET DEPRECIATION RUN: N |
|
MONTH: N QUARTER: N RPTS: N FIXED ASSET SUSPENSE RECONC: N |
|
ADVANCE PAYMENT DAYS- FIXED ASSET SUSPENSE POST: N |
|
WARR/CHK: 00 DIR DEP: 00 TAX OFFSET RUN: N |
|
BACKUP WITHHOLDING PCT: 28.00 : 30.00 MAX CHG TRANS: 01000 |
|
NEXT AVAIL ARCH REF NO (XMITL) CURR: 14 000001 PRIOR: 13 000001 |
|
NEXT AVAIL ARCH REF NO (non-XMITL) CURR: 14 A00001 PRIOR: 13 A00001 |
|
--------PROCESSING CYCLE INFORMATION----------- BATCH RESTORE |
|
CURRENT: DATE: 04042014 TIME: 20:06 CYCLE: 9790 INDICATOR (Y/N): N |
|
PRIOR: DATE: 04032014 TIME: 23:53 CYCLE: 9789 ONLINE AVAILABLE: Y |
|
|
|
F1-HELP F9-INTERRUPT F10-SAVE F11-SAVE/CLEAR CLEAR-EXIT |
550
Recurring Transaction Profile
The 550 Profile defines the coding elements for a Recurring Transaction. It also determines whether the system will generate a transaction on a pre-defined schedule or the user will enter the RTI to retrieve coding while creating a batch.
The 550 Profile creates a Recurring Transaction Index (RTI) used to identify the coding elements within the Recurring Transaction Subsystem. The subsystem provides a mechanism for reducing data entry for transactions that occur frequently over a period of time. Two examples are rent payments and utility bills.
The 550 Profile can also be used to allocated costs over multiple funds using a percentage split. This profile is Agency maintained.
Control Key
◾ AGENCY – Enter the three-character Agency Code. It must exist in the D02 profile.
◾ TRANS NO – Enter up to a six-digit Transaction Number.
◾ RTI – Enter the six-digit RTI or leave blank. This is a required field when % ALLOCATED field is entered. If R RTI Type, RTI may be blank. If S RTI Type, this field must be entered. All transactions for a given RTI must have the same RTI Type value.
◾ RTI TYPE – Enter the
one-character RTI Type. Valid types are as follows:
|
R |
– |
A regular non-split transaction – there is no limit on the quantity of Transactions Numbers and Amounts that may be entered. |
|||
|
S |
– |
A split transaction – only the following fields may be entered: |
|||
|
AGENCY |
TRANS NO |
RTI |
|||
|
There can not be more than 10 Transaction Numbers for an S Type RTI. |
|||||
Information
Elements
The following coding instructions are informational only, except those associated with the AMOUNT and % ALLOCATED data elements. A recurring transaction record can be added with all element values blank, except AMOUNT and % ALLOCATED. (One of these two must be on the profile).
◾ DESCRIPTION – Enter up to a 40-character Description for the Recurring Transaction. If the RTI Type is S, this field must be blank.
◾ GENERATE SCHEDULE – Enter the four-digit Generate Schedule in mmdd format. There are up to four Generate Schedules possible. Month (mm) must be from 01 to 12 and Date (dd) must be from 01 to 31. If the RTI Type is S, this field must be blank.
◾ BATCH AGENCY – Enter a three-digit Batch Agency. When entered, it must exist in the D02 profile. Usually this field is defaulted based on the user's sign-on. If the RTI Type is S, this field must be blank.
◾ BATCH TYPE – Enter the one-character
Batch Type. It identifies the type of transactions in the batch. Each Batch
Type must match the range of Batch Types defined in 28B profile for the
Trans Code. If the RTI Type is S, this field must be blank. Valid types
are as follows:
|
1 |
– |
Budgetary |
4 |
– |
Expenditures/Disbursements |
|
3 |
– |
Pre-encumbrances/Encumbrances |
|||
◾ DOC DATE – Enter the six-digit Document Date in mmddyy format. It identifies the date related to the Document. If the RTI Type is S, this field must be blank.
◾ SERV DATE – Enter the six-digit Service Date in mmddyy format. It identifies the date of service. If the RTI Type is S, this field must be blank.
◾ CUR DOC/SFX – Enter up to an eight-character Current Document and a three-character Current Document Suffix. The last three characters of the Current Document must be numeric. In the on-line process, the Cur Doc Number will not be retrieved from the 550 Profile. If the RTI Type is S, this field must be blank.
◾ REF DOC/SFX – Enter up to an eight-character Reference Document and a three-digit Suffix or leave blank. It identifies a document that has been previously entered in R⋆STARS. The SFX is required when the REF DOC is entered. In the on-line process, the REF DOC Number will not be retrieved from the 550 Profile. If the RTI Type is S, this field must be blank.
◾ TRANS CODE – Enter the three-digit Transaction Code that identifies the transaction to be posted to R⋆STARS. If the RTI Type is S, this field must be blank.
◾ INDEX – Enter the five-digit Index code or leave blank.
◾ PCA – Enter the five-digit PCA code or leave blank.
◾ COMP/AGY OBJ – Enter a four-digit D10 Comptroller Object and/or a four-digit D11 Agency Object. If the RTI Type is S, this field must be blank. Each agency identifies in the 25 profile whether D11 Agency Objects will be coded for expenditures, revenues, or both. If D11 Agency Object is coded, D10 Comptroller Object may either be referenced in the 550 profile or coded on input. It is dependent on whether the Agency Object is at a lower level of detail (Agency Object will look up Comptroller Object) or whether the Agency Object is at a summary level (both Agency Object and Comptroller Object are coded).
◾ AMOUNT – Enter the Amount or leave blank. If RTI is R and the % ALLOCATED field is entered, Amount must be left blank and vice versa. If the RTI Type is S, this field must be blank.
◾ RVS – Enter the one-character Reverse code or R or leave blank. The value of R causes the impact of a transaction to be reversed. If the RTI Type is S, this field must be blank.
◾ DISCOUNT – Enter up to 11 digits and two decimal places for the amount of Discount. If the RTI Type is S, this field must be blank.
◾ FUND OVRD – Enter the
one-character Fund Override code. It allows the system to override a fund
control edit in order to post an accounting transaction. Only authorized
personnel will have the security established to accomplish this. If the RTI
Type is S, this field must be blank. Valid codes are as follows:
|
Blank |
– |
Transaction posts normally |
◾ % ALLOCATED – If RTI Type is R, leave blank or enter up to five digits to the right of the decimal for a % Allocated. There must be at least two decimal places entered. If RTI Type is S, this field must be entered and the %’s for all related RTIs (RTIs that have the same name), must be greater than zero and equal 100%. No single S profile is allowed to equal 100%.
◾ DMI – Enter a one-character
Disbursement Method Indicator. If the RTI Type is S, this field must be
blank. Valid indicators are as follows:
|
H |
– |
Hold |
◾ PDT – This element is typically looked up from the Vendor Number and Mail Code record in 51 profile. If the RTI Type is S, this field must be blank.
◾ MOD – Enter a one-character
Modifier code. It identifies how the document should be posted and is normally
required on encumbrance transactions referencing pre-encumbrances and on
expenditure transactions referencing encumbrances documents. If the RTI Type is
S, this field must be blank. The valid values are:
|
F |
– |
Final Liquidation: The transaction represents a final
payment on the document. |
◾ APPN YEAR – Enter a two-digit Appropriation Year.
◾ APPN NO – Enter the five-digit Appropriation Number or leave blank. If entered, it must exist in the 20 profile. INDEX or PCA may look up the Appropriation Number.
◾ FUND – Enter the four-digit Fund. If entered, it must exist in the D23 profile. INDEX or PCA may look up the Fund.
◾ GL ACCT/AGY – Enter a four-digit D31 Comptroller General Ledger (Comp GL) Account number or an eight-digit D32 Agency General Ledger (GL) Account number leave blank. If a Comp GL is entered, it must exist in the D31 profile and be allowed by the transaction code (T-Code). If an Agency GL Acct is entered, it must exist in D32 profile. If the RTI Type is S, this field must be blank.
◾ GRANT NO/PH – Enter the six-digit Grant Number and the two-digit Grant Phase or leave blank. If entered, they must exist in the 29 profile.
◾ SUBGRANTEE – Enter the 14-digit Subgrantee code or leave blank. If entered, it must exist in 31 profile.
◾ PROJ NO/PH – Enter a six-digit Project Number and the two-digit Project Phase or leave blank. If entered, they must exist in the 27 profile.
◾ MPCD – Enter the ten-character Multipurpose Code or leave blank.
◾ AGY CD 1 – Enter a four-character Agency Code 1 or leave blank. If entered, it must exist in the D26 profile.
◾ AGY CD 2 – Enter the four-character Agency Code 2 or leave blank. If entered, it must exist in the D27 profile.
◾ AGY CD 3 – Enter the six-character Agency Code 3 or leave blank. If entered, it must exist in the D36 profile.
◾ VEND/MC – Enter a ten-digit Vendor Number and a three-digit Vendor Mail Code or leave blank. If entered, the Vendor Number and Mail Code must exist in the 51 profile. If the RTI Type is S, this field must be blank.
◾ STATUS CODE – Enter a
one-character Status Code. This code will default to an Inactive status until
the F12 -RTI COMPLETE key is pressed. The
status will automatically default to Inactive when an RTI is successfully
inserted, changed, or deleted. Therefore, once all the transaction numbers are
input for a RTI, F12 must be pressed to
activate them. This field may be used to inactivate records no longer in use.
|
A |
– |
Active |
I |
– |
Inactive |
◾ EFF START DATE – Enter the eight-digit Effective Start Date (MMDDYYYY format). It identifies when the record becomes effective. This field can be left blank; it will default to the current date and cause the record to be immediately available.
◾ EFF END DATE – Enter the eight-digit Effective End Date (MMDDYYYY format) or leave blank. EFF END DATE identifies when the record is no longer effective.
Example of R type:
|
S550 UC: 10 STATE OF OREGON 04/04/14 04:07 PM |
|
LINK TO: RECURRING TRANSACTION PROFILE PROD |
|
|
|
AGENCY: 101 TRANS NO: 000115 RTI: MOXFR1 RTI TYPE: R |
|
USER ID: NEWUSER DESCRIPTION: EAS MONTH REV TRANSFER |
|
GENERATE SCHEDULE (MMDD) - 1: 02 2: 3: 4: |
|
BATCH - AGY: 101 TYPE: 5 DOC DATE: SERV DATE: |
|
CUR DOC/SFX: BT REF DOC/SFX: FINANCIAL AGY: 101 |
|
TRANS CODE: 400 |
|
INDEX: |
|
PCA: 11340 |
|
COMP/AGY OBJ: 2729 |
|
AMOUNT: 00000000281.00 RVS: DISCOUNT: FUND OVRD: |
|
DOC AMT: DOC AGY: |
|
% ALLOCATED: 0.00000 PDT: MOD: APPN YEAR: APPN NO: |
|
FUND: GL ACCT/AGY: G38: 10741840 |
|
GRANT NO/PH: SUBGRANTEE: PROJ NO/PH: 110099 00 |
|
MPCD: AGY CD - 1: 2: 3: |
|
VEND/MC: STATUS CODE: A |
|
EFF START DATE: 07012013 EFF END DATE: LAST PROC DATE: 07012013 |
|
Z06 RECORD SUCCESSFULLY RECALLED |
|
|
|
F1-HELP F3-DELETE F4-EDIT F5-NEXT TRANS NO F8-NEXT FOR RTI F9-INTERRUPT |
|
F10-SAVE F11-SAVE/CLEAR F12-RTI COMPLETE ENTER-INQUIRE CLEAR-EXIT |
Example of S type:
|
S550 UC: 10 STATE OF OREGON 04/04/14 04:05 PM |
|
LINK TO: RECURRING TRANSACTION PROFILE PROD |
|
|
|
AGENCY: 920 TRANS NO: 000012 RTI: SHARED RTI TYPE: S |
|
USER ID: NEWUSER DESCRIPTION: |
|
GENERATE SCHEDULE (MMDD) - 1: 2: 3: 4: |
|
BATCH - AGY: TYPE: DOC DATE: SERV DATE: |
|
CUR DOC/SFX: REF DOC/SFX: FINANCIAL AGY: 920 |
|
TRANS CODE: |
|
INDEX: |
|
PCA: 11011 |
|
COMP/AGY OBJ: |
|
AMOUNT: RVS: DISCOUNT: FUND OVRD: |
|
DOC AMT: DOC AGY: |
|
% ALLOCATED: 0.17000 PDT: MOD: APPN YEAR: APPN NO: |
|
FUND: GL ACCT/AGY: G38: |
|
GRANT NO/PH: SUBGRANTEE: PROJ NO/PH: |
|
MPCD: AGY CD - 1: 2: 3: |
|
VEND/MC: STATUS CODE: A |
|
EFF START DATE: 07012013 EFF END DATE: LAST PROC DATE: 01022008 |
|
Z07 NEXT RECORD SUCCESSFULLY READ |
|
|
|
F1-HELP F3-DELETE F4-EDIT F5-NEXT TRANS NO F8-NEXT FOR RTI F9-INTERRUPT |
|
F10-SAVE F11-SAVE/CLEAR F12-RTI COMPLETE ENTER-INQUIRE CLEAR-EXIT |
![]()