It is always best if possible to start with an accessible source document (e.g., in Microsoft Word) and export to an accessible PDF. This way, if the document is edited later, the document’s accessibility features will still be intact and when the document is exported again to PDF the accessibility features will again be passed to the PDF.
However, if the original source document is not available, accessibility features can be added to the PDF using Adobe Acrobat Pro.
Consult the following checklist to (a) check a PDF for accessibility , and (b) fix any accessibility problems you find. To complete each of the items in this checklist, you will need Adobe Acrobat Pro. The checklist specifically applies to Acrobat Pro X and XI. Many of the same principles applied in earlier versions of Acrobat as well, but the steps for completing them are different. For additional information about fixing accessibility using Acrobat Pro versions 7 through 9, see WebAIM’s tutorial PDF Accessibility: Acrobat 7-9 and Accessibility.
WebAIM’s tutorial on PDF Accessibility makes for an excellent accompaniment to the current checklist.
NOTE: Modifying PDFs can have unpredictable results, and there is no “Undo”. Save often! (Saving multiple versions is recommended)
-
Step 1. Does document have text?
How to test: Try selecting text using a mouse, or select all text using Edit > “Select All” from the Acrobat menu.
If No: This is an image file and is not accessible. Covert to text using View > Tools > “Recognize Text”.
-
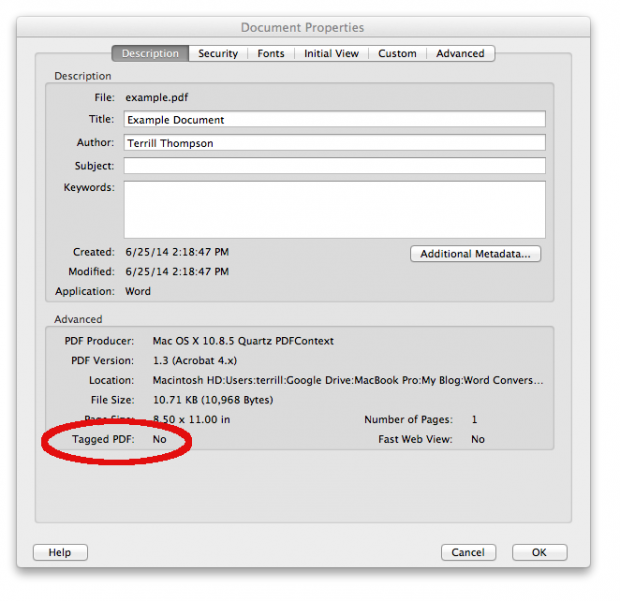
Step 2. Is document tagged?
How to test: Go to File Properties (Ctrl+D in Windows). In the bottom left corner of the Document Properties dialog, see the “Tagged PDF” field.
If No, this document needs to be tagged. Tags provide the structure on which accessibility is built. Add tags by selecting View > Tools > Accessibility > “Add Tags To Document”.
-
Step 3. Does document need to be “touched up?”
How to test: Use View > Tools > Accessibility > “Touch Up Reading Order” to see the order in which content on the current page will reflow if the document is viewed in a small window such as on a mobile device. This can also provide a fairly (though not entirely) accurate representation of the order in which screen readers will read the content.
Some accessibility fixes can be made using this tool. Here are a few:
- Hide decorative or redundant images from screen reader users. To do so, click an image, then click “background”
- Add or edit alt text for informative images. To do so, right click on an image, then select “Edit alt text”.
- Rearrange read order if needed. To do so, click “Show order panel”, then drag items to their appropriate location.
- If the page includes data tables, click a table, then click the “Table Editor” button to edit accessibility features within the table.
-
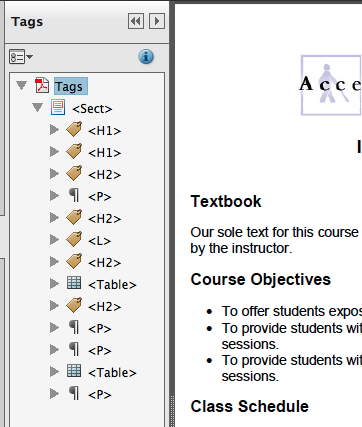
Step 4. Are headings marked up as headings at appropriate levels?
How to test: Study the document visually to determine what the heading structure should be. Keep in mind that headings should form an outline of the page, as explained in the Overview of accessible documents. Next, open the Tags Panel by selecting View > Show/Hide > “Navigation Panes” > Tags. The Tags Panel shows a tree of tags that is very similar to HTML.
There are a variety of ways to explore the tag tree. For example, use Acrobat’s text selector tool to highlight text in the document (for example, a heading) then click the menu icon at the top of the Tags pane and choose “Find tag from selection”. This will expand the tag tree if needed and highlight the selected tag.
Alternatively, click the menu icon at the top of the Tags pane and be sure “Highlight Content” is checked. Then click on any tag to see the content associated with that tag highlighted in the document.
Headings should be marked up with tags that are equivalent to HTML headings tags (i.e., <H1> for the main heading, <H2> for subheadings, then <H3>, <H4>, etc. Some authoring tools may create tags that have heading-like names (e.g., “<Heading_Level_1>”). However, these are not recognized by screen readers and will need to be changed.
To change a tag, right click on the tag, select Properties, then choose an appropriate tag from the list. If you know the what the correct name should be for a particular tag, you can also double-click the tag and type in the correct name.
-
Step 5. Does other markup need to be fixed?
How to test: Follow the same instructions as in the previous step. However, rather than focusing specifically on headings, consider the overall structure.
- Are lists tagged as lists?
- Does content in appear in a reasonable order? In Step 3 you checked the read order of content, and may have rearranged some items so they would flow in a meaningful order in a small window. While this order is typically close to the order of items in the tag tree, the latter is the actual order in which items will be read by screen readers. If items seem to be out of order in the tag tree, drag them to a better location.
Authoring tools generate a wide variety of tags. These typically aren’t cause for alarm, as screen readers ignore most of them and render their content as paragraphs. As long as headings are tagged as headings; and lists, tables, and images are all tagged up appropriately, a document will likely be easy for screen reader users to navigate, read, and understand.
In some cases, the tag tree of a document is a total mess, and it might be easier to delete all tags and start over building them from scratch rather than try to fix the existing tags.
-
Step 6. Check for any lingering errors.
How to test: Run the accessibility checker that is built in to Acrobat Pro. Select Tools > Accessibility > “Full Check” then read the report and follow the prompts.
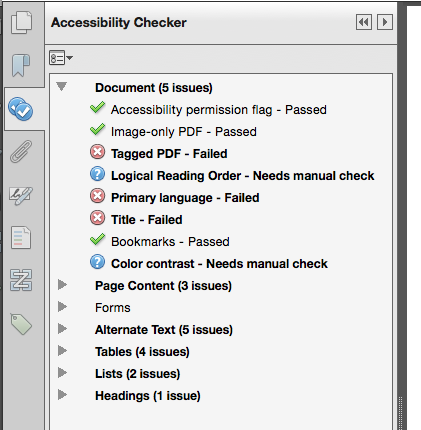
The report lists items in various categories such as Document, Page Content, etc. Each item is preceded by an icon indicating that the item either passes, fails, or requires manual inspection. Right click on any item to see a list of options for fixing the problem or learning more about it.
This is the final step in our checklist, rather than the first step, because some documents generate dozens of errors that can easily be addressed with the first five steps. This way, the accessibility checker will report fewer problems and will be easier to read and work with.
Most Details from this page were gleaned from the University of Washington's Accessible Technology section.